
Introduction
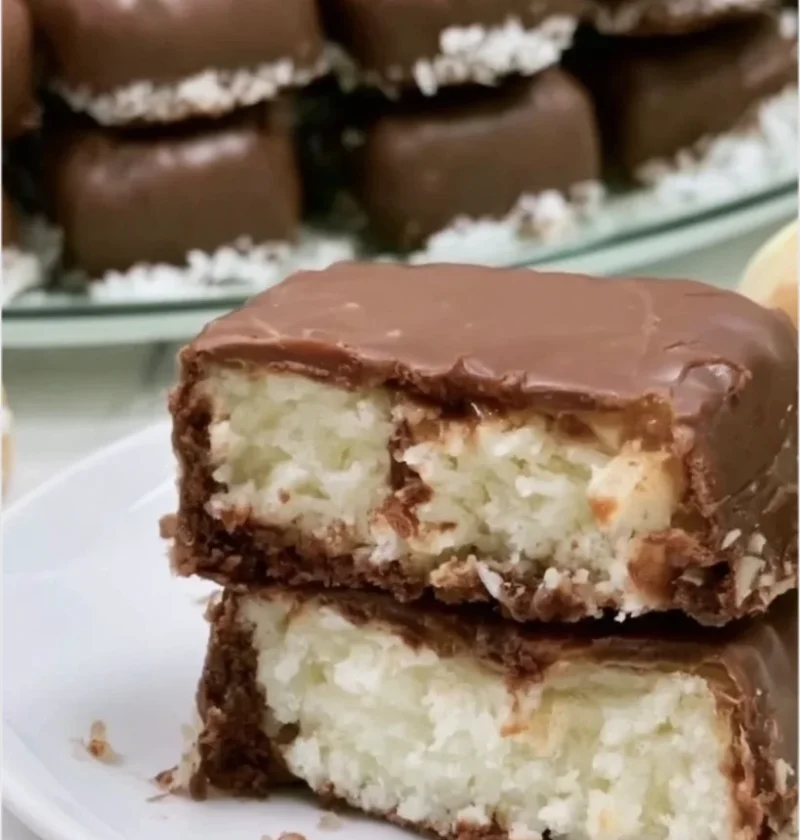
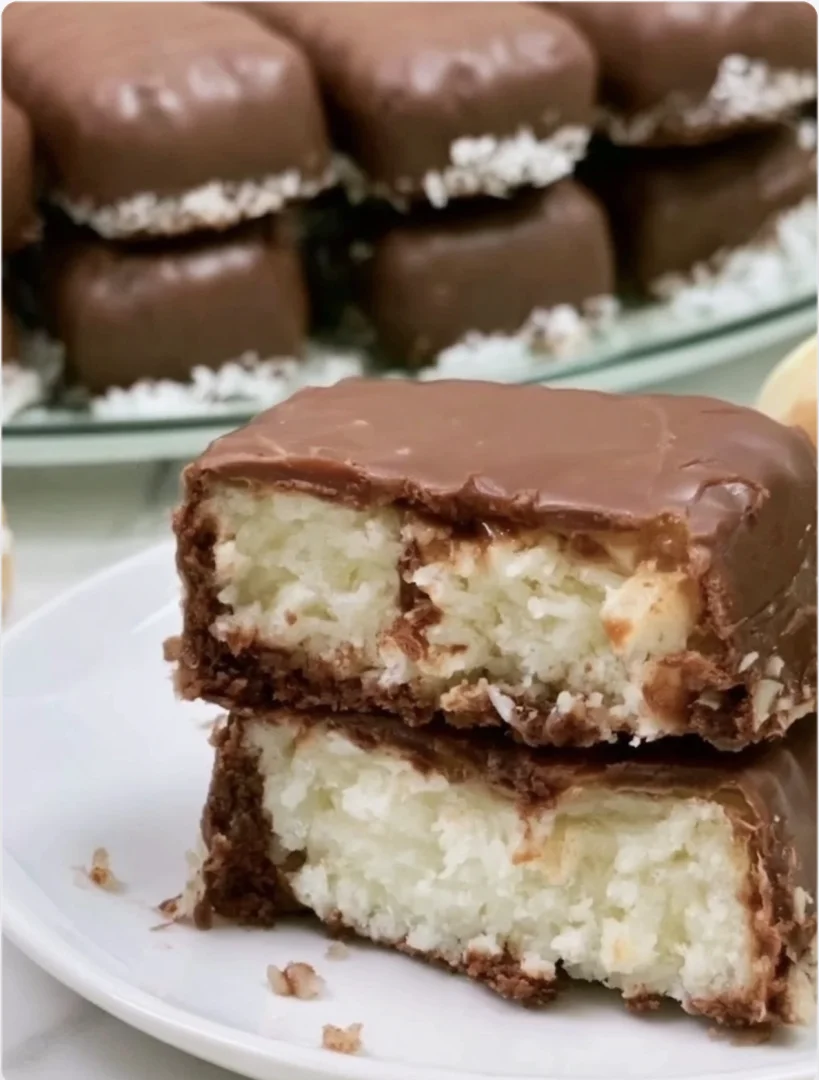
Indulge in the irresistible combination of coconut and chocolate with this homemade mounds bars recipe. Inspired by the classic candy bar, these delectable treats offer a luscious, creamy coconut filling enveloped in rich dark chocolate. Perfect for a tropical flavor escape, these bars are a sweet treat alternative that brings the joy of chocolate candy making right into your kitchen. Whether you’re a fan of chocolate dessert recipes or simply looking to explore coconut dessert ideas, these easy homemade candy recipes are sure to delight. Imagine biting into a homemade mounds bar—a perfect balance of smooth chocolate encasing a soft, chewy coconut center. This recipe delivers that same satisfying experience, right from your own kitchen.
The origin of Mounds bars dates back to the 1920s when Peter Paul Candy Manufacturing Company introduced this delightful confection. Today, we’re putting a homemade spin on this classic, offering a vegan mounds bars recipe that’s both gluten-free and no-bake. Let’s dive into the world of chocolate and coconut treats and learn how to make mounds bars that are not only indulgent but also easy to prepare. The homemade version allows you to control the quality and quantity of each ingredient, ensuring a treat that is both delicious and mindful of dietary preferences. Whether you’re making them for a special occasion or just to satisfy a craving, these mounds bars are a testament to the timeless pairing of coconut and chocolate. The joy of making homemade mounds bars also lies in the ability to customize them according to your taste, allowing for a personal touch that store-bought versions can never match.
Ingredients
For the Coconut Filling:
- 2 cups shredded unsweetened coconut
- 1 cup coconut cream
- 1/4 cup maple syrup
- 1 teaspoon vanilla extract
- Pinch of sea salt
For the Chocolate Coating:
- 2 cups dark chocolate chips
- 2 tablespoons coconut oil
Special Notes:
For a gluten-free option, ensure all ingredients are certified gluten-free. Substitute maple syrup with agave for a different sweetener alternative. Use high-quality dark chocolate for a richer flavor. The quality of chocolate significantly impacts the final taste, so opt for 70% cacao or higher for a more intense cocoa flavor. Check out our related guide for more tips. If you’re looking for organic or fair-trade options, there are many brands that offer ethically sourced ingredients which can enhance the depth of flavor and sustainability of your treats. When selecting coconut cream, choose a brand with a thick consistency for the best texture in your filling; this can make a significant difference in the final mouthfeel of your homemade mounds bars.
Steps / Instructions
- In a large mixing bowl, combine shredded coconut, coconut cream, maple syrup, vanilla extract, and sea salt. Stir until all ingredients are well incorporated and a thick paste forms. Make sure the mixture holds together when pressed between your fingers; if it’s too dry, add a little more coconut cream. A well-mixed filling is key to achieving that desirable chewy texture that defines mounds bars.
- Line an 8×8-inch baking pan with parchment paper. Press the coconut mixture firmly into the bottom of the pan, creating an even layer. Refrigerate for at least 1 hour or until set. This chilling step is crucial as it allows the coconut base to firm up, making it easier to cut and coat. If you rush this step, the bars may crumble during cutting, so patience is key.
- Meanwhile, melt the dark chocolate chips and coconut oil in a double boiler over simmering water. Stir constantly until smooth and glossy. Ensure no water comes into contact with the chocolate, as this can cause it to seize. The double boiler technique is gentle and helps maintain the chocolate’s smooth consistency, crucial for an even coating.
- Remove the coconut filling from the refrigerator and cut into bars of desired size. Use a sharp knife to ensure clean cuts and prevent crumbling. Consistency in size helps with even coating and presentation. Consider cutting the bars into bite-sized pieces for easier handling and serving.
- Using a fork, dip each bar into the melted chocolate, ensuring it is completely covered. Shake off excess chocolate and place the bars on a wire rack set over a baking sheet. Allow the chocolate to set completely. You may need to reheat the chocolate occasionally to maintain the perfect dipping consistency. This step can be a bit messy, but using a fork allows excess chocolate to drip off smoothly, ensuring a neat finish.
- Chill the bars in the refrigerator for an additional 30 minutes to fully harden the chocolate. Serve and enjoy! The final chilling not only sets the chocolate but also enhances the flavors, making each bite deliciously refreshing. This is when all your hard work pays off, resulting in a treat that is both visually appealing and extraordinarily tasty.
Tips & Tricks
- Storage: Store homemade mounds bars in an airtight container in the refrigerator for up to 2 weeks. If you prefer a chewier texture, take them out a few minutes before serving. Proper storage is essential to maintain the freshness and flavor of your bars over time.
- Make-Ahead: Prepare the coconut filling in advance and freeze for easy assembly later. This is a great time-saver for those busy days when you need a quick dessert fix. Simply defrost in the fridge overnight before proceeding with the chocolate coating.
- Common Mistakes: Avoid using sweetened coconut, as it can make the filling too sweet. Ensure chocolate is fully melted and smooth before dipping. If your chocolate is too thick, add a little more coconut oil to achieve the desired consistency. These little adjustments can make a big difference in the final quality of your homemade mounds bars.
- Pro Techniques: For an extra glossy finish, temper the chocolate before coating. This step requires a bit of practice but results in a professional look and a satisfying snap when bitten into. To temper chocolate, carefully heat it to 113°F, then cool to 82°F, and reheat to 88°F while stirring constantly.
Variations
- Dietary Alternatives: Use a sugar-free sweetener for a low-carb version. This can appeal to those following a keto lifestyle or managing sugar intake. Consider stevia or erythritol as alternatives that won’t compromise the texture or sweetness of the bars.
- Flavor Variations: Add a teaspoon of almond extract to the coconut mixture for a nutty twist. Alternatively, a splash of rum extract can give a tropical flair to the bars. For a festive option, incorporate dried fruits like cherries or cranberries for an added burst of flavor and color.
- Ingredient Swaps: Substitute coconut cream with almond cream for a different flavor profile. This not only changes the taste but also the texture, offering a smoother filling. Experiment with different nut creams to find your preferred combination.
Serving Suggestions
Homemade mounds bars are a delightful standalone treat but can be elevated with creative presentations. Pair them with a glass of creamy tropical agua fresca for a refreshing beverage or serve alongside a decadent no-bake chocolate eclair cake for a chocolate lover’s dessert table. Garnish with a sprinkle of sea salt or roasted coconut flakes for added texture and visual appeal. For a festive touch, consider drizzling a contrasting white chocolate on top or serving with fresh berries to enhance the colors and flavors on your dessert spread. These suggestions not only make your dessert table more appealing but also offer a balanced combination of flavors and textures that complement the sweetness of the homemade mounds bars.
Homemade Mounds Bars
Indulge in the irresistible combination of coconut and chocolate with this homemade mounds bars recipe. Inspired by the classic candy bar, these delectable treats offer a luscious, creamy coconut filling enveloped in rich dark chocolate.
Ingredients
- 2 cups shredded unsweetened coconut
- 1 cup coconut cream
- 1/4 cup maple syrup
- 1 teaspoon vanilla extract
- Pinch of sea salt
- 2 cups dark chocolate chips
- 2 tablespoons coconut oil
Directions
In a large mixing bowl, combine shredded coconut, coconut cream, maple syrup, vanilla extract, and sea salt. Stir until all ingredients are well incorporated and a thick paste forms.
Line an 8x8-inch baking pan with parchment paper. Press the coconut mixture firmly into the bottom of the pan, creating an even layer. Refrigerate for at least 1 hour or until set.
Meanwhile, melt the dark chocolate chips and coconut oil in a double boiler over simmering water. Stir constantly until smooth and glossy.
Remove the coconut filling from the refrigerator and cut into bars of desired size.
Using a fork, dip each bar into the melted chocolate, ensuring it is completely covered. Shake off excess chocolate and place the bars on a wire rack set over a baking sheet. Allow the chocolate to set completely.
Chill the bars in the refrigerator for an additional 30 minutes to fully harden the chocolate. Serve and enjoy!
Recipe Reviews
- ★★★★★
Excellent recipe!
Leave a Reply
Your email address will not be published. Required fields are marked *


Excellent recipe!