
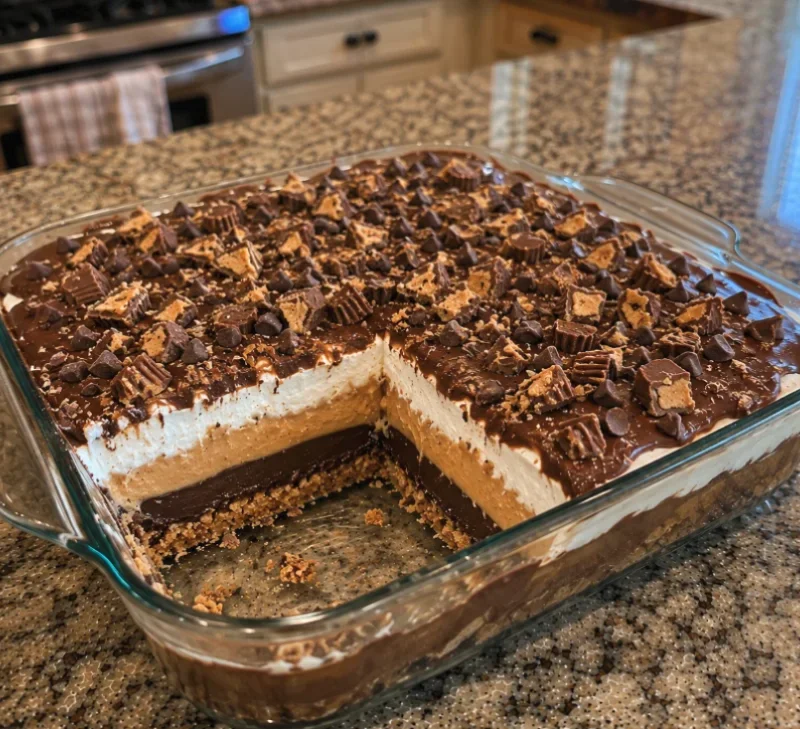
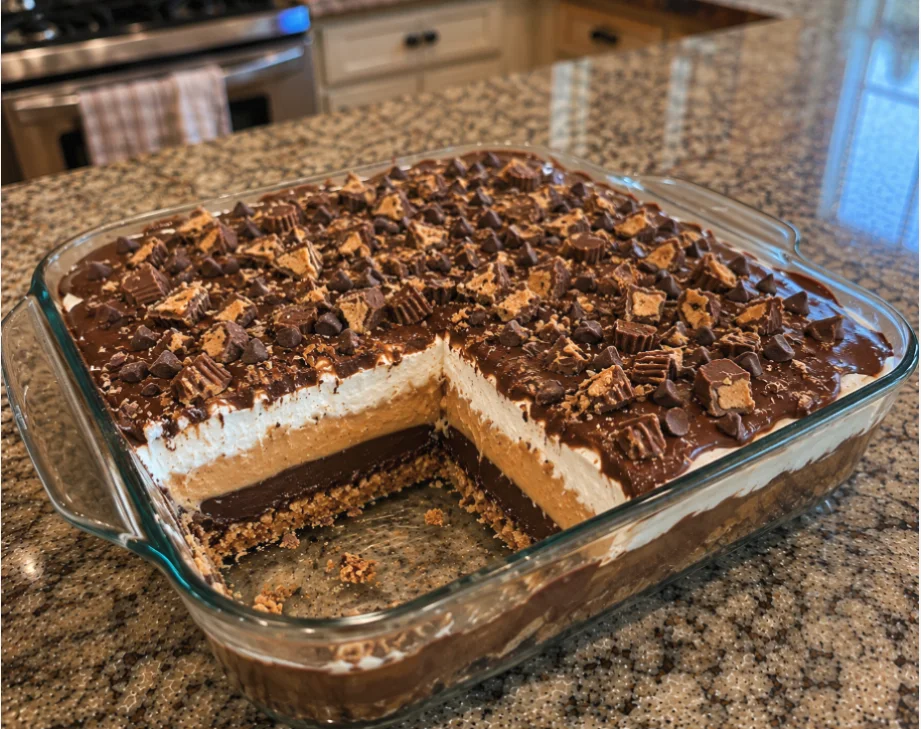
Indulging in a Chocolate Peanut Butter Lasagna is like taking a delicious trip to dessert heaven. This no-bake dessert combines the irresistible flavors of rich chocolate and creamy peanut butter, layered beautifully to create a visually stunning and delectable treat. Perfect for summer gatherings or any occasion where you want to impress your friends and family, this easy lasagna dessert is a crowd-pleaser. The combination of textures—smooth, creamy filling with crunchy layers—makes this dessert a delight for the senses. What sets this recipe apart is its simplicity; no baking is required, saving you time and hassle while delivering on taste. Whether you’re a chocolate lover, a peanut butter fanatic, or simply in the market for a show-stopping dessert, this Chocolate Peanut Butter Lasagna is sure to become a staple in your dessert repertoire. Not only does it cater to a variety of palates, but it also allows you to bring a touch of creativity to your dessert-making process. The layers of flavors meld together harmoniously, making each bite a truly memorable experience.
Ingredients
- For the crust:
- 1 ½ cups chocolate cookie crumbs (such as Oreo or chocolate graham crackers)—make sure to choose a high-quality cookie for the best flavor and texture. The ideal crumbs should be fine enough to pack tightly, yet retain a slight crunch.
- ½ cup unsalted butter, melted—unsalted butter is preferred to control the overall sweetness of the dessert and allows the chocolate to shine through without being overly sweet.
- For the peanut butter layer:
- 1 cup creamy peanut butter—smooth peanut butter works best for a creamy consistency; consider using natural peanut butter for a healthier option that has fewer additives and a more authentic peanut flavor.
- ½ cup powdered sugar—this helps to sweeten the peanut butter layer without making it grainy, allowing for a silky texture that complements the other layers.
- 8 oz cream cheese, softened—make sure it’s at room temperature for easy mixing, resulting in a velvety texture that incorporates smoothly into the peanut butter.
- 1 cup whipped topping (like Cool Whip)—this adds lightness and airiness to the layer, creating a delightful contrast to the denser crust and peanut butter mix.
- For the chocolate layer:
- 1 cup chocolate pudding mix—choose a high-quality mix for a rich chocolate flavor; a good mix will ensure a decadent layer that pairs perfectly with the other components.
- 3 cups milk—whole milk works best for a creamier pudding texture, but you can also use skim milk for a lighter version. Additionally, for an extra indulgent touch, consider using chocolate milk.
- 1 cup whipped topping (for layering)—this continues the light theme and complements the other layers, creating a beautiful finish on top of the dessert.
- For garnishing:
- Chocolate shavings or chips—these not only add flavor but also enhance the dessert’s visual appeal; they can be made easily by using a vegetable peeler on a chocolate bar.
- Chopped peanuts—adds a delightful crunch that complements the smoothness of the filling; you can toast them lightly for an enhanced nutty flavor.
Ensure you use high-quality chocolate cookies for the crust and fresh ingredients for the filling for the best flavor. You can substitute the creamy peanut butter with a natural almond butter if you prefer a different taste or are looking for an alternative. Additionally, feel free to experiment with other nut butters if you’re seeking different flavors. You can learn more about this topic and its growing popularity in dessert circles, showcasing its versatility and appeal in various culinary traditions.
Steps / Instructions
- Prepare the crust: In a medium bowl, combine the chocolate cookie crumbs and melted butter. Mix until the crumbs are evenly coated to ensure each bite has that delicious buttery flavor. Press the mixture firmly into the bottom of a 9×13-inch baking dish to form a solid crust; use the back of a measuring cup for an even surface. Make sure the crust is tightly packed to prevent it from falling apart when slicing. Place the dish in the refrigerator to set while you prepare the filling, ensuring it hardens slightly and provides a stable base for the layers.
- Make the peanut butter layer: In a large mixing bowl, combine the softened cream cheese, creamy peanut butter, and powdered sugar. Use a hand mixer to beat until smooth and creamy, ensuring there are no lumps; this step is crucial for a delightful texture. Carefully fold in 1 cup of whipped topping until fully incorporated, creating a luscious and airy mixture. Spread this peanut butter mixture evenly over the chilled crust, smoothing it out with a spatula for a beautiful finish, ensuring it reaches the edges for an aesthetic presentation.
- Prepare the chocolate layer: In another mixing bowl, whisk together the chocolate pudding mix and milk for about 2 minutes until it thickens to a pudding-like consistency. This is a key step; if it’s not thick enough, the layers won’t hold together as nicely. Make sure to whisk vigorously to avoid any clumps. Spread the pudding mixture over the peanut butter layer in an even layer, making sure to cover it completely and giving it a smooth surface for the next layer.
- Add the final layer: Spread the remaining 1 cup of whipped topping over the chocolate pudding layer. Use a spatula to smooth it out with gentle strokes to create an even surface; this will present beautifully when served. For an extra touch, you can create swirls or peaks in the topping with the spatula for a decorative effect.
- Chill: Cover the dish with plastic wrap and refrigerate for at least 4 hours, or overnight if time allows. This chilling time allows the layers to set properly and the flavors to meld, enhancing the overall taste. The longer it chills, the firmer and more cohesive the layers will become—ideal for slicing.
- Garnish and serve: Before serving, sprinkle chocolate shavings and chopped peanuts on top for added texture and visual appeal. Cut into squares and serve chilled, making sure to scoop through all the layers for a true taste of the Chocolate Peanut Butter Lasagna. This allows each individual serving to showcase the beautiful layers that make this dessert so enticing.
Tips & Tricks
To ensure your Chocolate Peanut Butter Lasagna turns out perfect, consider these tips: Check out our related guide for more tips. Following these suggestions can elevate your dessert to the next level, making it a real standout at any gathering.
- Storage: Store leftovers in an airtight container in the refrigerator for up to 3 days. The flavors actually improve as they meld together over time, making it an excellent choice for preparing in advance. This dessert can be made a day in advance, making it a great option for parties; the flavors actually improve with time, yielding a more harmonious taste.
- Make-ahead: For best results, prepare it a day ahead. The flavors deepen, and the textures become perfectly creamy after sitting overnight, making it even more delicious and easier to cut into neat pieces.
- Avoid common mistakes: Make sure the cream cheese is softened at room temperature before mixing to avoid lumps in your peanut butter layer. Also, don’t skip chilling the dessert as it helps it set correctly; patience is key for the best result, as rushing this step can lead to messy servings.
- Pro techniques: For easier cutting, run a knife under hot water and wipe it dry before slicing. This will give you clean cuts through the layers and maintain the aesthetic appeal of your Chocolate Peanut Butter Lasagna, ensuring each slice is as beautiful as it is delicious.
Conclusion
This Chocolate Peanut Butter Lasagna is a dream come true for dessert lovers. With its no-bake convenience and its rich, indulgent flavors, it’s the perfect sweet treat for any gathering. Whether enjoyed on a hot summer day or during a cozy family gathering, this layered dessert is bound to impress. Don’t hesitate to dive into this delightful recipe and bring a bit of joy to your dessert table—your friends and family will be grateful for the treat! Embrace the deliciousness and creativity this recipe offers, and enjoy every bite of this heavenly dessert.
Chocolate Peanut Butter Lasagna (No-Bake)
Indulging in a Chocolate Peanut Butter Lasagna is like taking a delicious trip to dessert heaven. This no-bake dessert combines the irresistible flavors of rich chocolate and creamy peanut butter, layered beautifully to create a visually stunning and delectable treat. Perfect for summer gatherings or any occasion where you want to impress your friends and family, this easy lasagna dessert is a crowd-pleaser.
Ingredients
- 1 ½ cups chocolate cookie crumbs (such as Oreo or chocolate graham crackers)
- ½ cup unsalted butter, melted
- 1 cup creamy peanut butter
- ½ cup powdered sugar
- 8 oz cream cheese, softened
- 1 cup whipped topping (like Cool Whip)
- 1 cup chocolate pudding mix
- 3 cups milk
- 1 cup whipped topping (for layering)
- Chocolate shavings or chips (for garnish)
- Chopped peanuts (for garnish)
Directions
Prepare the crust: In a medium bowl, combine the chocolate cookie crumbs and melted butter. Press the mixture firmly into the bottom of a 9x13-inch baking dish to form a solid crust. Place the dish in the refrigerator to set.
Make the peanut butter layer: In a large mixing bowl, combine the softened cream cheese, creamy peanut butter, and powdered sugar. Beat until smooth and creamy. Carefully fold in 1 cup of whipped topping. Spread this peanut butter mixture evenly over the chilled crust.
Prepare the chocolate layer: In another mixing bowl, whisk together the chocolate pudding mix and milk for about 2 minutes until it thickens. Spread the pudding mixture over the peanut butter layer.
Add the final layer: Spread the remaining 1 cup of whipped topping over the chocolate pudding layer. Smooth it out with a spatula.
Chill: Cover the dish with plastic wrap and refrigerate for at least 4 hours, or overnight.
Garnish and serve: Before serving, sprinkle chocolate shavings and chopped peanuts on top. Cut into squares and serve chilled.
Recipe Reviews
- ★★★★★
Excellent recipe!
Leave a Reply
Your email address will not be published. Required fields are marked *

Excellent recipe!