
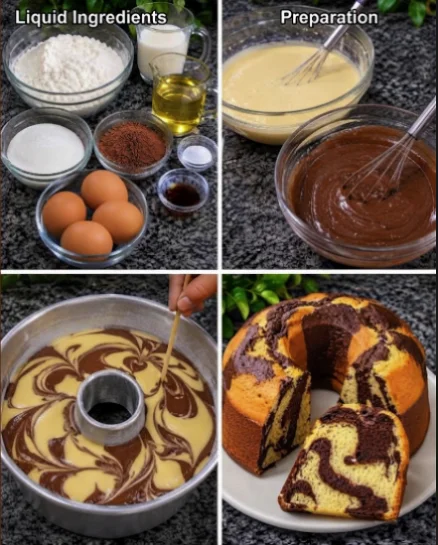
When it comes to baking, few desserts capture the essence of comfort and nostalgia like a homemade marble cake. This delightful confection brings together the best of both worlds—rich chocolate and fluffy vanilla cake—creating a visually stunning treat that is perfect for any occasion. Whether you’re celebrating a birthday, hosting a family gathering, or simply indulging in a sweet moment with loved ones, a marble cake is sure to impress and satisfy. With its intricate swirls of flavor and moist texture, it’s no wonder that this classic dessert has stood the test of time. A homemade marble cake not only satisfies your sweet cravings but also evokes memories of family gatherings, where the cake serves as a centerpiece on the table, beckoning everyone to partake in a slice. The contrast between the dark chocolate and light vanilla creates a striking visual appeal that invites everyone to enjoy a slice. This recipe is not just about taste; it’s also a way to share love and warmth in every bite, making the act of baking and sharing all the more special. Each slice reveals a beautiful pattern of swirls that can spark conversations, reminisce about past gatherings, and create new memories with every bite.
Ingredients
Dry Ingredients
- 2 ½ cups all-purpose flour
- 2 ½ tsp baking powder
- ½ tsp salt
Wet Ingredients
- 1 cup unsalted butter, softened
- 2 cups granulated sugar
- 4 large eggs
- 1 tsp vanilla extract
- 1 cup whole milk
Chocolate Batter
- ¾ cup unsweetened cocoa powder
- ½ cup hot water
Notes
For the best marble cake, use high-quality cocoa powder and pure vanilla extract. The quality of your ingredients can significantly impact the final flavor and texture, so choose brands you can trust. If you prefer a lighter cake, you can substitute half of the all-purpose flour with cake flour for a more delicate crumb that enhances the overall finish of your homemade marble cake. Alternatively, for a nutty flavor, consider adding finely ground almonds to the flour mixture, which can add an interesting depth to the taste. If you’re sensitive to gluten, you can also use a gluten-free all-purpose flour blend, ensuring that it contains a binding agent. You can learn more about this topic, including different flavor profiles and regional variations of marble cake that might inspire your baking adventures. Additionally, consider incorporating seasonal flavors such as citrus zest or spiced pumpkin to give your marble cake a unique twist that reflects the time of year.
Steps / Instructions
- Preheat your oven to 350°F (175°C). Grease and flour a 10-inch bundt pan or two 9-inch round cake pans, ensuring even coverage to prevent sticking. You can use baking spray for added convenience, which often includes flour in the formula. This preparation step is crucial to ensure that your cake releases easily after baking, keeping its beautiful shape intact. Take a moment to inspect your pans for any scratches or damages that could interfere with even cooking.
- In a medium bowl, whisk together the flour, baking powder, and salt. Set aside. Whisking the dry ingredients not only combines them but also aerates the flour, which helps create a lighter cake. This is an important step, as it ensures that there are no lumps and that the baking powder is evenly distributed, which encourages uniform rising. Sift the mixture if you prefer an even finer texture, especially for delicate cakes.
- In a large mixing bowl, cream the softened butter and granulated sugar together until light and fluffy, about 3-4 minutes. This step is crucial for achieving a rich and fluffy marble cake. Properly creamed butter and sugar will trap air, giving your cake a lovely rise. You can tell it’s done when the mixture is pale in color and fluffy to the touch. Scrape down the sides of the bowl with a spatula to ensure that all the butter and sugar are fully incorporated for a consistent batter.
- Add the eggs one at a time, mixing well after each addition. Stir in the vanilla extract. The eggs should be at room temperature for optimal mixing, which helps maintain that fluffy texture. This gradual addition helps to emulsify the mixture, ensuring a cohesive batter. After adding the eggs, you might notice the mixture becoming slightly looser—this is a good sign that the batter is coming together beautifully.
- Gradually add the dry ingredients to the wet mixture, alternating with the milk. Start with the dry ingredients and finish with the milk, mixing until just combined. This method ensures that the batter remains light and prevents overmixing, which could lead to a dense cake. You want the batter to be smooth but not overworked; small lumps are perfectly fine. Pay attention to the texture; it should be thick yet pourable, reminiscent of a soft pudding.
- In a separate bowl, combine the cocoa powder and hot water, stirring until smooth. This will be your chocolate batter. The hot water helps to dissolve the cocoa, maximizing its flavor and ensuring a silky texture, making your chocolate layer incredibly rich and satisfying. Allow it to cool slightly before combining it with the vanilla batter to prevent affecting the overall temperature of the cake mix.
- Divide the vanilla batter in half. Mix one half with the chocolate batter until thoroughly combined, and leave the other half plain. This division allows for distinct layers of flavor in your homemade marble cake, enhancing the overall taste experience with every bite. The contrasting chocolate and vanilla will create an enticing visual effect as well as a delightful interplay of flavors.
- To create the marble effect, spoon alternating dollops of the vanilla and chocolate batters into your prepared pan. Use a knife or a skewer to swirl the batters together gently. Be careful not to over-swirl; you want to maintain distinct layers for a beautiful marbling effect. Aim for an elegant pattern that enhances the visual appeal without completely mixing the two batters, as this will showcase the beautiful contrast of flavors.
- Bake in the preheated oven for 45-55 minutes or until a toothpick inserted into the center comes out clean. The exact baking time may vary based on your oven and the type of pan used, so start checking for doneness at the 45-minute mark. A perfectly baked cake should spring back lightly when pressed and have a golden-brown top. If the cake starts to brown too quickly, loosely cover it with aluminum foil to prevent burning while allowing it to finish cooking through.
- Once baked, remove the cake from the oven and allow it to cool in the pan for 10-15 minutes before transferring it to a wire rack to cool completely. This cooling process helps the cake firm up, making it easier to slice without crumbling and ensuring that it retains its moisture. If you’re using a bundt pan, gently run a knife along the edges before inverting to release the cake smoothly.
Tips & Tricks
- For added moisture, consider adding a tablespoon of sour cream or yogurt to the batter. This not only enhances the moisture but also adds a subtle tang that complements the sweetness, making your homemade marble cake even more delightful. You can experiment with flavored yogurts, such as vanilla or honey, to introduce a hint of additional flavor.
- Make your cake ahead of time! It can be wrapped tightly in plastic wrap and stored in the refrigerator for up to three days before serving. This allows the flavors to meld beautifully, making it even more delicious and giving you a stress-free option for dessert. Additionally, you can freeze the cake for up to three months, ensuring that you have a sweet treat ready whenever the craving strikes.
- If you want to enhance the flavors, consider adding a pinch of espresso powder to the chocolate batter; it will deepen the chocolate flavor without adding any coffee taste. This subtle addition can elevate your homemade marble cake to new heights, impressing even the most discerning chocolate lovers. Alternatively, try infusing your vanilla batter with a touch of almond extract for an extra layer of complexity.
- Avoid common pitfalls by ensuring all ingredients are at room temperature before mixing. This helps create a smooth batter and promotes even baking, resulting in a more consistent texture throughout the cake. It’s a simple step that can make a huge difference in your final product, leading to a bakery-quality cake right from your own kitchen.
- For a decorative touch, dust the cooled cake with powdered sugar or drizzle it with chocolate ganache. You can also top it with fresh berries or toasted nuts for an added layer of flavor and texture that complements the rich cake beautifully. A dollop of whipped cream alongside a slice can elevate your presentation and add a delightful creaminess.
Conclusion
With its rich flavors and eye-catching swirls, this homemade marble cake is not only a feast for the taste buds but also a beautiful centerpiece for any gathering. Whether you choose to serve it as is, or with a luscious cream cheese frosting, this cake is sure to be a hit among family and friends. Don’t hesitate to share your baking adventures and feedback! Check out our related guide for more tips on perfecting your baking skills and expanding your repertoire of delightful desserts. We hope this recipe for homemade marble cake inspires you to create your own sweet memories and share them with others.
Homemade Marble Cake
A delightful confection that brings together rich chocolate and fluffy vanilla cake, creating a visually stunning treat perfect for any occasion.
Ingredients
- 2 ½ cups all-purpose flour
- 2 ½ tsp baking powder
- ½ tsp salt
- 1 cup unsalted butter, softened
- 2 cups granulated sugar
- 4 large eggs
- 1 tsp vanilla extract
- 1 cup whole milk
- ¾ cup unsweetened cocoa powder
- ½ cup hot water
Directions
Preheat your oven to 350°F (175°C). Grease and flour a 10-inch bundt pan or two 9-inch round cake pans.
In a medium bowl, whisk together the flour, baking powder, and salt. Set aside.
In a large mixing bowl, cream the softened butter and granulated sugar together until light and fluffy, about 3-4 minutes.
Add the eggs one at a time, mixing well after each addition. Stir in the vanilla extract.
Gradually add the dry ingredients to the wet mixture, alternating with the milk.
In a separate bowl, combine the cocoa powder and hot water, stirring until smooth.
Divide the vanilla batter in half. Mix one half with the chocolate batter until thoroughly combined.
To create the marble effect, spoon alternating dollops of the vanilla and chocolate batters into your prepared pan and swirl gently.
Bake in the preheated oven for 45-55 minutes or until a toothpick inserted into the center comes out clean.
Once baked, remove the cake from the oven and allow it to cool in the pan for 10-15 minutes before transferring it to a wire rack to cool completely.
Nutrition Facts
Recipe Reviews
- ★★★★★
Excellent recipe!
Leave a Reply
Your email address will not be published. Required fields are marked *



Excellent recipe!