
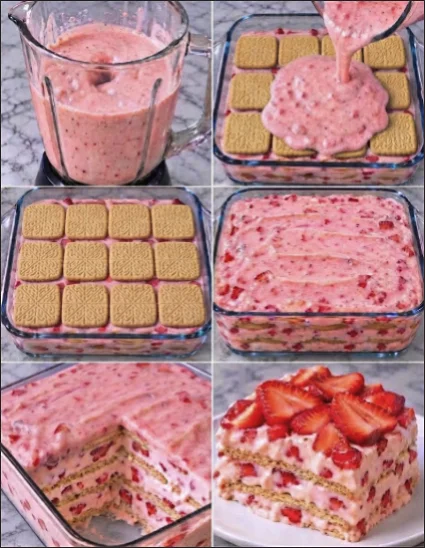
Summer is the perfect time for refreshing desserts, and there’s nothing quite like a No-Bake Strawberry Biscuit Cake to cool you down. This delightful treat combines the sweetness of fresh strawberries with a creamy filling and crunchy biscuits, resulting in a light and satisfying dessert that doesn’t require a single minute in the oven! Whether you’re hosting a picnic, a family gathering, or simply indulging in a personal treat, this recipe is sure to impress. The blend of textures—from the crunch of the biscuits to the smooth cream and juicy strawberries—creates a harmonious balance that is not only delightful to eat but also beautiful to behold. It’s easy to make, beautifully presented, and showcases the vibrant flavors of summer berries. As a bonus, it also allows you to enjoy the natural sweetness of strawberries without overwhelming them with heavy ingredients. Let’s dive into this delightful recipe that will leave your guests asking for seconds and create lasting memories around the table!
Ingredients
Gather these ingredients to create your No-Bake Strawberry Biscuit Cake: You can learn more about this topic.
- For the cake base:
- 300g digestive biscuits (or your preferred biscuits, such as graham crackers or shortbread, for different textures and flavors; each will impart a unique character to the cake, so consider trying various types for a fun twist)
- 150g unsalted butter, melted (using high-quality butter will enhance flavor; opt for European butter for a richer taste, as it often contains a higher fat content that improves the taste and texture)
- For the filling:
- 500g cream cheese, softened (make sure it’s at room temperature for easier mixing; this ensures a creamy consistency without lumps, which is vital for a smooth filling)
- 200ml heavy cream (opt for heavy whipping cream for the best results; the higher fat content will create a richer texture that is both luxurious and satisfying)
- 100g powdered sugar (sifted to avoid lumps; this helps create a smooth filling that blends seamlessly with the cream, giving it a velvety finish)
- 1 tsp vanilla extract (for added warmth and flavor; choose pure vanilla extract for a more authentic taste, as imitation vanilla can lack depth)
- For the strawberry layer:
- 400g fresh strawberries, hulled and sliced (look for ripe, vibrant strawberries for the best taste and presentation; local strawberries in season often have the best flavor, making them the star of this dessert)
- 2 tbsp sugar (adjust based on the sweetness of strawberries; use less if they are very ripe and sweet to balance the overall flavor, creating the perfect harmony in your cake)
- 1 tbsp lemon juice (to enhance the flavor of the strawberries and add a subtle tartness; fresh lemon juice is preferable for brightness, elevating the cake’s freshness)
Note: For best results, use fresh strawberries that are ripe and sweet. If fresh strawberries are not available, you can substitute with frozen strawberries, but ensure they are thawed and drained well to avoid excess moisture that could make the cake soggy. Check out our related guide for more tips on selecting ripe fruit and understanding flavor profiles. Remember, the quality of the strawberries directly impacts the final dish, so take the time to select the best berries available to ensure your No-Bake Strawberry Biscuit Cake stands out.
Steps / Instructions
- Prepare the Biscuit Base: In a large mixing bowl, crush the digestive biscuits into fine crumbs. You can use a food processor for a quick method or place them in a zip-top bag and crush with a rolling pin for a more hands-on approach. Ensure the crumbs are very fine for a smooth texture; larger pieces can disrupt the cake’s consistency. Once crushed, stir in the melted butter until the mixture resembles wet sand, ensuring all crumbs are coated; this will help achieve a firm base that supports the layers above.
- Form the Base: Press the biscuit mixture into the bottom of a 9-inch springform pan evenly. Use the back of a measuring cup or your fingers to pack it tightly, creating an even layer. Refrigerate for about 30 minutes to set firmly; this chilling step is crucial for maintaining the structure when adding the filling. A well-formed base is essential to support the layers above it, providing a satisfying crunch beneath the creamy filling.
- Make the Cream Filling: In a separate bowl, beat the cream cheese with an electric mixer until smooth and creamy. This will help eliminate any lumps; a smooth filling is vital for the overall texture of the cake. Gradually add the powdered sugar and vanilla extract, mixing until well combined. The filling should be velvety and smooth, resembling a thick frosting that will hold well between the layers.
- Whip the Cream: In another bowl, whip the heavy cream until stiff peaks form. This may take 3-5 minutes depending on your mixer speed; be careful not to over-whip, as this can lead to a grainy texture. Carefully fold the whipped cream into the cream cheese mixture until fully incorporated, ensuring you maintain the lightness of the whipped cream for a fluffy filling; this step creates the airy quality that makes each bite delightful and melt-in-your-mouth.
- Assemble the Cake: Remove the biscuit base from the refrigerator. Spread half of the cream filling over the base, smoothing it out with a spatula to create an even layer. Layer half of the sliced strawberries on top of the cream filling, arranging them neatly for a stunning look; this presentation is key to making the cake visually appealing and tempting to your guests.
- Repeat the Layers: Add the remaining cream filling on top of the strawberries and smooth it out using the spatula. Finish by layering the remaining sliced strawberries on top of the cream filling, creating a beautiful pattern that showcases the fresh fruit; this layering technique not only enhances the flavor but also adds to the aesthetics of the cake, making it truly irresistible.
- Chill the Cake: Cover the cake with plastic wrap and refrigerate for at least 4 hours, or overnight for best results. This allows the flavors to meld and the cake to set properly, ensuring each slice holds its shape; chilling overnight is particularly recommended for optimal flavor integration, making each bite a delightful experience.
- Serve: Once chilled, carefully remove the sides of the springform pan. Slice the cake with a sharp knife, wiping it between cuts for clean slices; this step helps maintain a neat presentation that impresses. Serve with additional fresh strawberries or a drizzle of chocolate sauce, if desired, for an extra touch of indulgence; these additions can elevate the overall experience of enjoying the cake and make it feel even more special.
Tips & Tricks
- Storage: Keep the No-Bake Strawberry Biscuit Cake refrigerated. It can be stored for up to 3 days, though it’s best enjoyed fresh. To cover, use a loose layer of plastic wrap to avoid condensation on the surface; this helps maintain the cake’s texture and flavor, ensuring it stays delicious for as long as possible.
- Make Ahead: This cake can be prepared a day in advance, allowing the flavors to develop even further; this makes it an excellent option for busy hosts. Just remember to cover it well to prevent any odors from the refrigerator affecting its taste, enhancing the overall enjoyment when it’s time to serve.
- Avoiding Sogginess: To prevent the biscuit base from becoming soggy, ensure that the melted butter is thoroughly mixed with the crumbs, and allow the base to set properly in the refrigerator. A well-packed base will hold up better against moisture from the filling, providing a satisfying crunch with each bite and ensuring the cake remains delightful.
- Customization: Feel free to mix in other berries like blueberries or raspberries for a mixed berry flavor. Adjust the sugar based on the sweetness of the fruits, and get creative with your layer arrangement for a visually stunning effect! Incorporating different fruits not only changes the flavor profile but can also add a beautiful array of colors to your cake, making it even more appealing to the eye.
Conclusion
This No-Bake Strawberry Biscuit Cake is the perfect way to enjoy the freshness of strawberries without the hassle of baking. With its creamy texture and delightful crunch, it’s an easy dessert that is sure to impress anyone who tries it. Get creative with your presentation, and enjoy this light and refreshing treat at your next summer gathering, making it a memorable centerpiece to any dessert table! Remember, this cake is not only about taste but also about the joy it brings to those who share it. Happy baking and enjoy every delicious slice!
No-Bake Strawberry Biscuit Cake
A delightful treat that combines the sweetness of fresh strawberries with a creamy filling and crunchy biscuits, resulting in a light and satisfying dessert that doesn't require baking.
Ingredients
- 300g digestive biscuits (or your preferred biscuits)
- 150g unsalted butter, melted
- 500g cream cheese, softened
- 200ml heavy cream
- 100g powdered sugar, sifted
- 1 tsp vanilla extract
- 400g fresh strawberries, hulled and sliced
- 2 tbsp sugar
- 1 tbsp lemon juice
Directions
In a large mixing bowl, crush the digestive biscuits into fine crumbs.
Stir in the melted butter until the mixture resembles wet sand.
Press the biscuit mixture into the bottom of a 9-inch springform pan evenly.
Refrigerate for about 30 minutes to set firmly.
In a separate bowl, beat the cream cheese until smooth and creamy.
Gradually add the powdered sugar and vanilla extract, mixing until well combined.
Whip the heavy cream until stiff peaks form.
Fold the whipped cream into the cream cheese mixture until fully incorporated.
Spread half of the cream filling over the base and layer half of the sliced strawberries on top.
Add the remaining cream filling on top of the strawberries and layer the remaining sliced strawberries on top.
Cover the cake with plastic wrap and refrigerate for at least 4 hours, or overnight for best results.
Once chilled, carefully remove the sides of the springform pan and slice the cake.
Recipe Reviews
- ★★★★★
Excellent recipe!
Leave a Reply
Your email address will not be published. Required fields are marked *




Excellent recipe!