
Introduction
The No-Bake Chocolate Biscuit Cake is a delightful treat that combines the rich, indulgent flavors of chocolate with the satisfying crunch of biscuits. This simple yet decadent dessert has captured hearts and taste buds around the world. Whether you are a seasoned baker or a novice looking for easy no-bake desserts, this recipe is a must-try. The beauty of this cake lies not only in its delicious taste but also in its effortless preparation. You can whip it up in no time, making it perfect for gatherings, birthdays, or just a sweet craving. There’s something nostalgic about the childhood memories associated with biscuit cakes, often enjoyed at parties or during family celebrations. In fact, many people reminisce about their first experience with this no-bake dessert, recalling how its rich flavors brought smiles to their faces. With this recipe, you can recreate that joy in your own kitchen! Moreover, the versatility and ease of this dessert allow it to fit into various occasions, from casual get-togethers to formal celebrations, making it a timeless choice for all.
Ingredients
- For the cake:
- 200g digestive biscuits (or your preferred biscuits; feel free to experiment with chocolate or graham crackers for a different flavor—each type will impart its own unique taste)
- 100g unsalted butter (ensure it’s at room temperature for easier mixing; this step is vital for achieving a seamless blend in the chocolate)
- 200g dark chocolate (at least 70% cocoa, for a richer chocolate flavor; higher cocoa content also enhances the overall taste and texture)
- 100g sweetened condensed milk (this adds creaminess and sweetness, balancing the bitterness of dark chocolate)
- 1 teaspoon vanilla extract (or a splash of almond extract for a unique twist; this can elevate the flavor profile significantly)
- For the chocolate cream filling:
- 250ml heavy cream (chilled for better whipping results; properly chilled cream will whip up to a light and airy texture)
- 50g icing sugar (adjust according to your sweetness preference; you can even experiment with less sugar if you prefer a more intense chocolate flavor)
- 100g dark chocolate (melted; you can use the same chocolate as in the cake or try a different type for contrast to enhance the flavor experience)
- For decoration (optional):
- Chocolate shavings (a mix of dark and white chocolate can create a lovely visual; this not only looks appealing but also adds layers of flavor)
- Chopped nuts (such as walnuts or almonds, which add a delightful crunch and can complement the softness of the cream)
- Fresh berries (like raspberries or strawberries, which can also provide a refreshing tartness that cuts through the richness of the cake)
For the best results, opt for high-quality chocolate and fresh ingredients. If you prefer a sweeter cake, you can adjust the amount of icing sugar in the cream filling—just remember that the chocolate and biscuits also contribute to the overall sweetness. Additionally, using organic or locally sourced ingredients can enhance the flavor and quality of your dessert. You can learn more about this topic, including its history and variations that exist in different cultures.
Steps / Instructions
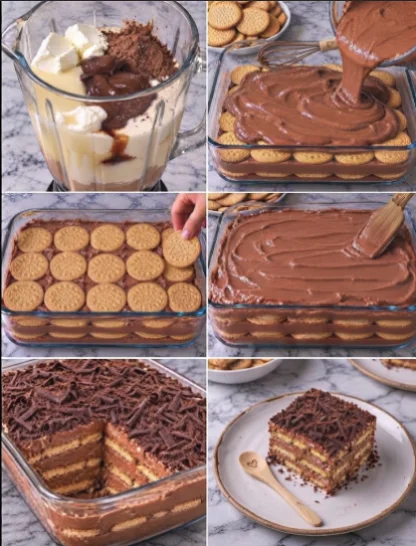
- Prepare the base: Start by breaking the digestive biscuits into small pieces. You can place them in a plastic bag and crush them with a rolling pin or use a food processor for quicker results. The pieces should be about the size of a quarter; this size helps ensure that they mix well with the chocolate, creating a cohesive texture. The more uniform the size of the pieces, the better they will incorporate with the chocolate.
- Melt the chocolate: In a heatproof bowl, combine the dark chocolate and unsalted butter. Melt them together over a pot of simmering water (double boiler method) or in the microwave in 30-second intervals, stirring until smooth and glossy. Be careful not to overheat the chocolate, as it can seize—remove it just as it starts to melt for the best results. Stirring continuously will help achieve a silky consistency.
- Add condensed milk and vanilla: Once melted, remove the bowl from heat and stir in the sweetened condensed milk and vanilla extract until fully incorporated. This mixture should be smooth and shiny, embodying the perfect balance of flavors that will envelop the biscuits. The addition of condensed milk not only enriches the mixture but also helps in creating a delightful mouthfeel.
- Combine with biscuits: In a large mixing bowl, add the crushed biscuits to the chocolate mixture. Stir well until the biscuits are completely coated with chocolate. Use a spatula to ensure that every piece is covered; this is essential for achieving that rich chocolate flavor in every bite. Take your time here; ensuring every biscuit is coated will enhance the overall taste.
- Form the cake: Line a loaf pan or a round cake tin with parchment paper. Pour the biscuit mixture into the prepared tin and press it down firmly with the back of a spoon or your hands to create an even layer. This step is crucial to ensure the cake holds its shape when unmolded; pressing down helps eliminate air pockets and ensures a dense, satisfying texture. Tapping the sides of the tin can also help level the mixture.
- Chill the base: Place the tin in the refrigerator and let it chill for at least 1 hour, or until set. For best results, you can chill it longer, allowing the flavors to meld beautifully. A longer chill time will enhance the flavor integration, so consider making it ahead of time if possible.
- Make the chocolate cream filling: While the base is chilling, whip the heavy cream in a mixing bowl until soft peaks form. Gradually add the icing sugar and continue beating until stiff peaks form. Gently fold in the melted dark chocolate until fully combined, ensuring no streaks remain for a uniform chocolate cream. Be careful not to overmix, as this can cause the cream to deflate.
- Assemble the cake: Once the biscuit base has set, remove it from the tin. Spread the chocolate cream filling evenly over the top, smoothing it out with a spatula. Ensure you cover the base entirely for a polished look and an even distribution of flavors. This is the part where you can also get creative with the topping if desired.
- Decorate: If desired, sprinkle chocolate shavings, chopped nuts, or fresh berries on top for added texture and flavor. This not only enhances the visual appeal but also adds a delightful contrast in taste and texture. Consider layering the toppings to create a beautiful presentation that invites your guests to dig in.
- Final chill: Return the cake to the refrigerator for another 30 minutes to allow the filling to set before slicing. This final chilling step helps the layers to bond together and makes slicing easier. The longer it chills, the firmer the cream will become, making for cleaner slices.
Tips & Tricks
- Storage: Keep any leftovers in an airtight container in the refrigerator for up to 5 days. This cake tastes even better the next day as the flavors meld together, allowing the chocolate and biscuit to harmonize beautifully. Just be sure to cover it well to prevent it from absorbing any refrigerator odors.
- Make-ahead: You can prepare the no-bake chocolate biscuit cake a day in advance, making it a convenient option for parties and gatherings. It makes for a stress-free dessert option, letting you focus on other party preparations. Having a dessert ready to go can significantly cut down on your last-minute cooking stress.
- Avoiding common mistakes: Ensure the chocolate is fully melted and smooth before mixing with the biscuits. This will help the cake hold together better. If using a microwave, stir the chocolate frequently to prevent overheating. Also, ensure your cream is cold enough; warm cream will not whip properly.
- Pro techniques: Use a hot knife (dip in hot water and dry) to slice the cake cleanly without squishing the layers. This tip is especially useful when you want to present your cake beautifully for guests. A clean slice also helps highlight the attractive layers you’ve worked hard to create.
Conclusion
With its rich chocolate flavor and delightful crunch, the No-Bake Chocolate Biscuit Cake is a dessert that appeals to both kids and adults alike. It’s an ideal choice for any occasion—birthdays, celebrations, or simply as an afternoon treat. The best part is that it requires no baking, making it a quick and easy chocolate dessert recipe that anyone can master. Try this indulgent chocolate and biscuit combination, and watch how it becomes a favorite in your home! Check out our related guide for more tips on making the most out of this delectable dessert.
No-Bake Chocolate Biscuit Cake
The No-Bake Chocolate Biscuit Cake is a delightful treat that combines the rich, indulgent flavors of chocolate with the satisfying crunch of biscuits. This simple yet decadent dessert has captured hearts and taste buds around the world.
Ingredients
- 200g digestive biscuits (or your preferred biscuits; feel free to experiment with chocolate or graham crackers for a different flavor)
- 100g unsalted butter (ensure it's at room temperature for easier mixing)
- 200g dark chocolate (at least 70% cocoa)
- 100g sweetened condensed milk
- 1 teaspoon vanilla extract (or a splash of almond extract for a unique twist)
- 250ml heavy cream (chilled for better whipping results)
- 50g icing sugar (adjust according to your sweetness preference)
- 100g dark chocolate (melted)
- Chocolate shavings (for decoration)
- Chopped nuts (such as walnuts or almonds)
- Fresh berries (like raspberries or strawberries)
Directions
Start by breaking the digestive biscuits into small pieces.
In a heatproof bowl, combine the dark chocolate and unsalted butter. Melt them together over a pot of simmering water or in the microwave.
Once melted, remove the bowl from heat and stir in the sweetened condensed milk and vanilla extract until fully incorporated.
In a large mixing bowl, add the crushed biscuits to the chocolate mixture. Stir well until the biscuits are completely coated.
Line a loaf pan or round cake tin with parchment paper. Pour the biscuit mixture into the prepared tin and press it down firmly.
Place the tin in the refrigerator and let it chill for at least 1 hour.
While the base is chilling, whip the heavy cream until soft peaks form. Gradually add the icing sugar and continue beating until stiff peaks form. Fold in the melted dark chocolate.
Once the biscuit base has set, remove it from the tin and spread the chocolate cream filling evenly over the top.
Decorate with chocolate shavings, chopped nuts, or fresh berries if desired.
Return the cake to the refrigerator for another 30 minutes to allow the filling to set before slicing.
Recipe Reviews
- ★★★★★
Excellent recipe!
Leave a Reply
Your email address will not be published. Required fields are marked *




Excellent recipe!