
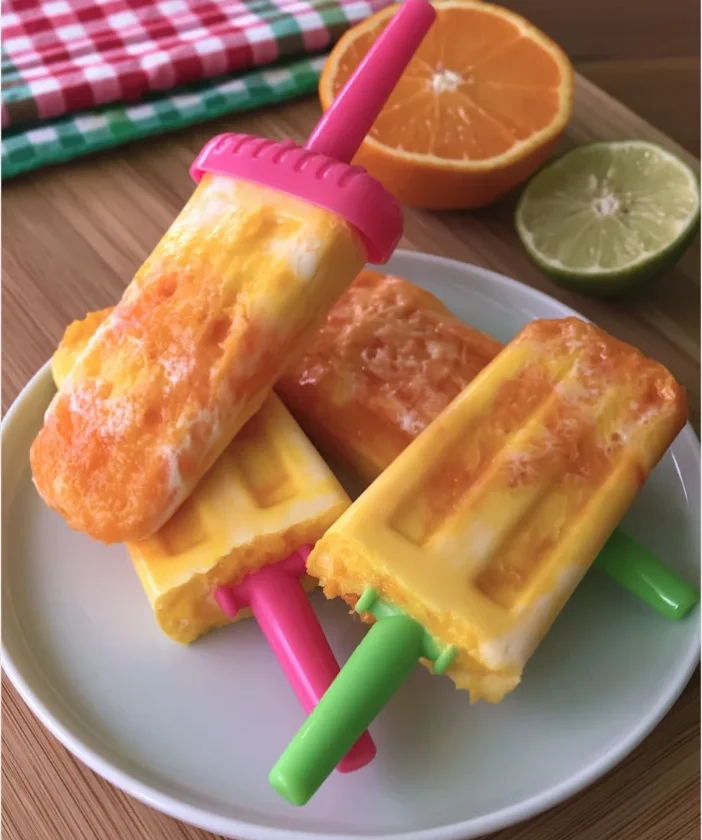
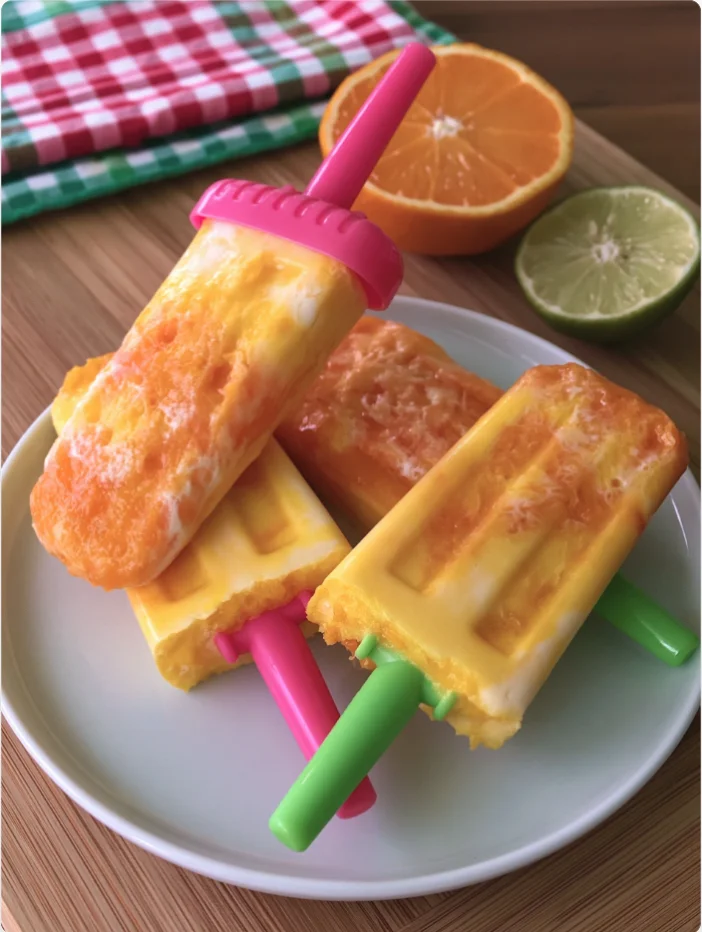
As summer approaches and the temperatures rise, there is nothing quite as refreshing as a homemade frozen treat. Among these delights, Easy Orange Creamsicles stand out, combining the vibrant, tangy flavor of oranges with a luscious creaminess that is simply irresistible. These delightful treats evoke nostalgic memories of childhood summers spent by the pool or at backyard barbecues, bringing back the joy of warm days and carefree moments. Not only are they delicious, but they are also easy to make, requiring minimal ingredients and no special equipment beyond a blender or popsicle molds. The simplicity of this recipe makes it accessible for anyone, regardless of their cooking skills. With their bright color and refreshing taste, these creamsicles are perfect for cooling down on a hot day and make for a delightful treat for kids and adults alike. Imagine biting into a creamy popsicle that bursts with fresh orange flavor—it’s a nostalgic summer indulgence that never goes out of style. Whether you enjoy them plain or with fun add-ins, these Easy Orange Creamsicles are bound to become a favorite in your summer recipe repertoire. Summer just wouldn’t be the same without these delicious, zesty pops that can be enjoyed anytime, anywhere. They are not only a refreshing snack but a reminder of simpler times spent enjoying the sun.
Ingredients
- Wet Ingredients:
- 2 cups fresh orange juice (about 6-8 oranges, depending on size and juiciness; choose oranges that feel heavy for their size, as this indicates juiciness. Navel oranges or Valencia oranges are particularly good choices for their sweet flavor.)
- 1 cup coconut milk (or any milk of your choice, such as almond, soy, or oat milk for different flavor profiles; full-fat coconut milk will yield a creamier texture, while lighter versions result in a slightly icier popsicle)
- 1/2 cup Greek yogurt (or dairy-free yogurt for a dairy-free version, providing the same creamy texture; look for unsweetened varieties to control sweetness. The yogurt adds not only creaminess but also a slight tang that balances the sweetness of the orange.)
- 1/4 cup honey or maple syrup (adjust based on sweetness preference; feel free to taste as you add for perfect sweetness; agave syrup is also a great alternative for a vegan option, providing a mild sweetness that blends well with the other flavors)
- Dried Ingredients:
- 1 teaspoon pure vanilla extract (for an aromatic touch that enhances the flavors; ensure it’s pure vanilla extract rather than imitation for the best flavor. This ingredient adds depth and complements the citrus notes beautifully.)
- 1-2 tablespoons orange zest (for extra flavor; freshly grated zest adds a vibrant aroma and enhances the orange flavor; be careful not to include the bitter white pith, as it can alter the sweetness of the creamsicles.)
For best results, opt for fresh, organic oranges to ensure the highest quality juice and zest, as organic fruit often has more flavor and fewer pesticides. When juicing, aim for a mix of sweet and slightly tart oranges to elevate the overall taste. If you prefer a sweeter treat, feel free to add a bit more honey or maple syrup to suit your taste. You can also use a dairy-free yogurt to keep the recipe fully dairy-free, making it suitable for various dietary preferences. This recipe is versatile enough to accommodate different tastes and needs, ensuring that everyone can enjoy these delightful creamsicles. Additionally, consider using other citrus fruits, such as blood oranges or mandarins, for a unique twist on this classic recipe. This adaptation not only diversifies the flavor profile but also adds a vibrant color that can make the creamsicles even more visually appealing. You can learn more about this topic.
Steps / Instructions
- Begin by juicing the oranges. You will need about 2 cups of fresh orange juice. Use a manual or electric juicer to extract the juice, then strain it through a fine mesh sieve to remove any pulp if desired, resulting in a smoother texture. If you enjoy the pulp, feel free to skip the straining step! Freshly squeezed orange juice not only tastes better but also retains more nutrients. Consider reserving the pulp for use in smoothies or baked goods to minimize waste.
- In a blender, combine the fresh orange juice, coconut milk, Greek yogurt, honey or maple syrup, vanilla extract, and orange zest. Blend on high speed until the mixture is smooth and creamy, about 30 seconds. Make sure no clumps remain, as a silky blend will yield the best creamsicles. You may need to scrape down the sides of the blender once or twice to ensure everything is well incorporated. Take a moment to enjoy the delightful aroma as it blends—it’s a prelude to the deliciousness to come!
- Once the mixture is well combined, taste it and adjust the sweetness if necessary by adding more honey or syrup. This step is crucial because the sweetness can vary based on the oranges used. You want a perfect balance between tangy and sweet! Don’t be afraid to experiment until you find the flavor that’s just right for you and your family. If using sweeter oranges, you might find you need less added sweetener, ensuring a more natural taste.
- Pour the creamy orange mixture into popsicle molds, leaving a little space at the top for expansion as they freeze. Filling the molds to about ¾ full is ideal. This prevents spillover and ensures even freezing. If you have extra mixture, you can pour it into small cups to make mini popsicles or serve it as a smoothie! Using silicone molds makes it easier to release the popsicles once frozen.
- Insert sticks into the molds and place them in the freezer. Allow the creamsicles to freeze for at least 4-6 hours or until solid. For the best results, consider leaving them overnight for a fully frozen treat. If using wooden sticks, ensure they are inserted deeply enough to stand upright while freezing without tipping over. The anticipation will build as you wait for your refreshing treats to solidify!
- To remove the creamsicles from the molds, run warm water over the outside of the molds for a few seconds until they loosen. Gently pull the sticks to release the popsicles. If they stick, a little extra warm water will help free them. Avoid using excessive force, as this may break the creamsicle. Patience is key here; allowing the warm water to work its magic is the best approach.
- Serve immediately and enjoy the refreshing taste of your homemade Easy Orange Creamsicles! These popsicles make a delightful addition to any summer gathering or as a refreshing afternoon snack. Pair them with fresh fruit or a light dessert for a complete summer treat experience! You can also present them on a colorful platter, garnished with mint leaves for an extra touch of elegance.
Tips & Tricks
Creating the perfect Easy Orange Creamsicles is simple, but here are some tips to help you achieve the best results: Check out our related guide for more tips.
- Storage: Store any leftover creamsicles in an airtight container in the freezer. They can last for up to two months, but they are best enjoyed fresh to preserve their flavor and texture. Consider labeling the container with the date to track freshness, and avoid placing them near strong-smelling foods in the freezer to prevent absorbing unwanted flavors. Wrapping individual pops in plastic wrap before placing them in the container can also help maintain their quality.
- Make Ahead: These creamsicles are perfect for meal prep. Make a batch at the beginning of the week for easy, healthy snacks all week long. They also make for a quick dessert option after dinner, ensuring you always have a cool treat on hand. The ability to prepare these in advance means you can always indulge in a refreshing dessert without the last-minute hassle. Consider making different flavors to keep things exciting throughout the week!
- Common Mistakes: Avoid overfilling the molds, as the mixture will expand when frozen. A little space at the top ensures they don’t overflow, preventing a mess in your freezer and ensuring a neat popsicle shape. Additionally, ensure your mixture is well-blended to achieve that creamy texture—lumps will create an uneven consistency. It’s also wise to check the firmness of the creamsicles before attempting to remove them; if they aren’t fully frozen, they may not hold their shape.
- Expert Technique: For a fun twist, consider mixing in pieces of fresh fruit or berries before freezing for added texture and flavor. Chopped strawberries, blueberries, or even mango chunks can elevate your creamsicles to a new level of deliciousness. This not only enhances the flavor but also adds visual appeal to your Easy Orange Creamsicles! Each bite can be a delightful surprise, bursting with fresh fruit flavor.
Conclusion
These Easy Orange Creamsicles are not just a treat; they are a celebration of summer, easy to make, and delicious to enjoy. Whether you are hosting a pool party, looking for a quick snack for the kids, or simply wanting to cool off on a hot day, these creamsicles will be a hit. Remember the joy of making these with your family and the smiles they bring with each creamy bite! We hope you try this recipe and share your experiences in the comments or let us know your favorite variations! Don’t forget to capture the smiles as your loved ones indulge in these delightful sweets! With just a few ingredients and a little bit of time, you can create a memorable summer experience that everyone will cherish.
Easy Orange Creamsicles
A refreshing homemade frozen treat combining the vibrant, tangy flavor of oranges with a luscious creaminess.
Ingredients
- 2 cups fresh orange juice (about 6-8 oranges)
- 1 cup coconut milk (or any milk of your choice)
- 1/2 cup Greek yogurt (or dairy-free yogurt)
- 1/4 cup honey or maple syrup
- 1 teaspoon pure vanilla extract
- 1-2 tablespoons orange zest
Directions
Juice the oranges to get about 2 cups of fresh orange juice. Strain if desired.
In a blender, combine orange juice, coconut milk, Greek yogurt, honey or maple syrup, vanilla extract, and orange zest. Blend until smooth.
Taste and adjust sweetness if necessary.
Pour the mixture into popsicle molds, leaving space at the top.
Insert sticks and freeze for at least 4-6 hours or until solid.
Run warm water over the molds to loosen, then gently pull the sticks to release the popsicles.
Serve immediately and enjoy!
Nutrition Facts
Recipe Reviews
- ★★★★★
Excellent recipe!
Leave a Reply
Your email address will not be published. Required fields are marked *

Excellent recipe!