
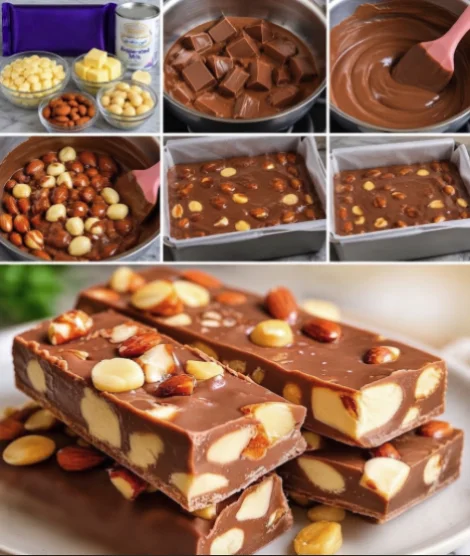
Indulging in a piece of rich, creamy Chocolate Nut Fudge is like a mini celebration for the senses. This delightful treat combines the luxurious flavor of chocolate with the satisfying crunch of nuts, creating a symphony of textures and tastes that are hard to resist. Chocolate fudge has a long-standing place in dessert history, often associated with festive occasions and personal gatherings, making it a beloved choice for dessert lovers everywhere. The origins of fudge date back to the late 19th century, with stories suggesting it originated from a “fudged” batch of caramels, and it has evolved into various delightful variations, with nutty adaptations being a popular choice. The texture of Chocolate Nut Fudge can range from soft and chewy to firm and creamy, depending on the cooking technique and timing used. Whether you are hosting a gathering, celebrating a special occasion, or simply satisfying a sweet tooth, this Chocolate Nut Fudge recipe is sure to impress. Let’s dive into the rich world of homemade chocolate treats, where you can discover not only how to make this decadent dessert but also the joy it brings to every bite, leaving you and your guests craving more!
Ingredients
- Dry Ingredients:
- 2 cups granulated sugar
- 1/2 cup unsweetened cocoa powder
- 1/4 teaspoon salt
- Wet Ingredients:
- 1/2 cup unsalted butter (1 stick)
- 1/2 cup whole milk
- 1 teaspoon vanilla extract
- Nuts:
- 1 cup mixed nuts (walnuts, pecans, almonds, or your choice), roughly chopped to enhance their flavor release during cooking. Feel free to experiment with different nut combinations to find your favorite blend.
- Toppings (optional):
- Additional chopped nuts for garnish, enhancing both texture and presentation, making your fudge visually appealing.
- Sea salt flakes for a sweet and salty contrast, which elevates the flavor profile and adds a gourmet touch. A sprinkle of flaky sea salt can draw out the chocolate’s richness beautifully.
For best results, use high-quality cocoa powder and fresh nuts to enhance the flavor of your Chocolate Nut Fudge. Fresh nuts not only provide a better crunch but also contribute a deeper, richer flavor that can elevate your dessert significantly. You can also substitute with other types of nuts based on your preference or dietary needs, such as macadamia nuts for their creamy texture or peanuts for a classic taste. Consider using organic sugar for a more robust flavor or dairy alternatives like almond milk or coconut milk for a vegan option. You can learn more about this topic to explore various ingredient options that can make your fudge unique. Additionally, using fair-trade chocolate can enhance both the taste and ethical credentials of your treat, making each bite not only delicious but also conscientious.
Steps / Instructions
- Prepare the pan: Line an 8×8-inch square baking dish with parchment paper, allowing some overhang for easy removal later. This step is crucial as it prevents sticking and helps in cutting uniform pieces once the fudge is set. Ensure that the parchment paper is smooth to avoid crinkles which could affect the fudge’s appearance, ensuring that every piece looks as good as it tastes.
- Combine dry ingredients: In a medium bowl, whisk together the granulated sugar, cocoa powder, and salt until well combined. This ensures that the sugar and cocoa are evenly distributed, which is vital for a consistent flavor throughout the fudge. A thorough mix here can prevent any pockets of sweetness or bitterness in the final product, allowing the rich chocolate flavor to shine through in every bite.
- Cook the fudge mixture: In a medium saucepan, melt the butter over medium heat. Once melted, add the dry mixture and milk, stirring continuously to prevent burning. Bring the mixture to a boil, constantly stirring for about 5 minutes, or until it reaches a soft ball stage (around 234°F or 112°C). Use a candy thermometer for accuracy, as reaching this specific temperature is essential for achieving the perfect texture. Maintain a watchful eye to prevent the mixture from boiling over, which can create a mess and ruin your fudge. The bubbling mixture will transform into a glossy, rich concoction that signals you are on the right track.
- Add vanilla and nuts: Once the fudge mixture is done cooking, remove it from heat and stir in the vanilla extract. Then fold in the mixed nuts until they are evenly distributed throughout the fudge mixture. This ensures that every bite of your Chocolate Nut Fudge is loaded with nutty goodness and that the flavors meld beautifully. Aim for a gentle fold to keep some of the air in the mixture, contributing to a lighter texture that contrasts perfectly with the dense chocolate.
- Pour into the pan: Immediately pour the fudge mixture into the prepared baking dish, spreading it evenly with a spatula. Tap the dish gently on the counter to remove any air bubbles. This helps the fudge to set evenly and prevents any unwanted air pockets that could affect the texture. Be quick with this step, as the mixture will start to set as it cools, ensuring a smooth finish.
- Chill: Allow the fudge to cool at room temperature for about 30 minutes, then transfer it to the refrigerator. Let it set for at least 2 hours, or until firm. This step is crucial for achieving that perfect fudge consistency; it should be firm enough to hold its shape but still melt in your mouth. During this time, consider covering the fudge loosely with foil to prevent it from absorbing odors from the refrigerator, ensuring your fudge retains its delightful chocolate aroma.
- Cut and serve: Once set, use the parchment paper to lift the fudge out of the pan. Cut it into squares or rectangles, and enjoy your homemade Chocolate Nut Fudge! Serve it on a decorative plate or in a festive box for gifting. For an extra touch, dust the top with cocoa powder or additional chopped nuts before serving, making it an inviting treat for anyone who lays eyes on it.
Be sure to keep an eye on the fudge as it cooks, as the timing can be crucial to achieving a smooth and creamy texture. Testing for the soft ball stage ensures the fudge will set perfectly. If you’re unsure, drop a small amount of the mixture into cold water; if it holds its shape, it’s ready. For further assistance, check out our related guide for more tips on perfecting your fudge-making skills. Remember, the joy of making fudge is not just in the final product but in the delightful experience of crafting it, allowing you to share love and sweetness with every piece!
Tips & Tricks
To achieve the best results, follow these tips:
- Storage: Store any leftover fudge in an airtight container at room temperature for up to a week or in the refrigerator for longer freshness. If stored properly, it can even last up to two weeks, maintaining its delicious flavor and texture. For longer storage, consider freezing the fudge, wrapping it tightly in plastic wrap and placing it in a freezer-safe bag. When ready to enjoy again, simply thaw at room temperature.
- Make-ahead: Chocolate Nut Fudge is perfect for making ahead of time, especially for parties or holiday gatherings. It can be made a few days in advance and stored until needed, making it a convenient treat for busy schedules. Prepare it during the weekend and surprise your family or friends with this delightful dessert. Having fudge on hand can also save you during unexpected guest visits, ensuring you’re always ready to impress with a delicious treat.
- Avoid common mistakes: Make sure to stir continuously while cooking to prevent burning. Also, ensure that you reach the soft ball stage, as undercooked fudge will be too soft and not set properly. If it becomes too firm, you may need to reheat it gently and add a splash of cream to loosen it. A quick tip is to keep a small cup of cold water nearby to test the fudge as it cooks, allowing you to achieve the ideal consistency effortlessly.
- Pro techniques: For a creamier texture, consider using a candy thermometer to monitor the fudge’s temperature accurately. This will help achieve the perfect consistency. Additionally, letting the fudge rest for a few minutes after mixing before pouring it into the pan can help incorporate air for a lighter texture. Adjusting cooking times based on your stove’s actual temperature can also yield better results, giving you confidence in your fudge-making skills as you create this delightful treat.
Chocolate Nut Fudge
Indulging in a piece of rich, creamy Chocolate Nut Fudge is like a mini celebration for the senses. This delightful treat combines the luxurious flavor of chocolate with the satisfying crunch of nuts, creating a symphony of textures and tastes that are hard to resist.
Ingredients
- 2 cups granulated sugar
- 1/2 cup unsweetened cocoa powder
- 1/4 teaspoon salt
- 1/2 cup unsalted butter (1 stick)
- 1/2 cup whole milk
- 1 teaspoon vanilla extract
- 1 cup mixed nuts (walnuts, pecans, almonds, or your choice), roughly chopped
- Additional chopped nuts for garnish (optional)
- Sea salt flakes for garnish (optional)
Directions
Line an 8x8-inch square baking dish with parchment paper.
In a medium bowl, whisk together the granulated sugar, cocoa powder, and salt until well combined.
In a medium saucepan, melt the butter over medium heat. Once melted, add the dry mixture and milk, stirring continuously to prevent burning. Bring the mixture to a boil, stirring for about 5 minutes, or until it reaches a soft ball stage (around 234°F or 112°C).
Remove from heat and stir in the vanilla extract. Then fold in the mixed nuts until evenly distributed.
Immediately pour the fudge mixture into the prepared baking dish, spreading it evenly. Tap the dish gently on the counter to remove air bubbles.
Allow the fudge to cool at room temperature for about 30 minutes, then transfer to the refrigerator to set for at least 2 hours.
Once set, lift the fudge out of the pan using the parchment paper. Cut into squares or rectangles and serve.
Nutrition Facts
Recipe Reviews
- ★★★★★
Excellent recipe!
Leave a Reply
Your email address will not be published. Required fields are marked *





Excellent recipe!