
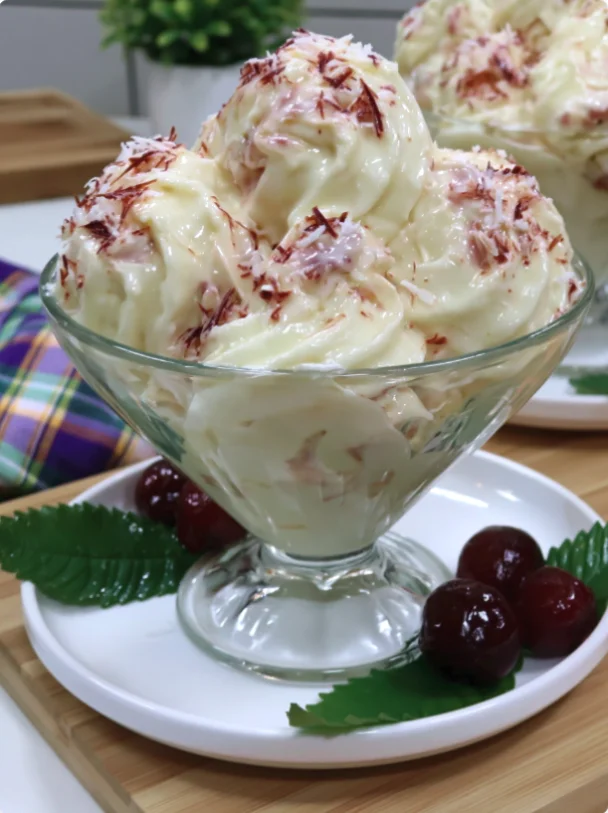
When the summer heat rolls in, nothing quenches your thirst for something sweet quite like a scoop of homemade Milky Ice Cream. This delightful treat isn’t just any ice cream; it’s a creamy and rich dessert that captures the essence of summer bliss. Originating from the classic traditions of ice cream making, this recipe combines the fundamental elements of milk and cream with a few simple ingredients to create a dessert that is both nostalgic and indulgent. Imagine the first bite melting in your mouth, the smooth texture harmonizing with the subtle sweetness of vanilla. It’s no wonder ice cream has become a beloved staple in many cultures around the world, enjoyed at family gatherings, birthday parties, and summer picnics. The history of ice cream itself dates back to ancient times, where it is said that a mixture of snow and flavored water was served to royalty. Today, making ice cream at home has become a cherished activity for many, allowing creativity to flourish in the kitchen. Let’s dive into the world of Milky Ice Cream and discover how to make this irresistible treat right in your kitchen!
Ingredients
To create the perfect Milky Ice Cream, gather the following ingredients: You can learn more about this topic.
- Wet Ingredients:
- 2 cups heavy cream – This forms the base of your ice cream, providing the rich and creamy texture that makes every bite so enjoyable. Opt for a high-fat content cream for the best results.
- 1 cup whole milk – Adds a bit of lightness and helps soften the flavor of the cream, creating a balanced mouthfeel that complements the heaviness of the cream.
- 1 cup granulated sugar – Sweetens the mixture and enhances the overall flavor profile. You can adjust this depending on your sweetness preference, perhaps even trying brown sugar for a deeper flavor.
- 1 tablespoon pure vanilla extract – This ingredient is essential for that classic ice cream flavor, lending a warm aroma and taste that rounds out the sweetness. Consider using vanilla bean paste for an even richer flavor.
- 1/2 teaspoon salt – Balances and enhances the sweetness, bringing out the flavors of the other ingredients and reducing any cloying sweetness that may arise from the sugar.
- Toppings (optional):
- Chocolate chips – Add a delightful crunch and a rich chocolate flavor that contrasts beautifully with the creamy ice cream.
- Crushed nuts – Almonds, pecans, or walnuts can offer a crunchy texture and nutty flavor that pairs well with the creamy ice cream, adding both texture and nutrition.
- Fresh fruits (like strawberries or bananas) – These not only add a burst of flavor but also a refreshing element to your dessert, bringing a touch of natural sweetness and color.
- Caramel or chocolate sauce – Drizzle on top for an extra layer of sweetness and visual appeal that takes your ice cream experience to the next level.
For the best results, choose high-quality cream and milk to ensure a rich flavor and smooth texture. Organic dairy products are often recommended for their purity and taste, which can significantly enhance your ice cream. You can substitute the granulated sugar with a sugar alternative if you prefer a low-sugar option, such as stevia or agave syrup. However, be mindful that substitutes may alter the texture slightly, requiring some adjustments in the recipe. Check out our related guide for more tips on ingredient selection and potential substitutions.
Steps / Instructions
- Combine Ingredients: In a large mixing bowl, whisk together the heavy cream, whole milk, granulated sugar, vanilla extract, and salt until the sugar is completely dissolved. This might take about 2-3 minutes of whisking. Make sure to whisk vigorously to incorporate air into the mixture, which will help create a fluffy texture in your ice cream. A frothy mixture indicates that you’ve incorporated enough air for a light final product.
- Chill the Mixture: Cover the bowl with plastic wrap and place it in the refrigerator for at least 2 hours, or overnight if you have time. This chilling process helps to enhance the flavors and leads to a creamier texture. The colder the mixture, the better the final ice cream will be, so don’t skip this step! A well-chilled mixture is crucial for achieving that smooth consistency.
- Prepare the Ice Cream Maker: If you’re using an ice cream maker, make sure to freeze the bowl according to the manufacturer’s instructions. This usually takes about 24 hours, so plan ahead! Ensure that the bowl is completely frozen before pouring in your mixture to achieve optimal churning. A properly frozen bowl will help achieve the right consistency much faster.
- Churn the Ice Cream: Once chilled, pour the mixture into the ice cream maker and churn according to the manufacturer’s instructions. This process typically takes 20-30 minutes. You’ll know it’s done when it reaches a soft-serve consistency and has increased in volume. If the ice cream looks too soft, you can churn for a few more minutes. Watch for it to double in size, which indicates that air has been properly incorporated.
- Transfer to a Container: Using a spatula, transfer the churned ice cream into an airtight container. For a firmer texture, smooth it out and press it down to eliminate air pockets. This will help prevent ice crystals from forming as it freezes, ensuring a smooth and creamy final product.
- Freeze: Cover the container with a lid or plastic wrap and freeze for at least 4 hours, or until firm. The longer it sits, the firmer the ice cream will become, so be patient! If you want a scoopable texture, let it sit at room temperature for around 5-10 minutes before serving. This will make it easier to scoop without compromising the texture.
- Serve: When ready to serve, remove the ice cream from the freezer and let it sit for about 5-10 minutes at room temperature to soften slightly. Scoop into bowls and add your favorite toppings! You can create a sundae-style serving by layering ice cream with various toppings in a tall glass, making it visually appealing and delicious.
Tips & Tricks
To ensure your Milky Ice Cream turns out perfectly every time, consider these expert tips:
- Storage: Store your ice cream in an airtight container to prevent freezer burn. If you notice ice crystals forming, simply give it a good stir and freeze again. To avoid the ice cream hardening too much, consider using a shallow container which allows for easier scooping. This also prevents over-freezing, which can occur in deeper containers.
- Make-Ahead: You can prepare the base and churn it ahead of time. Homemade ice cream can last up to 2 weeks in the freezer, but for the best flavor and texture, try to consume it within a week. To enjoy a fresh experience, keep your toppings stored separately until serving, which keeps the ice cream from becoming soggy.
- Common Mistakes: Avoid over-churning your ice cream, as it can become grainy. Stop churning once it reaches a soft-serve consistency. Also, ensure the ice cream maker bowl is adequately frozen; otherwise, the mixture won’t churn properly. This is crucial to achieving that perfect creamy texture.
- Pro Techniques: For a gourmet touch, consider infusing your cream with spices like cinnamon or adding a swirl of chocolate ganache during the last few minutes of churning for a rich chocolate and milk ice cream experience. You can also experiment with adding crushed cookies or other favorite candies into the mix for added flavor and texture, ensuring that every bite is a delightful surprise.
Conclusion
With this Milky Ice Cream recipe, you are well on your way to creating a delicious homemade treat that is sure to impress family and friends. The creamy texture, combined with the rich flavors, makes it an indulgent dessert option perfect for any occasion. Whether you’re enjoying a scoop on a hot summer day or serving it at a party, this ice cream will undoubtedly be a hit. Don’t hesitate to experiment with different toppings and flavor variations to truly make this recipe your own. Dive into this delightful dessert experience and create some sweet memories!
Milky Ice Cream
A creamy and rich dessert that captures the essence of summer bliss, perfect for quenching your thirst for something sweet.
Ingredients
- 2 cups heavy cream
- 1 cup whole milk
- 1 cup granulated sugar
- 1 tablespoon pure vanilla extract
- 1/2 teaspoon salt
- Optional toppings: chocolate chips, crushed nuts, fresh fruits, caramel or chocolate sauce
Directions
In a large mixing bowl, whisk together the heavy cream, whole milk, granulated sugar, vanilla extract, and salt until the sugar is completely dissolved.
Cover the bowl with plastic wrap and place it in the refrigerator for at least 2 hours, or overnight.
If using an ice cream maker, freeze the bowl according to the manufacturer’s instructions (usually about 24 hours).
Once chilled, pour the mixture into the ice cream maker and churn according to the manufacturer's instructions (typically 20-30 minutes).
Transfer the churned ice cream into an airtight container, smoothing it out to eliminate air pockets.
Cover the container and freeze for at least 4 hours, or until firm.
When ready to serve, let the ice cream sit for about 5-10 minutes at room temperature, then scoop into bowls and add your favorite toppings.
Recipe Reviews
- ★★★★★
Excellent recipe!
Leave a Reply
Your email address will not be published. Required fields are marked *

Excellent recipe!