
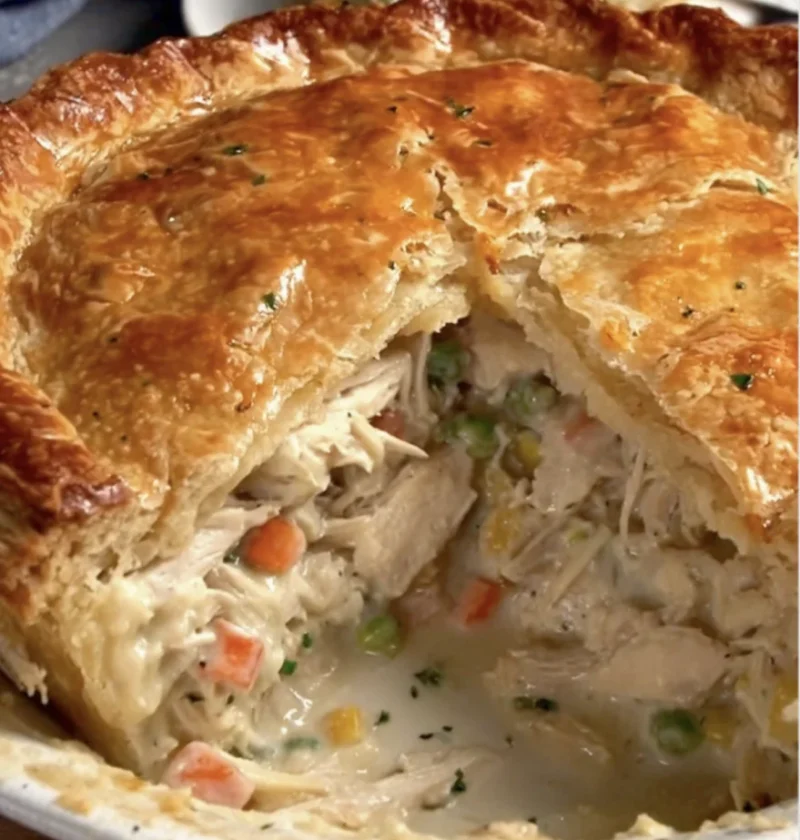
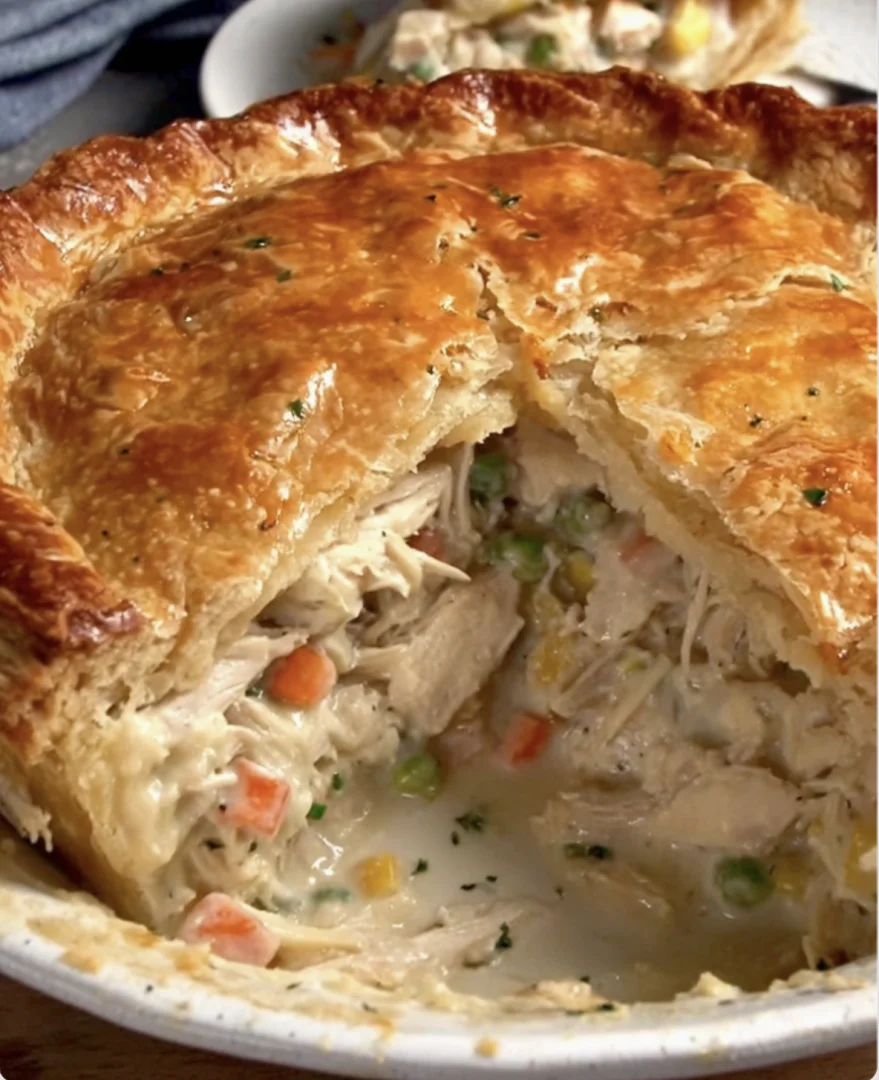
When it comes to comforting, home-cooked meals, nothing quite compares to the appeal of a classic chicken pie. Our Easy No-Pot Chicken Pie takes the beloved chicken pot pie concept and simplifies it, ensuring a delightful dish that doesn’t require hours of cooking or multiple pots to clean. This recipe is perfect for busy weeknights when you crave a hearty meal without the hassle. With a creamy chicken filling and a flaky crust, this dish is a family favorite that brings warmth and flavor to your table, making every bite a nostalgic experience. The combination of tender chicken and vibrant vegetables enveloped in a buttery crust creates an unforgettable culinary delight that is both satisfying and fulfilling.
The origins of chicken pie can be traced back to ancient civilizations, where meat and vegetables were encased in pastry to preserve them. This tradition has evolved over centuries, and today, chicken pot pie remains a staple comfort food in many households, celebrated for its rich taste and satisfying texture. It’s a dish that brings back memories of gathering around the dinner table, sharing stories, and enjoying a hearty meal together. Whether you’re serving it to your family or guests, the Easy No-Pot Chicken Pie is sure to impress and satisfy all palates, making any meal feel special. You can learn more about this topic and its cultural significance, including how variations of this dish are enjoyed worldwide, highlighting its universal appeal.
Ingredients
To make this Easy No-Pot Chicken Pie, gather the following ingredients: Check out our related guide for more tips to enhance your dish, including information on selecting fresh produce and premium quality meats that will elevate your cooking experience.
- For the Filling:
- 2 cups cooked, shredded chicken (rotisserie chicken works well as it is already seasoned and tender; you can also poach chicken breasts for a homemade option)
- 1 cup frozen mixed vegetables (peas, carrots, corn) – feel free to choose your favorites or use fresh vegetables, chopped finely. Fresh vegetables can add a vibrant crunch and enhance the flavor profile.
- 1 cup chicken broth (homemade or store-bought for convenience; homemade broth can infuse more flavor into your filling)
- 1 cup heavy cream (for a luxurious, creamy texture; you can substitute with half-and-half for a lighter version or even a plant-based cream for a dairy-free option)
- 1/2 cup onion, diced (yellow or white onion adds a classic flavor, while red onion can provide a sweeter note)
- 2 cloves garlic, minced (fresh garlic provides a robust aroma and taste; adding more can enhance the dish further)
- 1 teaspoon dried thyme (or fresh if available, which enhances the flavor profile significantly, bringing out the herbaceous notes)
- 1 teaspoon salt (more or less to taste; always taste and adjust seasoning during cooking)
- 1/2 teaspoon black pepper (freshly ground for best flavor; using a pepper mill can release essential oils for enhanced aroma)
- 2 tablespoons olive oil (for sautéing, can also use butter for a richer taste, or coconut oil for a hint of sweetness)
- For the Crust:
- 1 1/2 cups all-purpose flour (for a tender crust, you can also use whole wheat flour for a nuttier flavor or gluten-free flour for a gluten-free version)
- 1/2 teaspoon salt (to enhance the overall taste; consider using Himalayan pink salt for a mineral-rich twist)
- 1/2 cup unsalted butter, chilled and cubed (keep it cold to ensure flakiness in the crust; using a high-fat butter can improve the richness)
- 4 to 6 tablespoons ice water (helps to bring the dough together without warming it to maintain the flakiness; you might need to adjust this based on humidity)
- Optional Toppings:
- Fresh parsley, chopped (for garnish, adds a beautiful pop of color and freshness; consider using chives or thyme for a different herbaceous note)
- A sprinkle of paprika or freshly cracked black pepper on top for added visual appeal and flavor; smoked paprika can add a delightful smokiness.
Note: Feel free to substitute the frozen vegetables with fresh vegetables according to your preference, such as diced bell peppers or green beans, which can add a burst of color and nutrition. You can also use low-fat cream or a dairy-free option, such as coconut cream or almond milk, if you’re looking for healthier chicken pie options. Experimenting with different vegetable combinations can also add a personal touch to this dish, allowing you to cater to seasonal produce or your family’s favorites.
Steps / Instructions
- Prepare the Crust: In a large bowl, combine the flour and salt thoroughly to ensure even seasoning. Add the chilled butter, using a pastry cutter or your fingers to work the butter into the flour until the mixture resembles coarse crumbs with pea-sized bits of butter remaining. This method creates a flaky texture, which is the hallmark of a great pie crust.
- Add Ice Water: Gradually add ice water, one tablespoon at a time, mixing gently until the dough just clings together. It should feel slightly tacky but not sticky. Avoid overworking the dough to maintain a flaky texture; remember, the less you handle it, the better the results will be.
- Chill the Dough: Shape the dough into a disk, wrap it tightly in plastic wrap, and refrigerate for at least 30 minutes. This resting period allows the gluten to relax and helps create a tender crust, which is essential for achieving that perfect bite.
- Preheat the Oven: Preheat your oven to 425°F (220°C) to ensure it reaches the right temperature for baking, allowing for a perfect golden crust that is both flaky and delicious.
- Cook the Filling: In a large skillet, heat the olive oil over medium heat. Add the diced onion and minced garlic, sautéing until softened and fragrant, about 3-4 minutes. Stir occasionally to prevent burning and to achieve a sweet, caramelized flavor.
- Add Chicken and Vegetables: Stir in the shredded chicken and frozen mixed vegetables. Cook for an additional 2-3 minutes until heated through, ensuring the vegetables are bright and tender, contributing both flavor and nutrition to the mix.
- Make it Creamy: Pour in the chicken broth and heavy cream, stirring to combine thoroughly. Add the thyme, salt, and black pepper. Let the mixture simmer for about 5-7 minutes until slightly thickened, stirring frequently to avoid sticking. This step is crucial for creating that velvety filling that coats the chicken and vegetables.
- Assemble the Pie: Roll out the chilled dough on a lightly floured surface to fit your pie dish. Place the rolled dough into the dish, allowing the edges to hang over the sides. Ensure the dough is even and covers the entire base; this will be the foundation of your Easy No-Pot Chicken Pie.
- Fill the Crust: Pour the creamy chicken filling into the prepared crust, spreading it evenly. Ensure the filling is centered to achieve a well-balanced pie that cuts beautifully.
- Top with Dough: Roll out a second piece of dough to cover the top of the pie. Seal the edges by crimping them with a fork or your fingers to prevent any filling from oozing out during baking. Cut a few slits in the top to allow steam to escape, preventing the crust from becoming soggy and ensuring a crisp finish.
- Bake: Place the pie in the preheated oven and bake for 25-30 minutes, or until the crust is golden brown. Check for doneness by looking for a bubbling filling and a nicely browned crust, which indicates that the pie is ready to be enjoyed.
- Cool and Serve: Allow the pie to cool for a few minutes before slicing. This resting time helps the filling to set up slightly, making it easier to serve. Garnish with fresh parsley if desired and serve warm for the best flavor experience, allowing your guests to savor each delicious bite.
Tips & Tricks
To ensure the best results with your Easy No-Pot Chicken Pie, consider these tips:
- Make Ahead: You can prepare the filling a day in advance and store it in the refrigerator. Assemble the pie just before baking for a quick weeknight dinner, allowing for maximum flavor development and saving you time when you’re busy.
- Storage: Leftovers can be stored in an airtight container in the refrigerator for up to 3 days. Reheat in the oven or microwave before serving, ensuring it’s heated thoroughly for optimal taste; consider adding a splash of broth if the filling appears dry.
- Common Mistakes: Avoid overworking the dough, which can result in a tough crust. Also, make sure to let the filling cool slightly before adding it to the crust to prevent sogginess from steam; this small step makes a big difference in texture.
- Pro Techniques: For an extra crispy crust, brush the top with an egg wash (1 beaten egg mixed with 1 tablespoon of water) before baking. This enhances the color and gives a beautiful sheen to the crust, adding an appetizing look to your dish.
- Ingredient Quality: Using high-quality ingredients, such as organic chicken and fresh herbs, can elevate the overall flavor of your Easy No-Pot Chicken Pie, making it even more delightful and memorable.
Conclusion
Now that you have the recipe for Easy No-Pot Chicken Pie, it’s time to gather your ingredients and bring this comforting dish to life. With its creamy filling and golden crust, it promises to be a hit at your dinner table. Enjoy the warmth and satisfaction that comes from making this rustic chicken pie; your family will thank you for this delicious meal! This dish not only warms the stomach but also fills the heart with joy, making every moment spent around the table a cherished memory that you and your loved ones will treasure.
Easy No-Pot Chicken Pie
A simplified version of a classic chicken pot pie, ensuring a delightful dish that doesn’t require hours of cooking or multiple pots to clean.
Ingredients
- For the Filling:
- 2 cups cooked, shredded chicken
- 1 cup frozen mixed vegetables (peas, carrots, corn)
- 1 cup chicken broth
- 1 cup heavy cream
- 1/2 cup onion, diced
- 2 cloves garlic, minced
- 1 teaspoon dried thyme
- 1 teaspoon salt
- 1/2 teaspoon black pepper
- 2 tablespoons olive oil
- For the Crust:
- 1 1/2 cups all-purpose flour
- 1/2 teaspoon salt
- 1/2 cup unsalted butter, chilled and cubed
- 4 to 6 tablespoons ice water
- Optional Toppings:
- Fresh parsley, chopped
- A sprinkle of paprika or freshly cracked black pepper
Directions
Prepare the Crust: In a large bowl, combine the flour and salt thoroughly. Add the chilled butter and work it into the flour until it resembles coarse crumbs.
Add Ice Water: Gradually add ice water, mixing gently until the dough just clings together.
Chill the Dough: Shape the dough into a disk, wrap it tightly in plastic wrap, and refrigerate for at least 30 minutes.
Preheat the Oven: Preheat your oven to 425°F (220°C).
Cook the Filling: In a large skillet, heat the olive oil over medium heat. Add the diced onion and minced garlic, sautéing until softened.
Add Chicken and Vegetables: Stir in the shredded chicken and frozen mixed vegetables, cooking for an additional 2-3 minutes.
Make it Creamy: Pour in the chicken broth and heavy cream, stirring to combine. Add the thyme, salt, and black pepper. Let simmer for about 5-7 minutes.
Assemble the Pie: Roll out the chilled dough on a floured surface to fit your pie dish.
Fill the Crust: Pour the creamy chicken filling into the prepared crust.
Top with Dough: Roll out a second piece of dough to cover the top, sealing the edges and cutting slits for steam to escape.
Bake: Place the pie in the preheated oven and bake for 25-30 minutes until golden.
Nutrition Facts
Recipe Reviews
- ★★★★★
Excellent recipe!
Leave a Reply
Your email address will not be published. Required fields are marked *


Excellent recipe!