
Rye bread is a staple in many cultures, particularly in Northern and Eastern Europe. Known for its rich, earthy flavor and dense texture, rye bread has a unique appeal that sets it apart from its wheat counterparts. This Abundant Rye Bread Recipe celebrates those qualities, guiding you through the process of creating a loaf that is both hearty and fulfilling. Made from whole grain rye flour, this recipe not only offers a delightful taste but also provides health benefits, making it a perfect addition to any meal. Whether you are looking for a base for your sandwiches or a side for soups and stews, this homemade rye bread will not disappoint. The process is straightforward, allowing even novice bakers to enjoy the rewarding experience of crafting their own bread. A loaf of rye bread can serve as a conversation starter at any gathering, reflecting a rich culinary tradition. Additionally, the nutritional profile of rye bread can be quite impressive, as it tends to be higher in fiber and lower in gluten than its wheat counterparts, appealing to those with dietary preferences aimed at improving gut health or weight management. The versatility of rye bread allows it to be utilized in various ways, whether it’s enjoyed as toast for breakfast, a sandwich for lunch, or as a side on a dinner plate.
Ingredients
To make this scrumptious rye bread, gather the following ingredients: You can learn more about this topic. Selecting the right ingredients is crucial to the success of your bread, ensuring that the flavors meld beautifully and the texture is just right. The combination of rye and all-purpose flour strikes a perfect balance, allowing the bread to rise adequately while retaining its characteristic density. Fresh ingredients, particularly the flour and yeast, will significantly enhance the flavor and texture of the final loaf, making the effort put into selecting them worthwhile.
- Dry Ingredients:
- 3 cups whole grain rye flour
- 1 cup all-purpose flour
- 2 teaspoons salt
- 2 tablespoons sugar or honey (for sweetness)
- 2 teaspoons caraway seeds (optional, for flavor)
- 1 tablespoon instant yeast
- Wet Ingredients:
- 1 ½ cups warm water (about 110°F or 43°C)
- 2 tablespoons olive oil (for richness)
Note: For a gluten-free alternative, consider using gluten-free all-purpose flour mixed with a binder like xanthan gum. However, the flavor and texture will differ slightly from traditional rye bread. If you choose to incorporate a gluten-free option, be prepared for a denser, yet equally flavorful loaf. Check out our related guide for more tips on achieving the best results with gluten-free baking. Additionally, opting for organic or locally sourced ingredients can further enhance the flavor and quality of your bread, making it a wholesome choice for your family. When you choose organic ingredients, you’re not just opting for quality, but also supporting sustainable farming practices that benefit the environment.
Steps / Instructions
- Prepare the Dough: In a large mixing bowl, combine the whole grain rye flour, all-purpose flour, salt, sugar, caraway seeds, and instant yeast. Whisk these dry ingredients together to ensure an even distribution, which is vital to prevent uneven rising and flavor pockets in the final loaf. A consistent blend will not only enhance the rise but also create a uniform taste throughout the bread. Pay attention to the texture of the flour; it should be free of lumps to ensure that the yeast activates properly.
- Add Wet Ingredients: Create a well in the center of the dry mixture. Pour in the warm water and olive oil. Mix with a wooden spoon until the dough begins to come together, being careful to scrape down the sides of the bowl to incorporate all the flour. This step is crucial as it allows the yeast to properly activate and the flavors to start melding. After mixing, the dough may seem shaggy at first; continue to work it until it forms a cohesive mass.
- Knead the Dough: Transfer the dough onto a lightly floured surface. Knead for about 10 minutes until the dough becomes smooth and elastic. It should be slightly sticky but not overly wet. You can add a bit more flour if necessary; however, be cautious, as too much flour can lead to a denser bread. Kneading not only develops the gluten in the bread but also incorporates air, which is essential for a good structure and lightness. Be sure to fold and stretch the dough to fully incorporate air and enhance the overall texture.
- First Rise: Place the kneaded dough in a lightly greased bowl. Cover it with a damp cloth or plastic wrap and let it rise in a warm place for about 1 to 2 hours, or until it has doubled in size. If your kitchen is cool, consider placing the dough in an oven that is turned off but has the light on to provide warmth. This rising phase is critical as it allows the yeast to ferment, producing carbon dioxide that helps the dough to rise and develop flavor. Monitor the dough; it should feel puffy and airy when ready.
- Shape the Loaf: After the first rise, punch down the dough gently to release the air, which helps develop a finer crumb. Shape it into a loaf by flattening it slightly and then rolling it up tightly from one end to the other, ensuring that the seam is sealed well to prevent it from unraveling during the second rise. Shaping is an essential step that affects the final appearance and texture of your loaf. Make sure to be gentle during this step to avoid deflating the dough too much.
- Second Rise: Place the shaped loaf into a greased loaf pan or onto a parchment-lined baking sheet. Cover it again and let it rise for about 30 to 45 minutes, or until it has puffed up, creating a soft and airy structure that will make slicing a pleasure. This second rise is what gives the bread its final volume and lightness, so be patient and allow it to rise adequately. During this time, consider preheating your oven so it’s ready once the dough has risen.
- Preheat the Oven: While the dough is rising, preheat your oven to 375°F (190°C), ensuring it is fully heated before baking, as this helps achieve the best crust and texture for your rye bread. An adequately preheated oven will also ensure even cooking and a beautiful browning effect. This step is essential; a hot oven allows the bread to rise further during baking, contributing to its final structure.
- Bake the Bread: Once the second rise is complete, bake the loaf in the preheated oven for 30 to 35 minutes, or until it is golden brown on top and sounds hollow when tapped on the bottom. This auditory cue is key—if you don’t hear a hollow sound, it may need additional baking time. The crust should be firm and have a lovely golden hue, indicating that the bread is baked through. An instant-read thermometer can also be used; the internal temperature should reach about 190°F (88°C).
- Cool: Remove the bread from the oven and let it cool in the pan for 10 minutes, then transfer it to a wire rack to cool completely before slicing. This cooling phase helps to set the loaf, preventing it from becoming gummy when sliced. Patience is important here; if you slice too soon, the texture may not be as desired, while allowing it to cool properly enhances the flavor. As the bread cools, its flavors will continue to develop, offering a richer taste experience.
Tips & Tricks
For the best results with your rye bread, consider the following tips:
- Ingredient Quality: Use high-quality whole grain rye flour for the best flavor and texture. Freshly milled flour, if available, will enhance the bread’s taste significantly. The difference in flavor can elevate your bread from good to truly exceptional, making it worth sourcing the best ingredients you can find. Additionally, organic ingredients can contribute to a more vibrant flavor profile, as they are often fresher and free from synthetic additives.
- Temperature: Ensure that your water is warm but not hot; using water that is too hot can kill the yeast, leading to a dense loaf instead of a light, airy one. A temperature of 110°F (43°C) is ideal for activating the yeast without compromising its effectiveness. Using a thermometer can ensure accuracy in this step, as even slightly too hot can have undesirable effects on the bread.
- Storage: Store your rye bread at room temperature in a bread box or wrapped in a clean kitchen towel to maintain its moisture. For longer storage, slice and freeze the loaf in airtight bags; this will preserve its freshness for several weeks. Proper storage not only keeps the bread tasting great but also extends its shelf life considerably, allowing you to enjoy your homemade loaf over time.
- Common Mistakes: Avoid adding too much flour during kneading; rye dough is typically stickier than wheat bread dough. Letting the dough rise in a warm, draft-free area is crucial for a good rise. If your dough isn’t rising well, check for proper yeast activation. Also, be mindful of the kneading time; under-kneading can lead to a dense loaf, while over-kneading can cause it to become tough. Keeping an eye on these factors can make all the difference in your baking success.
- Enhancing Flavor: Experiment with adding different seeds or herbs to the dough. Flaxseeds or pumpkin seeds can add a lovely crunch and nutritional benefits, enriching the overall flavor profile of your bread. Additionally, a splash of vinegar or a teaspoon of malt extract can deepen the flavor of your rye bread, creating a more complex and satisfying taste that complements spreads and toppings beautifully.
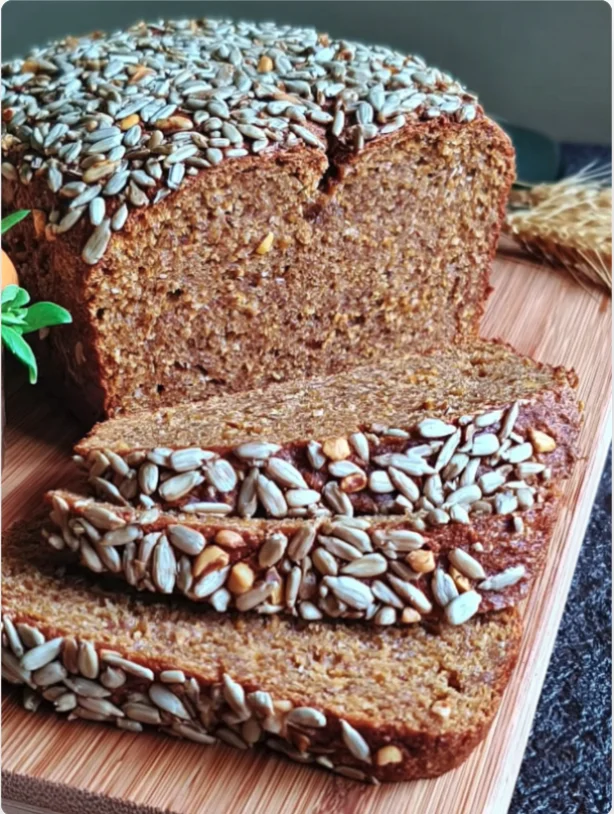
Abundant Rye Bread Recipe
This Abundant Rye Bread Recipe celebrates the rich, earthy flavor and dense texture of rye bread, guiding you through the process of creating a loaf that is both hearty and fulfilling.
Ingredients
- 3 cups whole grain rye flour
- 1 cup all-purpose flour
- 2 teaspoons salt
- 2 tablespoons sugar or honey
- 2 teaspoons caraway seeds (optional)
- 1 tablespoon instant yeast
- 1 ½ cups warm water
- 2 tablespoons olive oil
Directions
In a large mixing bowl, combine the whole grain rye flour, all-purpose flour, salt, sugar, caraway seeds, and instant yeast. Whisk together.
Create a well in the center of the dry mixture. Pour in the warm water and olive oil. Mix until the dough begins to come together.
Transfer the dough onto a lightly floured surface and knead for about 10 minutes until smooth and elastic.
Place the kneaded dough in a greased bowl, cover, and let it rise in a warm place for about 1 to 2 hours, or until doubled in size.
After the first rise, punch down the dough gently. Shape it into a loaf by flattening slightly and rolling it up tightly.
Place the shaped loaf in a greased loaf pan or on a parchment-lined baking sheet. Cover and let rise for about 30 to 45 minutes.
Preheat your oven to 375°F (190°C).
Bake the loaf for 30 to 35 minutes, until golden brown and sounds hollow when tapped.
Remove from the oven and let it cool in the pan for 10 minutes, then transfer to a wire rack to cool completely.
Nutrition Facts
Recipe Reviews
- ★★★★★
Excellent recipe!
Leave a Reply
Your email address will not be published. Required fields are marked *


Excellent recipe!