
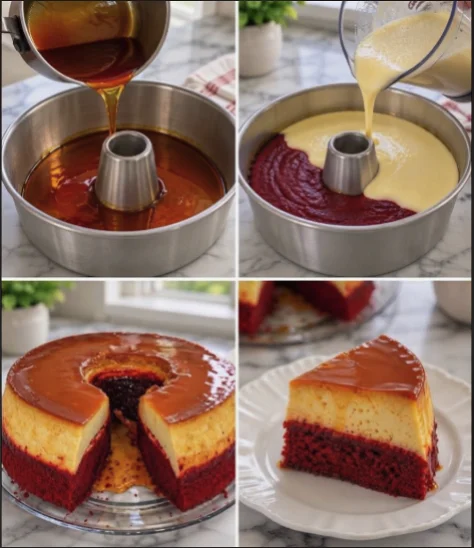
The Red Velvet Chocoflan is a stunning dessert that brings together two beloved treats: the rich, velvety texture of red velvet cake and the smooth, creamy consistency of flan. This unique layered dessert has captured the hearts of many, especially during festive occasions. Its vibrant red hue, coupled with a luscious layer of caramel flan, creates a visual feast that’s hard to resist. Originating from the Mexican tradition of chocoflan, this recipe has been embraced by dessert lovers worldwide, making it a delightful centerpiece for holiday gatherings and celebrations. The combination of flavors and textures in the Red Velvet Chocoflan is not only visually appealing but also offers a delightful contrast between the soft, moist cake and the silky flan, making it a memorable dessert for any occasion. The rich history of chocoflan, often referred to as “impossible cake” due to the way the layers form during baking, adds an element of curiosity and excitement to this dish, ensuring it’s always a conversation starter at any table. With its sumptuous balance of sweetness and the appealing visual layers, creating a Red Velvet Chocoflan at home can be both a rewarding challenge and a delightful experience for bakers of all skill levels.
Ingredients
- For the Red Velvet Cake:
- 2 cups all-purpose flour
- 1 ½ cups granulated sugar
- 1 teaspoon baking soda
- 1 teaspoon salt
- 1 cup vegetable oil
- 1 cup buttermilk, room temperature – this adds moisture and tanginess, enhancing the overall flavor. The acidity of the buttermilk also helps to react with the baking soda, contributing to the cake’s rise, resulting in a light and fluffy texture that’s essential for a perfect cake.
- 2 large eggs, room temperature – using eggs at room temperature helps them incorporate better into the batter. Room temperature eggs will emulsify more easily, resulting in a smoother batter that blends well with the other ingredients, ensuring even baking.
- 2 tablespoons cocoa powder – opt for high-quality Dutch-processed cocoa for a deeper flavor. This cocoa not only enhances the chocolatey aspect but also contributes to the cake’s rich color, ensuring a decadent taste that complements the red velvet.
- 1 teaspoon vanilla extract – pure vanilla extract enhances the flavor profile significantly, providing a warm, aromatic undertone that balances the sweetness of the cake and rounds out the overall taste.
- 1 tablespoon red food coloring – this not only gives the cake its signature color but also contributes to its moistness, ensuring that the cake remains vibrant even after baking. This vibrant hue is crucial to the aesthetic appeal of your Red Velvet Chocoflan.
- For the Chocoflan Layer:
- 1 can (14 ounces) sweetened condensed milk – this provides sweetness and a creamy texture to the flan, making it rich and indulgent, which is essential for achieving that luscious flan consistency that perfectly contrasts with the cake.
- 1 can (12 ounces) evaporated milk – the evaporated milk adds richness without being overly sweet, creating a perfect balance with the condensed milk. This combination is key to ensuring the flan layer is both smooth and satisfying.
- 3 large eggs – the eggs help set the flan, giving it a smooth consistency. Fresh eggs yield the best results, ensuring the flan is velvety and firm without being rubbery.
- 1 teaspoon vanilla extract – this adds a lovely aroma and depth of flavor to the flan layer, complementing the sweetness of the condensed milk and enhancing the overall dessert experience.
- 1 cup caramel sauce (store-bought or homemade) – homemade caramel can elevate the flavor; if using store-bought, ensure it’s a high-quality brand for the best results. A good caramel sauce will have a rich, buttery flavor that enhances the overall dessert, creating a delightful harmony of taste.
Steps / Instructions
- Preheat the Oven: Preheat your oven to 350°F (175°C). Prepare a Bundt pan by greasing it generously with non-stick spray or butter and then dusting it lightly with flour. This step is crucial as it prevents sticking and ensures the cake releases easily from the pan, allowing all the beautiful layers to show once inverted. Proper greasing is essential for achieving that flawless presentation.
- Make the Caramel Layer: Pour the caramel sauce into the bottom of the prepared Bundt pan. Set aside to allow it to settle while you prepare the cake batter. Make sure the caramel sauce is evenly spread to create a beautiful glaze once the cake is inverted, enhancing both flavor and presentation. Feel free to heat the caramel slightly for easier pouring.
- Prepare the Red Velvet Batter: In a large mixing bowl, sift together the flour, sugar, baking soda, salt, and cocoa powder. Sifting helps aerate the dry ingredients and ensures there are no lumps, contributing to a lighter cake texture. In another bowl, combine the vegetable oil, buttermilk, eggs, vanilla extract, and red food coloring. Mix until smooth and well combined, ensuring that the red food coloring is evenly distributed for that iconic hue. The mixture should be vibrant and creamy.
- Combine Mixtures: Gradually add the wet ingredients to the dry ingredients, mixing until just combined. Do not over-mix; a few lumps are acceptable as this will keep the cake light and fluffy. Use a spatula to scrape down the sides of the bowl to ensure everything is incorporated, ensuring a consistent batter with no dry patches.
- Prepare the Chocoflan Batter: In a blender, combine the sweetened condensed milk, evaporated milk, eggs, and vanilla extract. Blend until smooth and well combined. This step ensures that the flan layer is creamy and free of any egg lumps, which is essential for that smooth texture. Pouring the mixture into a blender also helps to integrate air, making it light.
- Layer the Batter: Pour the red velvet cake batter into the Bundt pan over the caramel layer. Then, carefully pour the chocoflan batter on top of the red velvet batter. The chocoflan will rise to the top during baking, creating a beautiful layered effect once inverted. Pour slowly to minimize mixing of the two layers, allowing each one to maintain its distinct flavor and texture.
- Bake: Place the Bundt pan in the center of the preheated oven and bake for 60-70 minutes, or until a toothpick inserted into the center comes out clean. The top should be firm and slightly springy to the touch. If the top begins to brown too quickly, you can cover it loosely with aluminum foil to prevent burning, ensuring even baking throughout. The aroma of the baking cake will fill your kitchen, creating anticipation!
- Cool: Once baked, remove the cake from the oven and allow it to cool in the pan for about 15 minutes. Then, carefully invert the cake onto a serving plate. Let it cool completely before slicing. This cooling period allows the caramel to set and prevents it from spilling out too much when served, creating perfect slices that showcase the beautiful layers of your Red Velvet Chocoflan.
- Serve: Drizzle additional caramel sauce over the top before serving for an extra touch of sweetness. This not only adds flavor but also enhances the presentation, making your Red Velvet Chocoflan even more enticing. You can also garnish with fresh berries or whipped cream for added texture and color, creating a stunning visual appeal that will impress your guests.
Tips & Tricks
- Ingredient Quality: Use high-quality cocoa powder and vanilla extract for the best flavor. Fresh ingredients yield the best results, and sourcing your ingredients from reputable brands can significantly enhance the taste of your Red Velvet Chocoflan. Organic or locally sourced ingredients often bring more vibrant flavors, making a noticeable difference in the final product.
- Make-Ahead Option: This dessert can be made a day in advance. Store it in the refrigerator, covered, until ready to serve. Allow it to come to room temperature before serving for optimal texture and flavor; chilling can help the flavors meld beautifully, making it an ideal make-ahead dessert for gatherings.
- Preventing Sinking: To help prevent the chocoflan layer from sinking, pour it slowly over the back of a spoon onto the red velvet batter. This gentle layering technique minimizes the disturbance of the cake layer below, allowing for distinct layers in your final presentation. Patience in this step results in a stunning visual outcome.
- Common Mistakes: Avoid over-mixing the cake batter, as this can lead to a dense cake. Also, ensure that your ingredients are at room temperature for even mixing, which helps to achieve a lighter texture in your Red Velvet Chocoflan. Additionally, be cautious not to open the oven door too early, as this can cause the cake to collapse. Taking care with these details will ensure a perfect dessert every time.
Conclusion
The Red Velvet Chocoflan is not just a dessert; it’s an experience that combines flavors and textures in a way that delights the senses. The process of creating this layered cake may seem intricate, but the joy it brings upon serving is absolutely worth it. Whether you’re celebrating a holiday, a birthday, or simply indulging in a special treat, this recipe is sure to impress. Don’t hesitate to share your experiences and thoughts after trying this delightful recipe! You can learn more about this topic.
Red Velvet Chocoflan
The Red Velvet Chocoflan is a stunning dessert that brings together two beloved treats: the rich, velvety texture of red velvet cake and the smooth, creamy consistency of flan. This unique layered dessert has captured the hearts of many, especially during festive occasions. Its vibrant red hue, coupled with a luscious layer of caramel flan, creates a visual feast that’s hard to resist.
Ingredients
- 2 cups all-purpose flour
- 1 ½ cups granulated sugar
- 1 teaspoon baking soda
- 1 teaspoon salt
- 1 cup vegetable oil
- 1 cup buttermilk, room temperature
- 2 large eggs, room temperature
- 2 tablespoons cocoa powder
- 1 teaspoon vanilla extract
- 1 tablespoon red food coloring
- 1 can (14 ounces) sweetened condensed milk
- 1 can (12 ounces) evaporated milk
- 3 large eggs
- 1 teaspoon vanilla extract
- 1 cup caramel sauce (store-bought or homemade)
Directions
Preheat your oven to 350°F (175°C). Prepare a Bundt pan by greasing it generously with non-stick spray or butter and then dusting it lightly with flour.
Pour the caramel sauce into the bottom of the prepared Bundt pan. Set aside to allow it to settle while you prepare the cake batter.
In a large mixing bowl, sift together the flour, sugar, baking soda, salt, and cocoa powder.
In another bowl, combine the vegetable oil, buttermilk, eggs, vanilla extract, and red food coloring. Mix until smooth and well combined.
Gradually add the wet ingredients to the dry ingredients, mixing until just combined.
In a blender, combine the sweetened condensed milk, evaporated milk, eggs, and vanilla extract. Blend until smooth.
Pour the red velvet cake batter into the Bundt pan over the caramel layer. Then, carefully pour the chocoflan batter on top.
Place the Bundt pan in the center of the preheated oven and bake for 60-70 minutes, or until a toothpick inserted into the center comes out clean.
Once baked, remove the cake from the oven and allow it to cool in the pan for about 15 minutes. Then, carefully invert the cake onto a serving plate and let it cool completely before slicing.
Drizzle additional caramel sauce over the top before serving.
Recipe Reviews
- ★★★★★
Excellent recipe!
Leave a Reply
Your email address will not be published. Required fields are marked *



Excellent recipe!