
Introduction
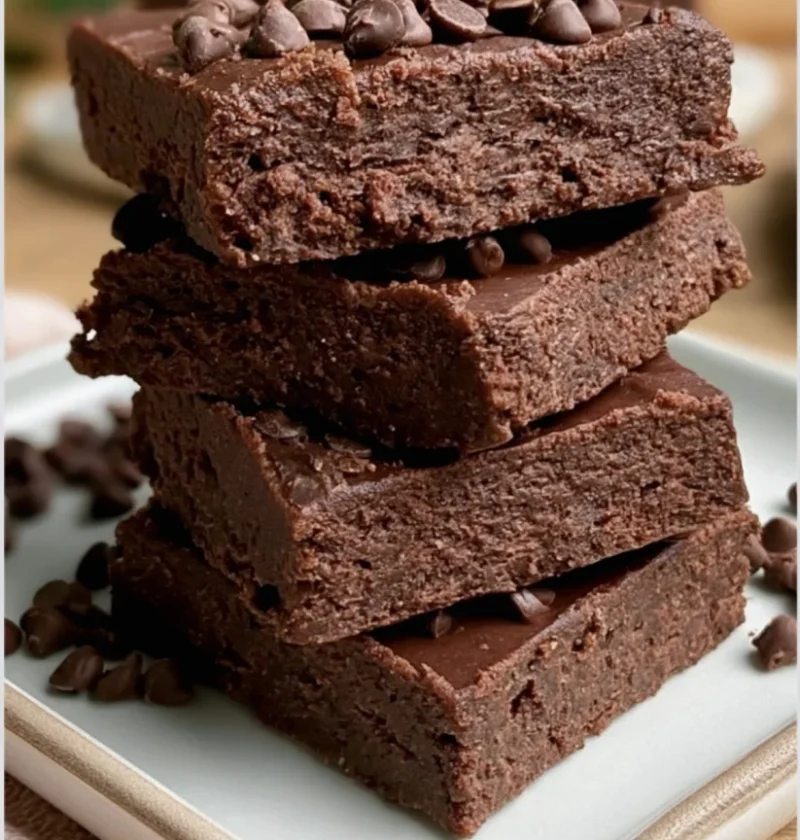
No-Bake Chocolate Protein Bars are the ultimate healthy snack that effortlessly combines taste and nutrition. Perfect for those bustling days when you need a quick pick-me-up or a post-workout boost, these bars are packed with protein and rich chocolate flavor. What makes this recipe truly special is its simplicity; you don’t even have to turn on the oven! Just mix the ingredients, press them into a pan, and let them chill. It’s a straightforward process that results in delicious, nutritious bars that satisfy cravings without any baking fuss. These bars are not only simple to make, but they also allow for creativity in tweaking flavors and textures to your liking. You can incorporate different flavorings, protein powders, and even mix-ins to tailor them to your preferences.
Moreover, making your own protein bars at home allows you to control the ingredients, ensuring that you’re enjoying a treat that’s not only tasty but also free from added sugars and artificial additives. This recipe is versatile, allowing you to customize it to fit your dietary preferences, whether you’re looking for vegan, gluten-free, or high-protein options. The satisfaction of creating your own healthy snacks can be immensely rewarding, and you’ll never have to settle for store-bought options again. This DIY approach also encourages you to experiment and discover what flavors work best for you, potentially leading to your new favorite snacks. So grab your mixing bowl, and let’s dive into creating these delectable No-Bake Chocolate Protein Bars! You can learn more about this topic and its background. Whether you’re an athlete looking for a post-workout snack or just someone who loves a sweet treat without the guilt, these bars have got you covered with both nutrition and flavor!
Ingredients
Dry Ingredients
- 1 cup rolled oats – these provide a hearty base and are a great source of fiber, promoting digestive health. You can choose old-fashioned oats for a chewy texture or quick oats for a finer consistency. Rolled oats are particularly beneficial as they retain their shape during mixing and chilling.
- 1/2 cup chocolate protein powder (choose your favorite brand) – look for a high-quality protein powder that fits your dietary needs, whether whey or plant-based. Brands with minimal additives and a good taste will make your bars even better, enhancing both flavor and nutritional content.
- 1/2 cup unsweetened cocoa powder – this adds robust chocolate flavor without unnecessary sugars. Opt for a premium brand to ensure deep, rich chocolate notes. The quality of cocoa powder can significantly impact the final taste, making a notable difference in the overall flavor profile.
- 1/4 cup ground flaxseed (optional for added nutrition) – flaxseeds are rich in omega-3 fatty acids and add a nice nutty flavor, enhancing the nutritional profile of your bars. They also serve as a binding agent, helping to hold everything together.
Wet Ingredients
- 1/2 cup natural peanut butter (or almond butter for a nut-free option) – ensure it’s a natural variety with minimal ingredients for the best health benefits. The creaminess of peanut butter helps bind the ingredients together. If you prefer almond butter, look for one without added sugars or oils for a healthier option.
- 1/4 cup honey or maple syrup (for a vegan version) – this acts as a binding agent and natural sweetener, giving the bars a delightful sweetness without refined sugars. Honey adds a distinct flavor, while maple syrup offers a unique maple taste that can complement the chocolate nicely.
- 1 teaspoon vanilla extract – enhances the overall flavor of the bars, adding warmth and depth. Use pure vanilla extract for the best flavor, as artificial versions may lack the complexity of real vanilla.
Toppings (optional)
- Chocolate chips (dairy-free for vegan options) – these can be melted and drizzled on top for a decadent finish, making your bars extra indulgent. Choose dark chocolate chips for a richer flavor or white chocolate for a sweeter contrast.
- Chopped nuts or seeds – sprinkle these on top for added crunch and flavor. Almonds, walnuts, or sunflower seeds are great choices that not only add texture but also boost the nutritional value of your bars.
- Shredded coconut – this can add a tropical twist and additional texture, giving a delightful chew to each bite. Toasted coconut can also enhance the flavor, providing a warm, nutty note that pairs well with chocolate.
For the best results, use high-quality ingredients. Opt for organic peanut butter and pure honey or maple syrup to enhance the flavor profile of your bars. Feel free to substitute ingredients based on your dietary needs; for instance, use a plant-based protein powder to create vegan protein bars or substitute honey with agave nectar to keep it vegan-friendly. Fresh and organic ingredients will not only elevate the taste but also assure you that the nutritional values are at their peak. Additionally, consider the importance of texture; using whole nuts or seeds can add a delightful crunch that complements the chewy oats. Check out our related guide for more tips on choosing the best ingredients to suit your taste and health goals. Always remember, the quality of your ingredients directly impacts the taste and texture of your No-Bake Chocolate Protein Bars.
Steps / Instructions
- In a large mixing bowl, combine the rolled oats, chocolate protein powder, cocoa powder, and ground flaxseed. Stir until evenly mixed, ensuring no clumps remain. Use a whisk or fork to break up any lumps and ensure an even distribution of dry ingredients. This initial step is crucial for achieving a uniform flavor throughout your bars.
- In a microwave-safe bowl, warm the peanut butter and honey (or maple syrup) together for about 30 seconds. This will make them easier to mix; a smoother texture helps in binding the ingredients together. Stir in the vanilla extract until fully incorporated, creating a homogeneous mixture that enhances the flavor. Be cautious not to overheat the mixture, as it can change the texture.
- Pour the wet mixture into the bowl with the dry ingredients. Use a spatula or your hands to combine everything thoroughly until the mixture is cohesive and sticky. You should be able to form it into a ball without it crumbling apart. If needed, adjust the consistency by adding a bit more honey or protein powder. Aim for a mixture that holds together well but is not overly wet.
- If you’re using any toppings like chocolate chips or nuts, fold them into the mixture now, ensuring they are evenly distributed throughout. This step adds extra texture and flavor to each bar, making every bite enjoyable and satisfying.
- Line an 8×8 inch baking dish with parchment paper for easy removal. Transfer the mixture into the dish and press it down firmly with your hands or the back of a spatula to create an even layer. A compact layer helps the bars hold together better and ensures they slice easily after chilling. Press firmly enough to eliminate air pockets for a denser bar.
- Cover the dish with plastic wrap or foil and place it in the refrigerator for at least 1 hour to firm up. This step is crucial as it allows the bars to set properly and develop the right texture. The longer you let them chill, the easier they will be to cut.
- Once chilled, remove the bars from the dish using the parchment paper. Cut them into squares or rectangles, depending on your preference. A sharp knife works best for clean edges, giving a polished look to your bars. You can also wrap individual bars in plastic wrap for easy grab-and-go snacks later.
Tips & Tricks
To achieve the best results with your No-Bake Chocolate Protein Bars, consider the following tips:
- Storage: Keep your bars stored in an airtight container in the refrigerator for up to a week. They can also be frozen for longer storage; just separate individual bars with parchment paper to prevent sticking. Thaw them in the fridge for a few hours before enjoying, ensuring they maintain their texture. When stored properly, these bars can last for months in the freezer without losing flavor.
- Make-Ahead: These bars are perfect for meal prep. Make a batch at the beginning of the week to ensure you always have a healthy snack on hand. This saves time during busy weekdays and helps in maintaining healthy eating habits. They’re also great for grabbing on the go! Consider doubling the recipe to have a larger supply ready for those busy days.
- Avoid Common Mistakes: Ensure that the mixture is well-combined and sticky enough to hold together. Adjust the amount of wet ingredients if the mixture seems too dry. If too sticky, you can add a bit more dry ingredients, but be careful not to overdo it to maintain the right consistency. Testing the mixture with your hands can be a great way to check if it’s ready for pressing into the dish.
- Pro Techniques: For an extra touch, consider drizzling melted dark chocolate over the tops of the bars before chilling for added richness. This not only enhances the flavor but also gives a beautiful presentation! Additionally, experimenting with spices like cinnamon or nutmeg can introduce a delightful warmth to your bars. You might also try adding a pinch of sea salt on top for a sweet and salty flavor contrast that elevates the entire experience of your No-Bake Chocolate Protein Bars.
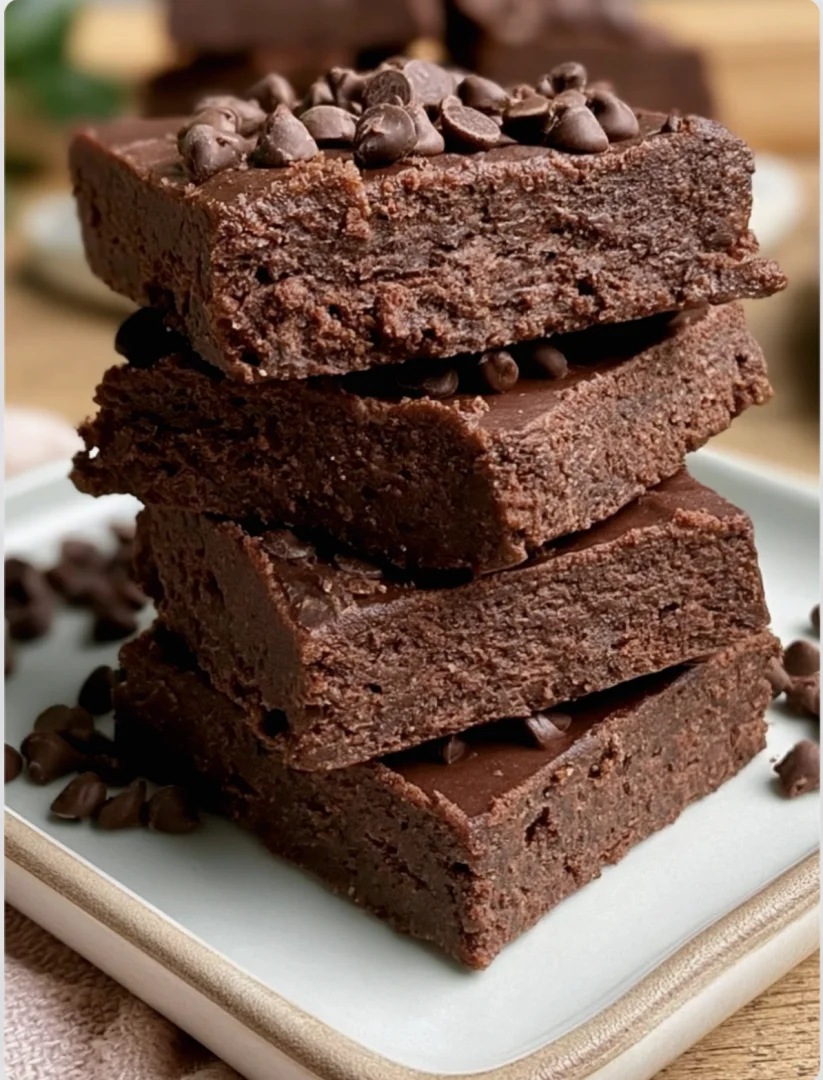
No-Bake Chocolate Protein Bars
No-Bake Chocolate Protein Bars are the ultimate healthy snack that effortlessly combines taste and nutrition. Perfect for those bustling days when you need a quick pick-me-up or a post-workout boost, these bars are packed with protein and rich chocolate flavor.
Ingredients
- 1 cup rolled oats
- 1/2 cup chocolate protein powder
- 1/2 cup unsweetened cocoa powder
- 1/4 cup ground flaxseed (optional)
- 1/2 cup natural peanut butter (or almond butter)
- 1/4 cup honey or maple syrup
- 1 teaspoon vanilla extract
- Chocolate chips (optional)
- Chopped nuts or seeds (optional)
- Shredded coconut (optional)
Directions
In a large mixing bowl, combine the rolled oats, chocolate protein powder, cocoa powder, and ground flaxseed. Stir until evenly mixed, ensuring no clumps remain.
In a microwave-safe bowl, warm the peanut butter and honey (or maple syrup) together for about 30 seconds. Stir in the vanilla extract until fully incorporated.
Pour the wet mixture into the bowl with the dry ingredients. Use a spatula or your hands to combine everything thoroughly until the mixture is cohesive and sticky.
If you’re using any toppings like chocolate chips or nuts, fold them into the mixture now.
Line an 8x8 inch baking dish with parchment paper. Transfer the mixture into the dish and press it down firmly to create an even layer.
Cover the dish with plastic wrap or foil and place it in the refrigerator for at least 1 hour to firm up.
Once chilled, remove the bars from the dish using the parchment paper. Cut them into squares or rectangles.
Recipe Reviews
- ★★★★★
Excellent recipe!
Leave a Reply
Your email address will not be published. Required fields are marked *


Excellent recipe!