
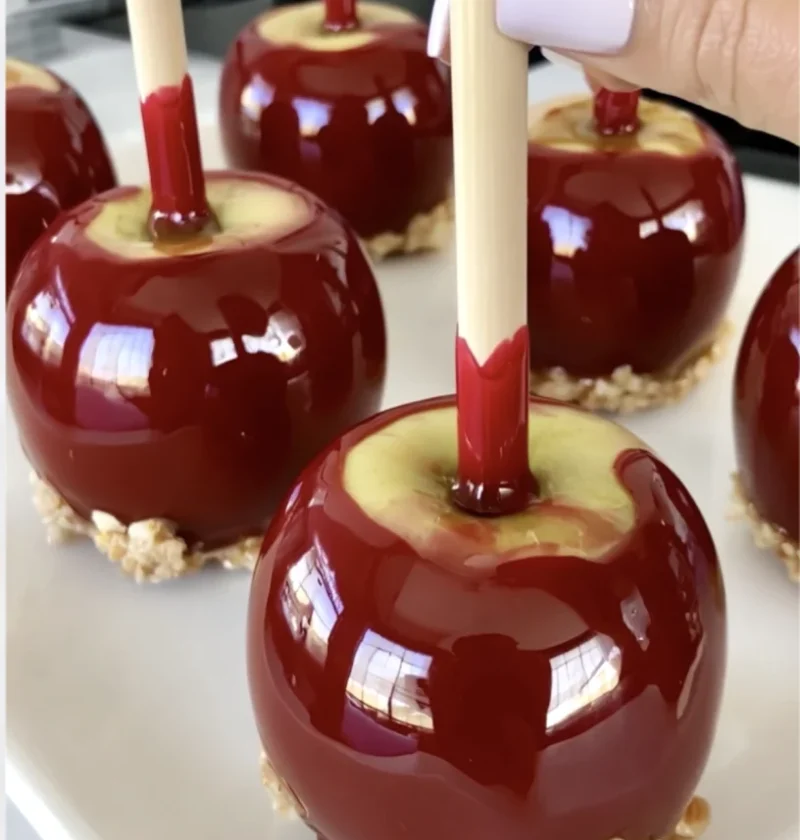
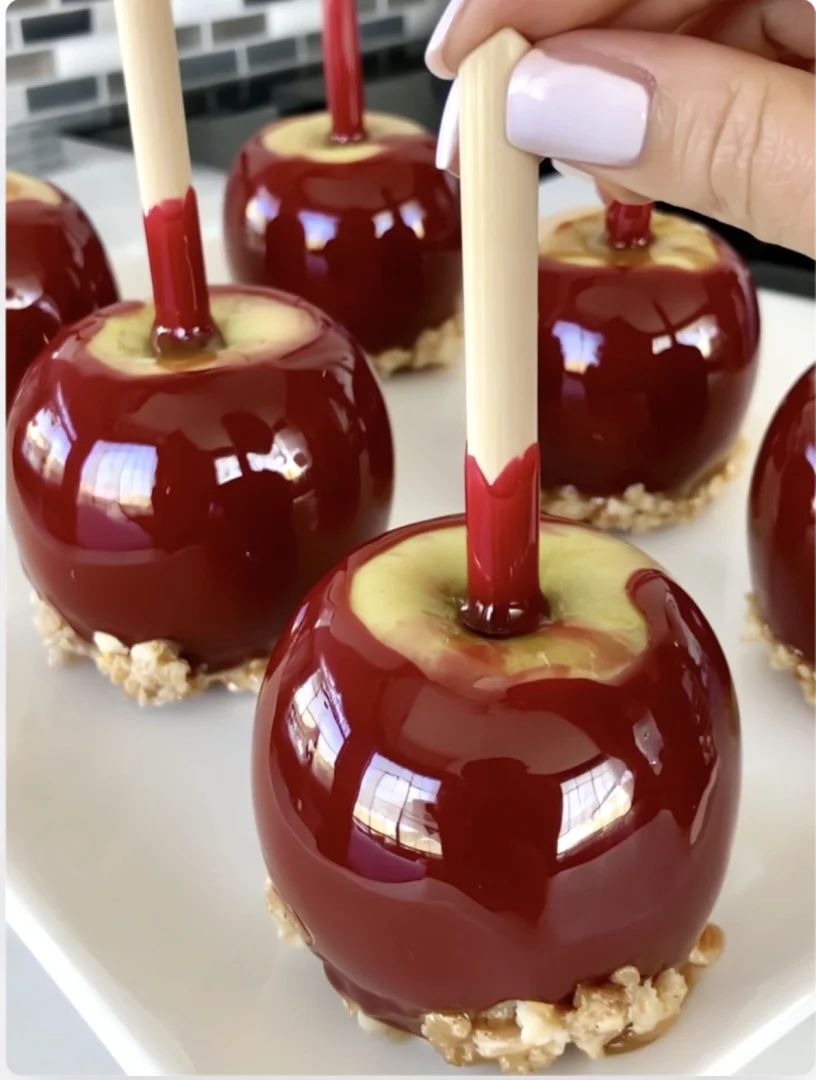
Homemade Caramel Apples are a delightful treat that combines the crispness of fresh apples with the rich, buttery goodness of caramel. These sweet confections evoke nostalgia, often reminding us of crisp autumn days, trips to the orchard, and festive occasions like Halloween. Caramel apples have been a popular fall dessert for centuries, with origins tracing back to the 1950s when candy makers began dipping apples in homemade caramel for a fun, sweet twist. Their iconic sweet-and-sour flavor profile makes them a favorite among kids and adults alike, making them an ideal choice for gatherings and celebrations. Whether you’re looking for a simple dessert to enjoy after dinner or a fun activity to share with your children, making homemade caramel apples is an experience as enjoyable as the treat itself. The process is not only about creating a delicious snack but also about making memories in the kitchen that can be cherished for years to come. The joy of crafting these treats can bring families together, sparking creativity and laughter as everyone gets involved in the process. There’s something magical about transforming simple ingredients into a beloved classic.
Ingredients
- For the Caramel:
- 2 cups granulated sugar
- 1/2 cup unsalted butter (1 stick)
- 1 cup heavy cream
- 1 teaspoon vanilla extract
- 1/4 teaspoon salt
- Tip: For a richer flavor, consider using a high-quality vanilla extract or even a touch of maple syrup for a unique twist. You can also experiment with flavored extracts like almond or orange for a different flavor profile. The choice of butter can also affect the flavor; using a European-style butter will give a creamier texture and more depth.
- For the Apples:
- 6 medium to large apples (Granny Smith, Honeycrisp, or Fuji work well)
- 6 wooden craft sticks or skewers
- Note: Choose apples that are firm and crisp to ensure they hold up well when dipped in the caramel. Organic apples are recommended for their flavor and because they are typically free from wax. Look for apples that have a bright color and feel heavy for their size, indicating juiciness and freshness. Feel free to mix varieties for an interesting taste experience—combining sweet and tart apples can create a delightful contrast.
- Toppings (optional):
- Chopped nuts (such as pecans or almonds)
- Chocolate drizzle (melted chocolate chips)
- Sprinkles
- Sea salt for garnish
- Crushed cookies (like Oreos or graham crackers) for an added crunch and flavor
- Suggestion: Experiment with different toppings to create your own signature caramel apple! Consider adding coconut flakes, toffee bits, or even crushed pretzels for a sweet and salty combination. You can also try drizzling with white chocolate or colored melts to enhance the visual appeal.
Note: When selecting apples, choose firm varieties for the best results. Avoid soft or mealy apples, as they won’t hold up well when dipped in caramel. You can learn more about this topic. To enhance the apple flavor, try soaking them in water with lemon juice for a few minutes before dipping; this will clean them and add a slight tartness that complements the sweetness of the caramel. Additionally, consider chilling your apples in the refrigerator for about an hour before dipping to make them even crisper. A cold apple will also help the caramel set more quickly, leading to a better texture.
Steps / Instructions
- Prepare the Apples: Wash and thoroughly dry the apples. Remove any wax coating by scrubbing gently with a clean cloth or sponge. This step is crucial as it allows the caramel to adhere properly. Insert a wooden stick into the stem end of each apple, ensuring it is secure. The stick should go at least halfway into the apple for stability during dipping. You can even soak the wooden sticks in warm water for a few minutes to make inserting them easier and prevent breaking the apple. Make sure not to push the stick through the bottom, as this can cause the apple to leak juice.
- Make the Caramel: In a medium saucepan, combine the granulated sugar and butter over medium heat. Stir constantly until the mixture is smooth and the sugar has dissolved, which will take about 3-5 minutes. Keep an eye on it to prevent burning; if it starts to brown, reduce the heat. It’s important to create a smooth, uniform mixture for the best caramel consistency. The butter should be fully melted before adding any other ingredients to ensure even mixing.
- Add Cream: Slowly pour in the heavy cream while continuing to stir. Be cautious as it may bubble vigorously, so it’s essential to pour slowly. Continue cooking for about 5-7 minutes until the mixture reaches a rich golden color and thickens slightly. The caramel should coat the back of a spoon when ready. If you want a deeper flavor, you could also add a pinch of cinnamon or nutmeg at this stage. This addition not only enhances flavor but also adds a warm, aromatic quality to the caramel.
- Add Flavorings: Remove the saucepan from heat. Stir in the vanilla extract and salt until fully incorporated. This is the moment when the flavor truly comes alive, transforming the caramel into an indulgent treat. Make sure to taste your caramel at this point; you can adjust the flavor with more vanilla or a sprinkle of sea salt if desired. A touch of bourbon or whiskey can also be added for an adult version of this classic treat.
- Dip the Apples: Let the caramel cool for a couple of minutes until it thickens slightly. Dip each apple into the caramel, turning to coat it evenly. Ensure the apple is fully submerged, but do not let it sit too long in the caramel. Allow excess caramel to drip back into the saucepan, ensuring a nice, thick coat. For an extra thick layer of caramel, you can repeat the dipping process after the first coat has set slightly. Hold the apple upside down for a few moments to allow the excess caramel to drip off.
- Coat with Toppings: Before the caramel sets, roll the dipped apples in your choice of toppings, if desired. Place them upright on a parchment-lined baking sheet to cool and set. Consider using a different topping for each apple to create a variety. This is also a great opportunity to get creative with designs, like making a half-dipped apple with a chocolate drizzle on one side. If using chocolate, allow the caramel to cool for a few minutes before adding the chocolate drizzle to keep the layers distinct.
- Let Set: Allow the caramel apples to sit at room temperature for about 30 minutes to an hour, or until the caramel hardens. You can also refrigerate them for quicker setting, but keep in mind that refrigeration may affect texture, making them a bit sticky. Once set, they can be enjoyed immediately or stored for later! For the best flavor and texture, it’s advisable to consume them within a few days.
Tips & Tricks
To ensure your caramel apples turn out perfectly, follow these tips: Check out our related guide for more tips. Remember, practice makes perfect, and every batch will teach you something new! Don’t hesitate to involve kids or friends in the process, as it’s a fantastic way to bond and create fun memories. You can even set up a caramel apple bar with different toppings and flavors, allowing everyone to customize their own treat.
- Use a Candy Thermometer: For precision, monitor the temperature of the caramel carefully. It should reach about 240°F (soft-ball stage) for the best consistency. If you don’t have a thermometer, drop a small amount of caramel into cold water; if it forms a soft ball, it’s ready. This tip is crucial for achieving the perfect texture—too hot and it will be brittle, too cool and it won’t coat the apples properly. Make sure to check the temperature regularly as cooking caramel can be tricky.
- Don’t Rush the Cooling: Allow the caramel to cool slightly before dipping to avoid it sliding off the apples. Waiting can help develop a thicker outer layer, creating that perfect bite. If the caramel is too hot when you dip, it can melt any added toppings. A good indicator that the caramel is ready for dipping is when it clings to a spoon without dripping off too quickly.
- Storage: Store the finished caramel apples in a cool, dry place, ideally in a single layer, to prevent them from sticking together. Wrapping them individually in wax paper can also help preserve their shape and flavor. You can also place them in an airtight container lined with parchment paper. Be cautious not to stack them, as the caramel can remain sticky and may stick to each other.
- Make Ahead: You can prepare the caramel in advance and store it in the refrigerator. Simply reheat gently before dipping the apples, ensuring it returns to the right consistency. This is a great way to save time if you’re planning to make a large batch for a party or event. Having the caramel ready to go will streamline the process, allowing you to focus on the fun part—dipping and decorating!
- Watch for Common Mistakes: Avoid using apples that are too soft, as they can break apart when dipped. Also, ensure your apples are completely dry to help the caramel adhere better. If your caramel is too thin, it may not cling well, so take care to follow the cooking times accurately. A little patience during the process will yield the best results, and practice will lead to mastery of these delicious Homemade Caramel Apples.
Homemade Caramel Apples
Homemade Caramel Apples are a delightful treat that combines the crispness of fresh apples with the rich, buttery goodness of caramel. These sweet confections evoke nostalgia, often reminding us of crisp autumn days, trips to the orchard, and festive occasions like Halloween.
Ingredients
- 2 cups granulated sugar
- 1/2 cup unsalted butter (1 stick)
- 1 cup heavy cream
- 1 teaspoon vanilla extract
- 1/4 teaspoon salt
- 6 medium to large apples (Granny Smith, Honeycrisp, or Fuji work well)
- 6 wooden craft sticks or skewers
- Chopped nuts (such as pecans or almonds) (optional)
- Chocolate drizzle (melted chocolate chips) (optional)
- Sprinkles (optional)
- Sea salt for garnish (optional)
- Crushed cookies (like Oreos or graham crackers) (optional)
Directions
Wash and thoroughly dry the apples. Remove any wax coating by scrubbing gently with a clean cloth or sponge. Insert a wooden stick into the stem end of each apple, ensuring it is secure.
In a medium saucepan, combine the granulated sugar and butter over medium heat. Stir constantly until the mixture is smooth and the sugar has dissolved, which will take about 3-5 minutes.
Slowly pour in the heavy cream while continuing to stir. Continue cooking for about 5-7 minutes until the mixture reaches a rich golden color and thickens slightly.
Remove the saucepan from heat. Stir in the vanilla extract and salt until fully incorporated.
Let the caramel cool for a couple of minutes until it thickens slightly. Dip each apple into the caramel, turning to coat it evenly. Allow excess caramel to drip back into the saucepan.
Before the caramel sets, roll the dipped apples in your choice of toppings, if desired. Place them upright on a parchment-lined baking sheet to cool and set.
Allow the caramel apples to sit at room temperature for about 30 minutes to an hour, or until the caramel hardens.
Recipe Reviews
- ★★★★★
Excellent recipe!
Leave a Reply
Your email address will not be published. Required fields are marked *


Excellent recipe!