
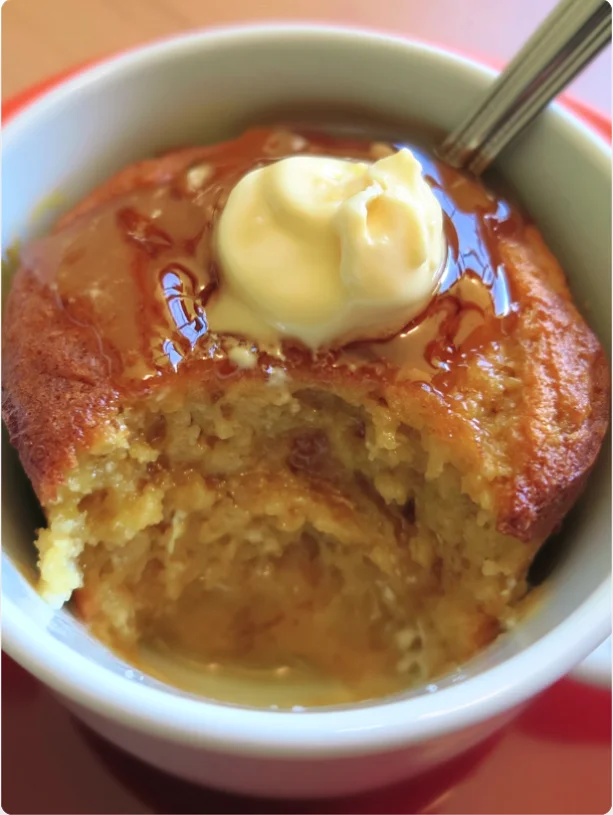
If you’re in the mood for something sweet but don’t want to spend hours in the kitchen, the 5-Minute Honey Mug Cake is your perfect solution. This delightful dessert not only satisfies your sweet tooth but also allows you to whip up a fluffy, soft cake in mere minutes using a microwave. The beauty of this cake lies in its simplicity and speed; in just five minutes, you can indulge in a homemade treat. With its honey-infused flavor, the cake is moist and tender, making it a wonderful quick treat for one. Perfect for those late-night cravings or as a quick dessert after dinner, this recipe is a testament to how easy it can be to enjoy homemade sweets, even when you’re short on time. The simplicity of the preparation and the minimal cleanup required make this recipe especially appealing for busy individuals or those just beginning their baking journey. Additionally, the sweet aroma that fills your kitchen as the cake cooks is an added bonus that enhances the overall experience, making it not just a dessert but a moment of joy. This quick indulgence has become a favorite in many households, proving that dessert doesn’t have to be a lengthy affair.
Ingredients
Gather the following ingredients to make your 5-Minute Honey Mug Cake. The list is organized into dry and wet ingredients for your convenience. You can learn more about this topic and explore the origins of mug cakes, which have gained popularity for their convenience and adaptability. When selecting your ingredients, consider quality for the best results, as they significantly influence the flavor and texture of your cake.
- Dry Ingredients:
- 4 tablespoons all-purpose flour: This forms the base of your cake and provides structure. If you’re looking to switch it up, whole wheat flour can also work, adding additional nutrients and a slightly nutty flavor. For a gluten-free version, consider using almond flour or a gluten-free all-purpose blend. Always sift your flour for a lighter cake.
- 2 tablespoons granulated sugar: This sweetens the cake and contributes to its soft texture. Consider adjusting the sweetness to your taste, especially if you’re using very sweet honey. For a lower-calorie option, you might try stevia or monk fruit sweetener in the same quantity. Sugar not only sweetens but also aids in creating that delicate crumb.
- 1/8 teaspoon baking powder: Essential for providing lift and creating that fluffy texture. Ensure it’s fresh for the best results, as expired baking powder can affect the rise and texture, leading to a denser cake than desired. Baking powder is crucial for achieving that perfect, light cake.
- Pinch of salt: A small amount enhances flavor and balances the sweetness of the cake. Don’t skip this step; it’s crucial for elevating the overall flavor profile. Salt is a flavor enhancer that helps to deepen the sweetness, making your cake taste even better.
- Wet Ingredients:
- 3 tablespoons milk (or a dairy-free alternative): This adds moisture to the batter. Almond milk, soy milk, or oat milk are great substitutes that can also add their unique flavors, making your mug cake even more delicious and personalized. Choose unsweetened versions to maintain control over the sweetness.
- 1 tablespoon vegetable oil (or melted butter): Oil keeps the cake moist, while butter can impart a richer flavor. You can also use coconut oil for a hint of tropical taste, or even flavored oils like hazelnut for a unique twist. The fat content helps in achieving that tender crumb, which is essential for a pleasing texture.
- 1 tablespoon honey: The star ingredient! Honey not only sweetens but also adds a unique depth of flavor. For variations, different types of honey, such as lavender or clover, can change the taste profile significantly, making each mug cake a different experience. Honey adds moisture and richness, enhancing the overall cake experience.
- 1/4 teaspoon vanilla extract: This complements the sweetness and rounds out the flavors. Using pure vanilla extract is recommended for the best aroma and taste; avoid imitation vanilla for optimal results. The vanilla enhances the honey, creating a beautifully aromatic dessert.
Note: For a richer flavor, consider using honey that is raw and organic, which can provide a more robust taste. If you prefer a healthier version, you can swap granulated sugar for coconut sugar or a sugar substitute, which can offer a lower glycemic index. Check out our related guide for more tips on ingredient choices that can enhance your baking experience. Choosing high-quality ingredients can significantly impact the final taste and texture of your mug cake, making it all the more enjoyable. Always measure accurately for consistent results, as even slight variations can affect the final product.
Steps / Instructions
- In a microwave-safe mug, combine the dry ingredients: flour, sugar, baking powder, and salt. Whisk them together with a fork until well mixed, ensuring there are no clumps. This is a crucial step, as unevenly mixed dry ingredients can lead to inconsistencies in texture, affecting the overall quality of your 5-Minute Honey Mug Cake. A well-mixed dry base is essential for a uniform rise.
- Add the wet ingredients: milk, vegetable oil, honey, and vanilla extract to the mug. Stir until the mixture is smooth and free of lumps. Make sure to scrape the bottom and sides for a uniform batter. This mixture should be thick yet pourable, resembling a pancake batter consistency. The smoother the batter, the better your cake will rise and cook. Pay special attention to any remaining flour pockets, as they can affect texture.
- Microwave the mug cake on high for 1 minute and 30 seconds. Cooking times may vary based on your microwave’s wattage, so start checking at 1 minute for doneness. The cake should rise and look slightly firm to the touch; it will continue to cook from residual heat after you remove it from the microwave. If the top is still wet or jiggly, add additional 10-second intervals until done. Remember, it’s better to slightly undercook than overcook to maintain that tender texture. Keep an eye on it—microwave power can vary greatly.
- Let the mug cake cool for a minute before enjoying. It will be hot, and the cooling process allows the flavors to set in better. You can also enjoy it directly from the mug, or carefully turn it out onto a plate if you prefer a more traditional presentation. A light dusting of powdered sugar or a drizzle of honey on top can enhance its aesthetic appeal. For an extra touch, consider adding a sprinkle of cinnamon for warmth.
Tips & Tricks
To ensure a successful 5-Minute Honey Mug Cake, here are some expert tips:
- Use a large mug: This cake rises during cooking, so choose a mug that can hold at least 12 ounces. Using a smaller mug may cause the cake to overflow, creating a mess in your microwave, which can be a hassle to clean up. Opting for a slightly larger mug can give the cake room to expand properly.
- Don’t overcook: Overcooking can lead to a rubbery texture. If in doubt, undercook slightly as the cake continues to cook in its mug once removed from the microwave. Keep an eye on it as it cooks to gauge the perfect timing, ensuring that you achieve a fluffy, delightful cake. The cake should be set in the center with a slightly moist texture for optimal enjoyment.
- Customize your cake: Feel free to add chocolate chips, nuts, or a sprinkle of cinnamon before microwaving for extra flavor. You could even fold in some fruit like blueberries or sliced bananas for a fruity twist, making each mug cake uniquely yours. Don’t be afraid to experiment; this recipe is versatile!
- Storage: If you have leftovers (though unlikely due to its deliciousness), store the mug cake covered in the fridge for up to 2 days. Reheat in the microwave for about 10-15 seconds before enjoying again. It’s great for a quick breakfast or a late-night snack when you need something sweet. Ensure it’s in an airtight container to maintain moisture.
- Experiment with toppings: After cooling, top your mug cake with whipped cream, a drizzle of chocolate sauce, or a dollop of yogurt to elevate the dessert experience further. Fresh fruits, such as strawberries or raspberries, also pair beautifully and add a refreshing contrast. Toppings can transform your mug cake from simple to sensational!
5-Minute Honey Mug Cake
A quick and easy dessert that can be made in the microwave, perfect for satisfying sweet cravings in just five minutes.
Ingredients
- 4 tablespoons all-purpose flour
- 2 tablespoons granulated sugar
- 1/8 teaspoon baking powder
- Pinch of salt
- 3 tablespoons milk (or dairy-free alternative)
- 1 tablespoon vegetable oil (or melted butter)
- 1 tablespoon honey
- 1/4 teaspoon vanilla extract
Directions
In a microwave-safe mug, combine the dry ingredients: flour, sugar, baking powder, and salt. Whisk them together with a fork until well mixed.
Add the wet ingredients: milk, vegetable oil, honey, and vanilla extract to the mug. Stir until the mixture is smooth and free of lumps.
Microwave the mug cake on high for 1 minute and 30 seconds. Cooking times may vary based on your microwave's wattage, so start checking at 1 minute for doneness.
Let the mug cake cool for a minute before enjoying.
Recipe Reviews
- ★★★★★
Excellent recipe!
Leave a Reply
Your email address will not be published. Required fields are marked *


Excellent recipe!