
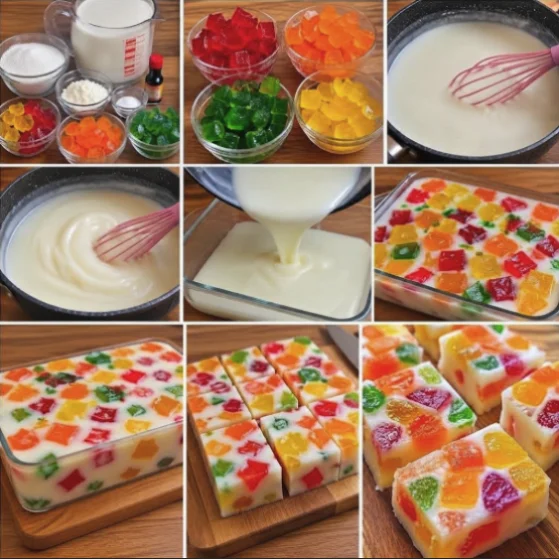
When it comes to delightful desserts, few things can match the charm and creativity of Colorful Milk Jelly Squares. This vibrant treat is not only visually stunning but is also a crowd-pleaser, making it perfect for gatherings, celebrations, or simply as a fun snack. Drawing from the rich tradition of Asian dessert recipes, this milk jelly dessert is light, refreshing, and highly customizable. The combination of creamy milk and gelatin allows for a delightful texture that is both smooth and quivery, while the addition of colorful layers makes each bite an experience. The visual appeal of the jelly, with its bright colors contrasting against the white milk base, creates an inviting dessert that beckons you to take a bite. Whether you’re introducing this dish to your family or showcasing it at a party, Colorful Milk Jelly Squares will certainly steal the show. These delightful squares not only offer a festive touch to any dessert table but also encourage creativity in how you choose to flavor and color each layer, truly reflecting your personal taste.
Ingredients
- For the Jelly Layers:
- 4 cups of milk (whole or coconut milk for a twist) – Whole milk will give a richer flavor, while coconut milk adds a tropical twist, enhancing the overall taste of your Colorful Milk Jelly Squares. For a lighter alternative, consider using almond or oat milk as well.
- 1 cup of sugar – Adjust this amount based on your sweetness preference; you can experiment with less sugar or opt for sugar substitutes like stevia or erythritol to make the dessert more health-conscious.
- 1 tablespoon of vanilla extract – This adds a lovely aromatic flavor that complements the milk beautifully, enriching the overall depth of the dessert. You can also use almond extract for a different aromatic profile.
- 4 tablespoons of gelatin powder (or vegetarian gelatin alternatives) – Ensure you are using gelatin that is unflavored to maintain the color and taste of the layers. For a vegetarian option, agar-agar can be used, but be sure to follow the package instructions for proper gelling.
- 1 cup of fruit juice (e.g., mango, strawberry, or any flavor you prefer) – Freshly squeezed juices offer the best flavor, but store-bought juice works well too. Just ensure it’s pure juice without added sugars for optimal taste. You can also experiment with herbal infusions like hibiscus for a unique flavor.
- 1/4 cup of water (for blooming the gelatin) – Blooming the gelatin is a critical step to achieve the perfect texture. This step ensures that the gelatin will dissolve smoothly without any lumps.
- For Garnish:
- Assorted fresh fruits (e.g., diced mango, kiwi, or berries) – These not only enhance the aesthetic but also add freshness and texture to the dessert. Feel free to mix fruits for a more colorful topping, incorporating seasonal fruits for added variety.
- Mint leaves for decoration (optional) – Fresh mint leaves can add a pop of color and a hint of coolness to each serving, balancing the sweetness of the jelly nicely. You may also use edible flowers for an elegant touch.
Note: Using high-quality ingredients will elevate your dish, especially the milk and fruit juices. Feel free to substitute the sugar with honey or agave syrup for a healthier version. You can learn more about this topic. Choosing organic ingredients can also enhance the flavors and make your dessert even more enjoyable.
Steps / Instructions
- Start by blooming the gelatin: In a small bowl, combine 4 tablespoons of gelatin powder with 1/4 cup of water. Let it sit for about 5-10 minutes until it becomes spongy. This step is crucial as it ensures the gelatin activates properly, allowing it to incorporate smoothly into your mixtures later.
- In a saucepan over medium heat, combine 2 cups of milk and 1/2 cup of sugar. Stir gently until the sugar dissolves and the mixture is warm, but do not let it boil. Watching the temperature is key; too high can alter the gelatin’s effectiveness and texture, so keep an eye on it.
- Remove the saucepan from the heat and add the bloomed gelatin. Stir until the gelatin is completely dissolved. This should take just a minute or two; look for a clear and smooth mixture. Ensure no granules remain to keep the texture silky.
- Stir in 1 tablespoon of vanilla extract for flavor. This forms your first layer of the jelly, adding a fragrant vanilla aroma that will enrich the overall dessert. This layer serves as the base, setting the stage for the colorful layers to come.
- Pour the first layer into a square or rectangular dish. Ensure it’s evenly spread out. Refrigerate for about 30-45 minutes, or until it sets. To check if it’s set, gently nudge the dish; it should feel firm to the touch. You can also lightly press the center for a more accurate check.
- In the meantime, prepare your second layer: In another saucepan, combine 2 cups of the fruit juice of your choice with the remaining 1/2 cup of sugar over medium heat. Stir until fully dissolved, ensuring the sugar integrates completely into the juice. If using sweeter juices like grape, you may want to reduce the sugar amount.
- Once the juice mixture is warm, add the bloomed gelatin (if using powdered gelatin) and stir until dissolved. This creates the second layer that will contrast beautifully with the milk base, adding a vibrant color that catches the eye.
- After the first layer has set, carefully pour the fruit juice mixture over the top. Use a spoon to help guide it if needed, which will prevent the two layers from mixing. Take your time during this step for the best visual separation.
- Return the dish to the refrigerator and let it set for another 30-45 minutes. This wait is essential for the jelly to firm up and hold its structure, making the subsequent layers easier to add.
- Repeat the layering process with different colors and flavors until the dish is filled, ensuring that each layer is fully set before adding the next one. This is what gives the Colorful Milk Jelly Squares their signature look and taste, showcasing a beautiful spectrum of colors.
- Once all layers are complete and set, remove the dish from the refrigerator. Cut the jelly into squares with a sharp knife for clean edges. You can also try using a cookie cutter for fun shapes if desired, adding an extra flair to your presentation.
- Garnish with fresh fruits and mint leaves for an appealing presentation. The addition of toppings adds a fresh element and makes the dish even more inviting, enhancing both the flavor and aesthetic appeal.
Tips & Tricks
To achieve the best results with your Colorful Milk Jelly Squares, consider the following tips: Check out our related guide for more tips and tricks to elevate your dessert-making experience.
- Ensure Layers Set Properly: It’s crucial to allow each layer to set completely before adding the next. This will prevent the layers from mixing and maintain the vibrant separation. Patience is key in this process to achieve the desired look, so plan accordingly.
- Experiment with Flavors: The fruit juices can be mixed and matched. Try tropical flavors like pineapple or guava, or even create a mixed fruit jelly. Adding herbs like basil to fruit juices can add an unexpected twist that surprises the palate.
- Make Ahead: This dessert can be prepared a day in advance, making it perfect for busy days or festive occasions. The flavors will deepen and the jelly will firm up nicely overnight, often enhancing the overall taste.
- Storage: Store the jelly squares in an airtight container in the refrigerator for up to a week. The texture is best when enjoyed fresh, but it can last for several days. If the jelly starts to sweat, it might be a sign that it’s time to enjoy it! Keep it chilled until serving for the best experience.
- Avoid Common Mistakes: Make sure your gelatin is fully dissolved in hot liquid to prevent a grainy texture in the jelly. Also, avoid boiling the mixture after adding the gelatin, as this can weaken its gelling ability. It’s important to keep an eye on the temperature here, as it can affect the final product.
Colorful Milk Jelly Squares
This vibrant treat is not only visually stunning but is also a crowd-pleaser, making it perfect for gatherings, celebrations, or simply as a fun snack. Drawing from the rich tradition of Asian dessert recipes, this milk jelly dessert is light, refreshing, and highly customizable.
Ingredients
- 4 cups of milk (whole or coconut milk)
- 1 cup of sugar
- 1 tablespoon of vanilla extract
- 4 tablespoons of gelatin powder (or vegetarian gelatin alternatives)
- 1 cup of fruit juice (e.g., mango, strawberry, or any flavor you prefer)
- 1/4 cup of water (for blooming the gelatin)
- Assorted fresh fruits (e.g., diced mango, kiwi, or berries) for garnish
- Mint leaves for decoration (optional)
Directions
Start by blooming the gelatin: In a small bowl, combine 4 tablespoons of gelatin powder with 1/4 cup of water. Let it sit for about 5-10 minutes until it becomes spongy.
In a saucepan over medium heat, combine 2 cups of milk and 1/2 cup of sugar. Stir gently until the sugar dissolves and the mixture is warm, but do not let it boil.
Remove the saucepan from the heat and add the bloomed gelatin. Stir until the gelatin is completely dissolved.
Stir in 1 tablespoon of vanilla extract for flavor.
Pour the first layer into a square or rectangular dish and refrigerate for about 30-45 minutes, or until it sets.
In the meantime, prepare your second layer: In another saucepan, combine 2 cups of the fruit juice of your choice with the remaining 1/2 cup of sugar over medium heat. Stir until fully dissolved.
Once the juice mixture is warm, add the bloomed gelatin and stir until dissolved.
After the first layer has set, carefully pour the fruit juice mixture over the top.
Return the dish to the refrigerator and let it set for another 30-45 minutes.
Repeat the layering process with different colors and flavors until the dish is filled.
Once all layers are complete and set, remove the dish from the refrigerator. Cut the jelly into squares.
Garnish with fresh fruits and mint leaves.
Recipe Reviews
- ★★★★★
Excellent recipe!
Leave a Reply
Your email address will not be published. Required fields are marked *
Excellent recipe!