
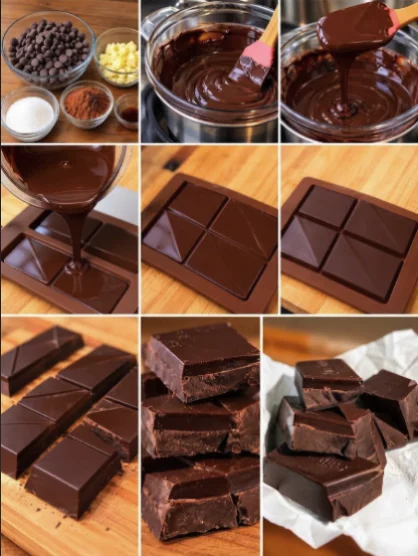
Chocolate is more than just a sweet treat; it’s a beloved staple in many cultures around the world. The joy of indulging in a rich, creamy homemade chocolate bar is something that can bring back childhood memories or create new ones with loved ones. This homemade chocolate bar recipe is not just about the taste; it’s a hands-on experience that allows you to tailor flavors to your liking, experiment with various ingredients, and create a delightful treat that can be enjoyed at any occasion. Whether you are a chocolate connoisseur, a vegan, or simply someone who loves sweet treats, you’ll find that making your own chocolate bars can be a rewarding endeavor. The tactile process of melting, pouring, and decorating allows you to connect with your food in a way that’s both enjoyable and fulfilling. Additionally, creating your own chocolate bars opens the door to healthier options, as you can control the sugar content and choose high-quality ingredients. The satisfaction of crafting your own chocolate bars is unparalleled, and sharing them can turn an ordinary gathering into a memorable celebration.
Ingredients
For this homemade chocolate bar recipe, you’ll need the following ingredients, grouped logically for your convenience: You can learn more about this topic. Selecting the right ingredients can significantly impact the flavor and texture of your chocolate bars. High-quality chocolate will yield a more delicious result, so strive for brands known for their rich cocoa content. You can also consider organic or fair-trade options to enhance both the ethical and taste aspects of your homemade chocolate experience.
- Dark Chocolate Ingredients:
- 2 cups (12 oz) dark chocolate chips or chopped chocolate (at least 70% cocoa) – Make sure to choose high-quality chocolate for the best flavor. Look for brands that list cocoa as the first ingredient and avoid those with unnecessary fillers. If you prefer a less intense flavor, you can opt for a slightly lower cocoa percentage.
- 1 tablespoon coconut oil (optional, for a smoother texture) – This ingredient can help create a silkier mouthfeel in your chocolate bars, making them even more enjoyable to eat. It can also aid in the melting process, ensuring an even consistency during pouring.
- Milk Chocolate Varieties:
- 1 cup (6 oz) milk chocolate chips or chopped chocolate – Choose a creamy variety for a sweet and mellow flavor, ensuring it’s one that melts well. If you want to avoid dairy, opt for vegan milk chocolate. Many brands now offer excellent dairy-free alternatives that provide similar taste and texture.
- 2 tablespoons milk powder or a non-dairy milk powder for vegan options – This helps to enhance the creaminess of the chocolate, giving it a more authentic milk chocolate taste. Non-dairy versions are often made from nuts or soy, catering to various dietary needs.
- Toppings and Fillings:
- 1/2 cup nuts (such as almonds or hazelnuts), chopped – Nuts add a delightful crunch and richness to each bite; consider toasting them first for an enhanced, nutty flavor. Toasting can be done by spreading them on a baking sheet and placing them in the oven at 350°F (175°C) for about 10 minutes, stirring halfway through.
- 1/2 cup dried fruit (like cranberries or apricots), chopped – These add a chewy texture and a burst of sweetness that contrasts nicely with chocolate. You can also experiment with different types of fruit, such as cherries or raisins, for a unique tasting experience.
- 1/4 cup shredded coconut (optional) – For a tropical twist, shredded coconut adds a chewy texture and subtle sweetness. Unsweetened coconut can be used for a healthier option while still providing flavor.
- Sea salt, to sprinkle on top – A light sprinkle of sea salt can elevate the chocolate’s flavor, enhancing its sweetness and adding depth. Consider flavored sea salts, like smoked or rosemary, for an exciting twist.
When selecting your chocolate, opt for high-quality brands to ensure that your homemade chocolate bars are delicious and rich in flavor. If you’re looking for a vegan chocolate bar recipe, use dairy-free chocolate chips and coconut milk powder as substitutes for traditional ingredients. The choice of toppings can also be tailored to suit dietary restrictions or personal preferences. Check out our related guide for more tips, including options for low-sugar or keto-friendly variations.
Steps / Instructions
- Prepare your workspace: Gather all your ingredients and tools. You’ll need a microwave-safe bowl, a spatula, and chocolate molds or a lined baking tray. Make sure your workspace is clean and organized to facilitate a smooth cooking process. Having a clean area will also help prevent any unwanted flavors from contaminating your chocolate.
- Temper the chocolate: To achieve a glossy finish, start by melting the dark chocolate. Place the chocolate chips in a microwave-safe bowl and heat in 30-second intervals, stirring in between until melted and smooth. This method helps prevent overheating, which can ruin the chocolate’s texture. If using coconut oil, add it at this point to enhance the smoothness of your melted chocolate. Stir until completely combined to ensure a uniform texture.
- Pour and spread: Carefully pour the melted chocolate into your molds or onto the lined baking tray. Spread it evenly with a spatula, ensuring it reaches all corners of the mold. This step is crucial as it determines how evenly your chocolate sets. You can also tap the tray lightly on the counter to eliminate any air bubbles that may be trapped in the chocolate.
- Add toppings: Sprinkle your desired nuts, dried fruit, and shredded coconut evenly over the melted chocolate. Gently press them in to ensure they stick, which helps integrate the toppings beautifully into the chocolate as it sets. Be creative with your arrangements—layering the toppings can also create a visually appealing pattern.
- Refrigerate: Place the molds or tray in the refrigerator for about 30 minutes or until the chocolate is fully set. You can tell it’s ready when it feels firm to the touch and has a dull appearance, contrasting the shiny finish when it was melted. For quicker setting, you can place it in the freezer for about 10-15 minutes, but be cautious not to leave it too long.
- Remove from molds: Once set, carefully remove the chocolate bars from the molds or cut them into squares if using a baking tray. If the chocolate is stubborn, gently twist the mold or use a small offset spatula to help release the chocolate. Patience is key; rushing this step might lead to breaking or crumbling.
- Store: Store your homemade chocolate bars in an airtight container at room temperature or refrigerate for longer shelf life. If storing in the refrigerator, allow the bars to come to room temperature before enjoying for the best flavor and texture. Consider wrapping individual bars in parchment paper for an elegant presentation or easy gifting.
Tips & Tricks
Here are some expert tips to make your chocolate-making experience smoother and more enjoyable:
- How to temper chocolate: If you want a beautiful shine and snap to your bars, temper the chocolate by melting it to 110°F (43°C) and then cooling it to 85°F (29°C) before rewarming to 88°F (31°C) for dark chocolate. This process is delicate but well worth the effort for a professional touch. It may require a thermometer for accuracy, but the result is chocolaty perfection.
- Storage options: Homemade chocolate bars can last up to two weeks in a cool, dry place. For longer storage, keep them in the fridge. Just be aware that refrigeration can lead to condensation, which may affect the chocolate’s texture. To prevent this, allow them to come to room temperature gradually.
- Common mistakes: Avoid overheating your chocolate; it can become grainy and unworkable. If this happens, adding a small amount of vegetable oil might help bring it back to a smooth consistency, but it’s best to prevent this issue from occurring in the first place. Always keep an eye on your chocolate, stirring frequently to ensure even melting.
- Experiment: Don’t hesitate to mix flavors! Try adding spices like cinnamon or chili for a kick or using flavored extracts for a unique twist. You could even experiment with infusing your chocolate with coffee or tea for a sophisticated flavor profile. The beauty of this homemade chocolate bar recipe lies in its adaptability—it’s your canvas!
Conclusion
Making your own chocolate bars is not only a fun and creative process, but it also allows you to explore flavors and ingredients that are uniquely yours. Whether you opt for a rich dark chocolate base, a creamy milk chocolate variety, or a vegan chocolate bar recipe, the possibilities are endless. Dive into the world of chocolate crafting today and share these sweet treats with family and friends. You might even find them to be the perfect gift idea for any chocolate lover in your life. Enjoy the satisfaction of creating something special, and don’t forget to savor every bite of your homemade creations! Embrace the joy of chocolate-making and let your taste buds guide you on this delicious journey!
Homemade Chocolate Bar Recipe
This homemade chocolate bar recipe is not just about the taste; it’s a hands-on experience that allows you to tailor flavors to your liking, experiment with various ingredients, and create a delightful treat that can be enjoyed at any occasion.
Ingredients
- 2 cups (12 oz) dark chocolate chips or chopped chocolate (at least 70% cocoa)
- 1 tablespoon coconut oil (optional, for a smoother texture)
- 1 cup (6 oz) milk chocolate chips or chopped chocolate
- 2 tablespoons milk powder or a non-dairy milk powder for vegan options
- 1/2 cup nuts (such as almonds or hazelnuts), chopped
- 1/2 cup dried fruit (like cranberries or apricots), chopped
- 1/4 cup shredded coconut (optional)
- Sea salt, to sprinkle on top
Directions
Prepare your workspace: Gather all your ingredients and tools. You’ll need a microwave-safe bowl, a spatula, and chocolate molds or a lined baking tray.
Temper the chocolate: Start by melting the dark chocolate. Place the chocolate chips in a microwave-safe bowl and heat in 30-second intervals, stirring in between until melted and smooth.
Pour and spread: Carefully pour the melted chocolate into your molds or onto the lined baking tray. Spread it evenly with a spatula.
Add toppings: Sprinkle your desired nuts, dried fruit, and shredded coconut evenly over the melted chocolate. Gently press them in to ensure they stick.
Refrigerate: Place the molds or tray in the refrigerator for about 30 minutes or until the chocolate is fully set.
Remove from molds: Once set, carefully remove the chocolate bars from the molds or cut them into squares if using a baking tray.
Store: Store your homemade chocolate bars in an airtight container at room temperature or refrigerate for longer shelf life.
Recipe Reviews
- ★★★★★
Excellent recipe!
Leave a Reply
Your email address will not be published. Required fields are marked *



Excellent recipe!