
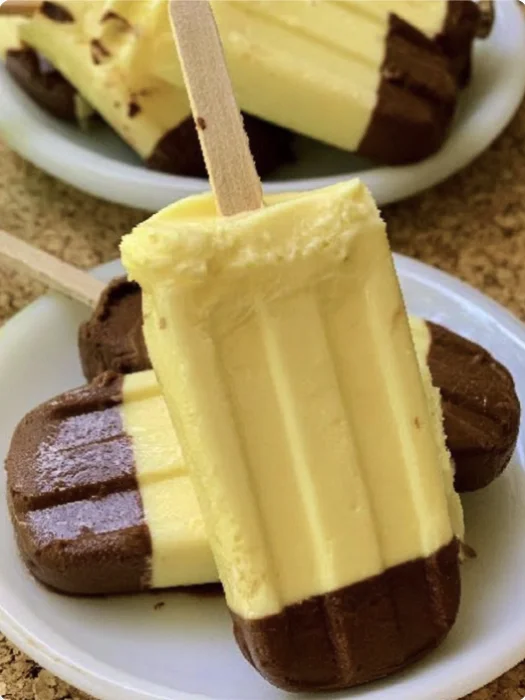
As the sun shines brightly and temperatures rise, there’s nothing quite like a refreshing treat to beat the heat. Introducing the Creamy Chocolate-Bottom Popsicles! These delightful frozen snacks combine the rich flavors of chocolate and the smoothness of creamy vanilla, making them the perfect summer indulgence. Not only are they simple to make, but they also allow for plenty of customization to suit your taste preferences. With just a few ingredients and a popsicle mold, you can create a frozen treat that brings joy to kids and adults alike. Whether you’re lounging by the pool, hosting a backyard barbecue, or simply craving a sweet snack, these popsicles are sure to be a hit! Fun fact: Popsicles date back to 1905 when an 11-year-old boy accidentally left a mixture of powdered soda and water outside in the cold, thus creating the first frozen treat. Over the decades, they have evolved into a beloved dessert enjoyed in various forms worldwide! Each bite offers a burst of creamy goodness paired with the satisfying crunch of chocolate, making these popsicles a standout choice for dessert lovers.
Ingredients
- For the chocolate bottom:
- 1 cup semi-sweet chocolate chips
- 2 tablespoons coconut oil (or butter)
- For the creamy layer:
- 2 cups vanilla yogurt (Greek yogurt for a thicker texture)
- 1/2 cup milk (dairy or non-dairy, such as almond or coconut milk)
- 1/4 cup honey or maple syrup (adjust based on sweetness preference)
Note: For a dairy-free version, opt for coconut yogurt and non-dairy milk. Quality ingredients make a difference; choose high-quality chocolate for rich flavors. For the best results, avoid generic brands of chocolate chips as they may not melt smoothly or have the best flavor. You can learn more about this topic. Ensure your yogurt is fresh and creamy for optimal taste and texture, and don’t hesitate to experiment with flavored yogurts to add an exciting twist! For instance, consider using honey-flavored yogurt for an extra layer of flavor or even fruit-flavored varieties such as strawberry or blueberry to complement the chocolate.
Steps / Instructions
- Melt the chocolate: In a microwave-safe bowl, combine the chocolate chips and coconut oil. Microwave in 30-second intervals, stirring in between, until fully melted and smooth. This should take about 1 to 1.5 minutes. Be cautious not to overheat, as burnt chocolate can have a bitter taste. Stirring is crucial during this process; it helps to evenly distribute the heat and prevents lumps from forming in your melted chocolate.
- Prepare the popsicle molds: Lightly grease your popsicle molds with cooking spray or a small amount of oil to make removal easier. This step is crucial to prevent sticking, ensuring your Creamy Chocolate-Bottom Popsicles come out perfectly intact. Additionally, choose silicone molds if possible, as they are typically easier to work with compared to rigid plastic molds.
- Fill the bottom layer: Pour a small amount of the melted chocolate into each popsicle mold, filling it about 1/4 of the way full. Use a spoon to help spread it evenly. Tap the mold on the counter to remove any air bubbles. This layer provides a satisfying crunch, so be sure it’s evenly distributed. If you desire a thicker chocolate base, feel free to add a bit more chocolate, but remember to maintain some balance with the creamy layer above.
- Freeze the chocolate layer: Place the molds in the freezer for about 15-20 minutes, or until the chocolate is firm to the touch. Check after 15 minutes; if it’s still soft, give it a few more minutes. The firm layer will hold its shape when you pour in the creamy mixture. This step is critical as a solid base will ensure that the layers remain distinct and visually appealing.
- Prepare the creamy layer: While the chocolate is setting, mix together the vanilla yogurt, milk, and honey in a medium bowl. Stir until well combined and smooth. Taste the mixture; feel free to adjust sweetness with additional honey or maple syrup, depending on your preference. For a thicker consistency, use less milk, or for a lighter texture, add a bit more. You can also use a whisk to combine these ingredients for a creamier mixture.
- Add the creamy layer: Once the chocolate layer is set, remove the molds from the freezer. Carefully pour the creamy yogurt mixture over the chocolate layer until the molds are nearly full, leaving a little space at the top to allow for expansion during freezing. This ensures that the popsicles will not overflow as they freeze and that you’ll have a perfectly layered dessert.
- Insert sticks: Place the popsicle sticks into the molds, ensuring they are centered. If needed, adjust the creamy layer around the sticks to make sure they are held firmly in place. This ensures even popsicle proportions and makes them easier to hold later. You can use wooden sticks or even reusable silicone sticks for an eco-friendly option.
- Freeze completely: Return the molds to the freezer and freeze for at least 4-6 hours, or until completely solid. For best results, leave them overnight if you can; this allows the flavors to meld beautifully and the popsicles to freeze thoroughly. The longer freezing time also helps in achieving a better texture.
- Remove and enjoy: To remove the popsicles, run warm water over the outside of the molds for a few seconds, then gently pull on the sticks to release them. Enjoy your Creamy Chocolate-Bottom Popsicles immediately! These are delicious on their own, but feel free to dip them in additional melted chocolate or roll them in crushed nuts for an added treat. You can also sprinkle some sea salt on top for a delightful contrast to the sweetness.
Tips & Tricks
Here are some practical tips to enhance your popsicle-making experience: Check out our related guide for more tips. These insights can enrich your popsicle journey and lead you to new creations. Remember, popsicle making is as much about creativity as it is about following the recipe!
- Storage: Once frozen, you can store the popsicles in an airtight container or freezer bag to prevent freezer burn. They can last up to 2 months in the freezer. To avoid any freezer odors affecting your popsicles, keep them well-wrapped. If you have multiple flavors, label your containers for easy identification later.
- Make-ahead: These popsicles are perfect for meal prepping. Make a batch and store them for quick and easy summer snacks. They also make a great treat for children’s parties or as a refreshing dessert after a family dinner. Preparing them in advance can save you time during busy days, especially during the hot summer months.
- Common mistakes to avoid: Ensure the chocolate layer is fully frozen before adding the creamy layer to prevent them from mixing together. Additionally, avoid overfilling the molds, as the mixture may spill over once the sticks are inserted. Be mindful of the temperature of your yogurt mixture; if it’s too warm, it can soften the chocolate layer.
- Pro techniques: Experiment with different flavors by adding fruit purees or extracts to the creamy layer. A splash of vanilla extract or a handful of crushed berries can elevate the taste. You could even layer in some fruit slices or nuts for added texture and flavor. For a gourmet touch, consider drizzling the tops with melted chocolate or adding a sprinkle of crushed cookies.
Conclusion
With just a handful of ingredients and a little bit of patience, these Creamy Chocolate-Bottom Popsicles transform into a delightful summertime treat. Perfectly creamy with a rich chocolate base, these popsicles are not only a great way to cool down, but they also offer a delicious way to indulge your sweet tooth. Whether you’re enjoying them alone or sharing with friends and family, they are sure to be a memorable addition to your summer repertoire. So grab your popsicle molds and get ready to enjoy this simple, homemade frozen treat! Don’t forget to share your creations and any unique twists you’ve added to the recipe! Your feedback can inspire others to try their hand at making these decadent popsicles.
Creamy Chocolate-Bottom Popsicles
These delightful frozen snacks combine the rich flavors of chocolate and the smoothness of creamy vanilla, making them the perfect summer indulgence. Not only are they simple to make, but they also allow for plenty of customization to suit your taste preferences.
Ingredients
- 1 cup semi-sweet chocolate chips
- 2 tablespoons coconut oil (or butter)
- 2 cups vanilla yogurt (Greek yogurt for a thicker texture)
- 1/2 cup milk (dairy or non-dairy, such as almond or coconut milk)
- 1/4 cup honey or maple syrup (adjust based on sweetness preference)
Directions
In a microwave-safe bowl, combine the chocolate chips and coconut oil. Microwave in 30-second intervals, stirring in between, until fully melted and smooth. This should take about 1 to 1.5 minutes.
Lightly grease your popsicle molds with cooking spray or a small amount of oil to make removal easier.
Pour a small amount of the melted chocolate into each popsicle mold, filling it about 1/4 of the way full. Use a spoon to help spread it evenly. Tap the mold on the counter to remove any air bubbles.
Place the molds in the freezer for about 15-20 minutes, or until the chocolate is firm to the touch.
While the chocolate is setting, mix together the vanilla yogurt, milk, and honey in a medium bowl. Stir until well combined and smooth.
Once the chocolate layer is set, remove the molds from the freezer. Carefully pour the creamy yogurt mixture over the chocolate layer until the molds are nearly full.
Place the popsicle sticks into the molds, ensuring they are centered.
Return the molds to the freezer and freeze for at least 4-6 hours, or until completely solid.
To remove the popsicles, run warm water over the outside of the molds for a few seconds, then gently pull on the sticks to release them.
Recipe Reviews
- ★★★★★
Excellent recipe!
Leave a Reply
Your email address will not be published. Required fields are marked *
Excellent recipe!
1