
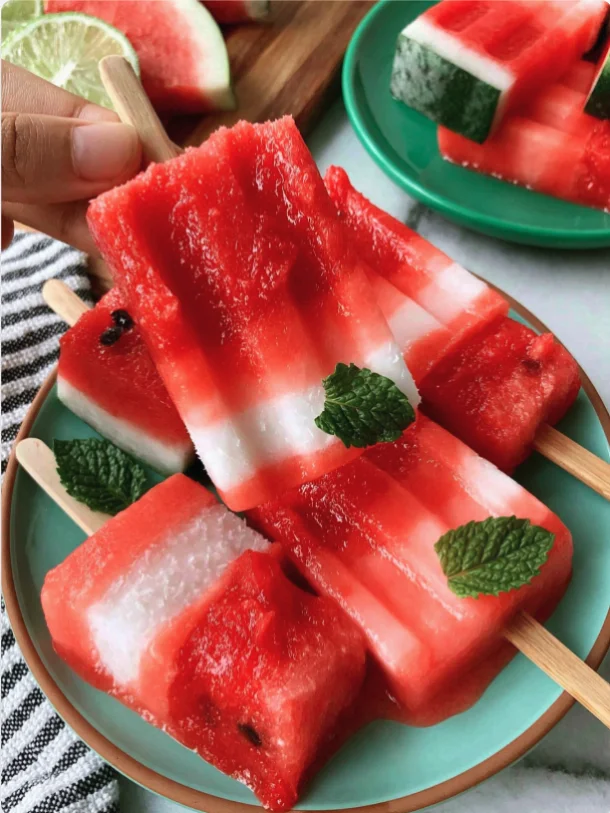
As summer approaches, there’s nothing quite as refreshing as a cold treat to cool you down. Enter the Coconut & Watermelon Popsicles. These delightful frozen snacks are not only easy to make but also bursting with tropical flavors that evoke sun-soaked beaches. Combining the sweetness of ripe watermelon with the creamy richness of coconut milk, these popsicles are a healthy and delicious way to enjoy summer. Perfect for kids and adults alike, they’re a great alternative to store-bought ice creams packed with sugars and additives. Whether you’re hosting a backyard barbecue, enjoying a picnic in the park, or just looking for a quick snack on a hot day, this homemade popsicle recipe is sure to impress. Plus, making your own popsicles allows you to control the ingredients, ensuring they fit your dietary preferences and taste preferences. The vibrant colors and delightful textures of these popsicles make them not only tasty but also visually appealing, making them a perfect centerpiece for any summer gathering. The experience of biting into these refreshing Coconut & Watermelon Popsicles is truly unmatched, providing both a burst of flavor and a cooling sensation that is simply unforgettable.
Ingredients
- Watermelon Layer:
- 4 cups fresh watermelon, cubed (seedless if possible) – Choose a ripe watermelon that feels heavy for its size and has a deep, uniform color for the best flavor. The sweetness of the watermelon is essential for achieving that refreshing taste in each bite. When selecting watermelon, always look for one that has a hollow sound when tapped, indicating ripeness.
- 2 tablespoons honey or agave syrup (optional, adjust based on sweetness of watermelon) – Adjust the amount based on your personal taste and the ripeness of the watermelon. If your watermelon is particularly sweet, you might not need any additional sweetener at all. Alternatively, if you’re looking for a sugar-free option, consider using a stevia or monk fruit sweetener.
- 1 tablespoon lime juice (for added brightness) – Freshly squeezed lime juice works best, as it enhances the flavor profile of the watermelon. The acidity from the lime juice balances the sweetness and adds a zesty kick, making the popsicle even more refreshing on a hot summer day.
- Coconut Layer:
- 1 can (13.5 oz) full-fat coconut milk – Opt for organic coconut milk for a richer taste and creamy texture. This will contribute to a luxurious mouthfeel and a delightful creaminess that pairs beautifully with the watermelon. The use of full-fat coconut milk also provides a satisfying creaminess that enhances the overall popsicle experience.
- 1 tablespoon maple syrup or honey (optional) – This adds sweetness and a hint of caramel flavor that complements the coconut perfectly. Feel free to adjust the sweetness based on your personal preference, and keep in mind that the sweetness of the coconut will also depend on the brand you choose.
- 1 teaspoon vanilla extract (for enhanced flavor) – Pure vanilla extract is recommended for the best aroma and taste. It infuses the coconut layer with a warm, inviting flavor that elevates the entire popsicle, creating a perfect balance between the layers.
For the best results, use ripe, sweet watermelon and high-quality coconut milk. If you prefer a lighter popsicle, opt for light coconut milk instead. You can also substitute the sweeteners with your favorite sugar alternatives if you wish to keep this a no-sugar-added treat. These popsicles not only satisfy sweet cravings but also provide hydration due to their high-water content, making them a perfect option for rehydrating after outdoor activities under the sun. You can learn more about this topic and discover why these flavors pair so well together, enhancing your understanding of tropical cuisine.
Steps / Instructions
- Prepare the Watermelon Layer: In a blender, combine the cubed watermelon, honey (if using), and lime juice. Blend until smooth, about 30 seconds. Taste and adjust sweetness as necessary. If you prefer a chunkier texture, blend for a shorter time; however, a smooth blend will create a nice, cohesive popsicle. Make sure to scrape down the sides of the blender if necessary to ensure everything is well incorporated, allowing the flavors to meld together seamlessly.
- Pour the Watermelon Mixture: Pour the watermelon puree into popsicle molds, filling them approximately halfway. Ensure each mold is filled evenly to allow for a balanced popsicle. Tap the molds gently on the counter to remove any air bubbles, which can cause unwanted holes in your popsicles. This step is vital for achieving a smooth finish once frozen, creating a visually appealing treat that showcases the beautiful watermelon color.
- Freeze the Watermelon Layer: Insert sticks into the molds and freeze for about 2-3 hours, or until solid. Checking the firmness by gently wiggling the stick can help ensure they are ready for the next layer. If you find that the mixture sticks to the stick, it may need more time in the freezer. The watermelon layer should be completely frozen before adding the coconut layer to avoid mixing the two.
- Prepare the Coconut Layer: While the watermelon layer is freezing, blend the coconut milk, maple syrup (if using), and vanilla extract until well combined and smooth. This step is crucial for creating a creamy texture that will contrast beautifully with the watermelon. Make sure that there are no lumps in the mixture, as this will impact the final texture of the popsicle, ensuring a delightful mouthfeel.
- Add the Coconut Layer: Once the watermelon layer has set, carefully pour the coconut mixture on top of the frozen watermelon layer in each mold, filling them to the top. This will create a stunning two-layer look that is visually appealing. For a fun twist, you can even swirl the coconut mixture gently into the watermelon layer to create a marbled effect, adding an artistic touch to your popsicles.
- Final Freeze: Return the molds to the freezer and freeze for an additional 4-6 hours, or until completely frozen. For the best results, leave them overnight if you can, allowing the flavors to meld together perfectly. This ensures that the popsicles are firm and will hold their shape when unmolded, providing a satisfying consistency with each bite.
- Unmold and Serve: To release the popsicles, run warm water over the outside of the molds for a few seconds. Gently pull the popsicles out and serve immediately. Enjoy your Coconut & Watermelon Popsicles as a refreshing treat on a hot day! For an extra touch, consider serving them on a colorful plate or with fresh mint leaves for garnish, creating a visually stunning presentation.
Tips & Tricks
- Storage: These popsicles can be stored in an airtight container in the freezer for up to two weeks. To prevent freezer burn, wrap each popsicle individually in plastic wrap before placing them in a container. This helps maintain their flavor and texture. If stored properly, they can retain their delightful taste for longer. Consider labeling the container with the date so you know when they were made.
- Make-Ahead: These popsicles are perfect for making ahead of time. Prepare them a day or two before you plan to serve them for the best flavor and texture. They are ideal for summer gatherings or simply to have on hand for a quick snack. You’ll be happy to have them ready to go when the temperatures rise, providing a quick and healthy dessert option.
- Avoid Common Mistakes: Ensure your watermelon is sweet enough before blending. If it’s not, the popsicles may taste bland. Always taste the mixture before freezing; this way, you can adjust sweetness to your liking and create the perfect balance. Also, be careful not to overfill the molds, as the mixtures will expand slightly when freezing, which can lead to messy results.
- Serving Tip: For a fun presentation, garnish with a slice of watermelon or sprinkle with toasted coconut flakes before serving. You can also serve them in colorful paper cups for a festive touch, perfect for parties! These little details can elevate the experience and make your popsicles even more enjoyable, encouraging guests to indulge in these tropical delights.
Conclusion
Embrace the joys of summer with these Coconut & Watermelon Popsicles. They are not only a breeze to make but also a delightful treat that brings together the freshness of watermelon and the creaminess of coconut. Perfect for cooling down on a hot day or serving at gatherings, these homemade popsicles are sure to be a hit. Gather your ingredients, follow these simple steps, and enjoy this tropical delight! Check out our related guide for more tips. We would love to hear your feedback or any variations you try!
Coconut & Watermelon Popsicles
These delightful frozen snacks are not only easy to make but also bursting with tropical flavors that evoke sun-soaked beaches. Combining the sweetness of ripe watermelon with the creamy richness of coconut milk, these popsicles are a healthy and delicious way to enjoy summer.
Ingredients
- 4 cups fresh watermelon, cubed (seedless if possible)
- 2 tablespoons honey or agave syrup (optional, adjust based on sweetness of watermelon)
- 1 tablespoon lime juice (for added brightness)
- 1 can (13.5 oz) full-fat coconut milk
- 1 tablespoon maple syrup or honey (optional)
- 1 teaspoon vanilla extract (for enhanced flavor)
Directions
Prepare the Watermelon Layer: In a blender, combine the cubed watermelon, honey (if using), and lime juice. Blend until smooth, about 30 seconds. Taste and adjust sweetness as necessary.
Pour the Watermelon Mixture: Pour the watermelon puree into popsicle molds, filling them approximately halfway. Tap the molds gently on the counter to remove any air bubbles.
Freeze the Watermelon Layer: Insert sticks into the molds and freeze for about 2-3 hours, or until solid.
Prepare the Coconut Layer: While the watermelon layer is freezing, blend the coconut milk, maple syrup (if using), and vanilla extract until well combined and smooth.
Add the Coconut Layer: Once the watermelon layer has set, carefully pour the coconut mixture on top of the frozen watermelon layer in each mold, filling them to the top.
Final Freeze: Return the molds to the freezer and freeze for an additional 4-6 hours, or until completely frozen.
Unmold and Serve: To release the popsicles, run warm water over the outside of the molds for a few seconds. Gently pull the popsicles out and serve immediately.
Recipe Reviews
- ★★★★★
Excellent recipe!
Leave a Reply
Your email address will not be published. Required fields are marked *


Excellent recipe!