
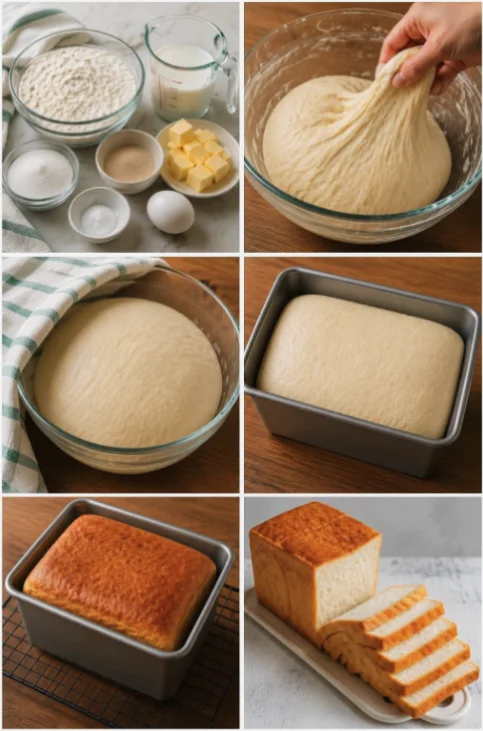
Soft Sandwich Bread is a staple in many kitchens, loved for its tender crumb and light texture. This classic recipe brings back memories of homemade lunches filled with fresh ingredients, nestled between two slices of fluffy bread. What makes this bread special is its ability to be both versatile and comforting, perfect for any sandwich from a simple PB&J to gourmet deli creations. Baking your own bread not only fills your home with an irresistible aroma but also allows you to control the ingredients, ensuring a wholesome addition to your meals. The texture and flavor of homemade bread far surpass anything you can buy at the store, and the satisfaction of kneading the dough and watching it rise is a rewarding experience. Every bite of this Soft Sandwich Bread will remind you of the warmth and nostalgia associated with home-cooked meals, making it a perfect choice for family gatherings or casual get-togethers.
Ingredients
- Dry Ingredients:
- 4 cups all-purpose flour (plus extra for dusting) – This forms the base of your bread and gives it structure. For the best results, use a high-quality flour with a good gluten content to ensure a well-risen loaf.
- 2 tablespoons granulated sugar – This helps to activate the yeast and add a slight sweetness to the bread. If you’re looking for a less refined alternative, consider using honey or maple syrup, adjusting the liquid content slightly.
- 2 teaspoons salt – Essential for flavor and controlling yeast activity, enhancing the overall taste. Kosher salt is a great choice here due to its texture and ease of measurement.
- 2 tablespoons instant yeast – This is the leavening agent that allows your bread to rise beautifully without the need for proofing. Make sure to check the expiration date on the yeast for optimal results.
- Wet Ingredients:
- 1 ½ cups warm water (about 110°F) – This temperature is crucial; too hot can kill the yeast, while too cold won’t activate it. A kitchen thermometer can help ensure accuracy, or test the warmth with your wrist.
- 2 tablespoons unsalted butter, melted – Adds richness and flavor, creating a soft and tender crumb in the final loaf. For a dairy-free option, you can substitute with olive oil or a vegan butter alternative.
Note: Use high-quality ingredients for the best results. If you’re sensitive to gluten, consider using a gluten-free all-purpose flour blend for an alternative loaf. For enriched flavor, you can try using bread flour instead of all-purpose flour, which has a higher protein content and yields a chewier texture. You can learn more about this topic and explore various ingredient choices that can influence the outcome of your bread.
Steps / Instructions
- In a large mixing bowl, combine the warm water and sugar. Sprinkle the instant yeast over the top and let it sit for about 5-10 minutes until frothy. This step ensures the yeast is active. If the mixture doesn’t froth, discard and start over with fresh yeast. A frothy mixture indicates that the yeast is alive and ready to do its job in making your bread rise.
- Add the melted butter and salt to the yeast mixture, stirring gently to combine. Be careful not to add the salt directly on top of the yeast at this point, as it can inhibit yeast growth. Instead, dissolve the salt in the liquid before adding it to promote a healthy yeast environment.
- Gradually add the flour, one cup at a time, mixing with a wooden spoon or a dough whisk until a shaggy dough forms. This gradual incorporation helps to manage the dough’s texture and ensures even mixing. The dough should start pulling away from the sides of the bowl as you add flour.
- Turn the dough onto a floured surface. Knead the dough by hand for about 10 minutes until it becomes smooth and elastic. Alternatively, you can use a stand mixer fitted with a dough hook on medium speed for 5-7 minutes. To knead by hand, push the dough away from you with the heel of your hand, fold it over, and repeat. The goal is to develop the gluten structure, which gives the bread its delightful chewiness.
- Place the kneaded dough into a greased bowl, cover it with a clean kitchen towel or plastic wrap, and let it rise in a warm place until doubled in size, about 1 hour. Look for the dough to become puffy and larger, indicating that fermentation is successful. A warm, draft-free area is ideal for this step; you can even preheat your oven for a minute or two and turn it off to create a cozy environment.
- Once risen, punch down the dough to release the air. This step redistributes the yeast and sugars and prepares the dough for shaping. Turn it out onto a floured surface and shape it into a loaf by flattening it into a rectangle, then rolling it tightly from one end. Ensure that you roll tightly to avoid air pockets, which can create uneven holes in your bread.
- Place the shaped dough into a greased 9×5 inch loaf pan. Cover it again and let it rise until it reaches the top of the pan, about 30-45 minutes. This second rise, known as proofing, is crucial for a light and airy loaf. You can gently poke the dough with your finger; if it springs back slowly, it’s ready for the oven.
- Preheat your oven to 350°F (175°C) during the last 15 minutes of rising. This ensures that the oven reaches the proper temperature for baking. A hot oven is essential for a good oven spring, which helps your bread rise further during baking.
- Bake the bread for 30-35 minutes until golden brown and the loaf sounds hollow when tapped on the bottom. A thermometer inserted into the center of the loaf should read about 190°F for optimal doneness. The crust should have a beautiful golden hue, and it should feel firm to the touch.
- Remove the bread from the oven and let it cool in the pan for about 10 minutes. Then, transfer it to a wire rack to cool completely before slicing. Cooling on a rack allows air to circulate around the bread, preventing it from becoming soggy. Patience is key here; slicing too soon can lead to gummy slices!
Tips & Tricks
Here are some expert tips to ensure your Soft Sandwich Bread turns out perfectly: Check out our related guide for more tips. These insights will help you troubleshoot common issues and elevate your bread-making skills.
- Storing Bread: Store your bread in an airtight container at room temperature for up to 3 days. For longer storage, slice and freeze the bread, then toast slices directly from the freezer when needed. Freezing preserves freshness and allows you to enjoy homemade bread without waste. Alternatively, consider wrapping the whole loaf in plastic wrap followed by aluminum foil for longer-term storage.
- Make-Ahead: You can prepare the dough ahead of time and refrigerate it after the first rise. To do this, punch down the dough, cover it tightly, and refrigerate for up to 24 hours. Let it come to room temperature before shaping. This method can also enhance the flavor of your bread! Cold fermentation allows for more complex flavors to develop.
- Avoid Over-Kneading: If using a stand mixer, be cautious not to over-knead the dough as this can lead to a dense loaf instead of fluffy sandwich bread. The dough should be smooth and elastic with just a bit of stickiness. Keep an eye on the texture; it should stretch without tearing.
- Flavor Infusions: Consider adding herbs or spices to the dough for unique flavor-infused sandwich bread. For example, mixing in dried oregano or rosemary can elevate the taste. You can also experiment with adding garlic powder or onion powder for a savory twist. Just be mindful of the amount, as you don’t want to overwhelm the delicate flavor of the bread itself.
Conclusion
Now that you have this easy homemade sandwich bread recipe, it’s the perfect opportunity to experiment with different toppings and fillings. Whether you’re making a classic lunch or trying your hand at gourmet sandwiches, this Soft Sandwich Bread is sure to enhance any meal. Enjoy the process of kneading, rising, and baking, and savor the satisfaction of enjoying bread made from scratch! Each loaf is an invitation to create delicious memories, so gather your loved ones and dive into the delightful world of homemade bread. Remember, the joy of baking is not just about the end product; it’s about the love and effort you put into each step of the process.
Soft Sandwich Bread
Soft Sandwich Bread is a staple in many kitchens, loved for its tender crumb and light texture. This classic recipe brings back memories of homemade lunches filled with fresh ingredients, nestled between two slices of fluffy bread. What makes this bread special is its ability to be both versatile and comforting, perfect for any sandwich from a simple PB&J to gourmet deli creations.
Ingredients
- 4 cups all-purpose flour (plus extra for dusting)
- 2 tablespoons granulated sugar
- 2 teaspoons salt
- 2 tablespoons instant yeast
- 1 ½ cups warm water (about 110°F)
- 2 tablespoons unsalted butter, melted
Directions
In a large mixing bowl, combine the warm water and sugar. Sprinkle the instant yeast over the top and let it sit for about 5-10 minutes until frothy.
Add the melted butter and salt to the yeast mixture, stirring gently to combine.
Gradually add the flour, one cup at a time, mixing with a wooden spoon or a dough whisk until a shaggy dough forms.
Turn the dough onto a floured surface. Knead the dough by hand for about 10 minutes until it becomes smooth and elastic.
Place the kneaded dough into a greased bowl, cover it with a clean kitchen towel or plastic wrap, and let it rise in a warm place until doubled in size, about 1 hour.
Once risen, punch down the dough to release the air. Shape it into a loaf by flattening it into a rectangle and rolling it tightly.
Place the shaped dough into a greased 9x5 inch loaf pan. Cover it again and let it rise until it reaches the top of the pan, about 30-45 minutes.
Preheat your oven to 350°F (175°C) during the last 15 minutes of rising.
Bake the bread for 30-35 minutes until golden brown and the loaf sounds hollow when tapped on the bottom.
Remove the bread from the oven and let it cool in the pan for about 10 minutes, then transfer it to a wire rack to cool completely before slicing.
Recipe Reviews
- ★★★★★
Excellent recipe!
Leave a Reply
Your email address will not be published. Required fields are marked *






Excellent recipe!