
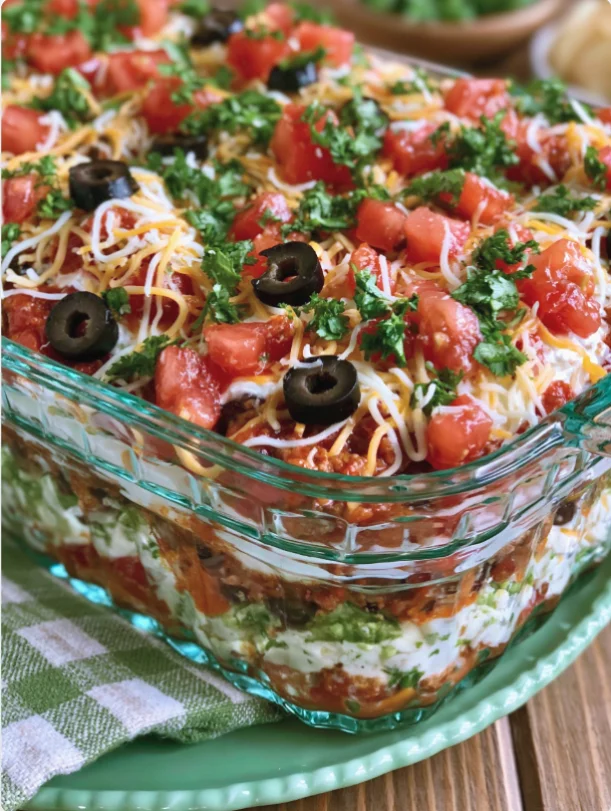
When it comes to party snacks, few dishes evoke the same sense of nostalgia and excitement as the Old Fashioned 7-Layer Dip Recipe. This layered marvel, bursting with vibrant colors and flavors, has been a staple at gatherings since the 1970s, making it a true classic in the realm of Tex-Mex appetizers. Whether it’s game day, a holiday party, or a summer barbecue, this dip brings people together, inviting everyone to dig in with tortilla chips and enjoy layers of creamy, savory goodness. The visual appeal of its colorful layers not only tempts the taste buds but also makes it a conversation starter at any gathering. With its versatile ingredients, it allows for personalization while maintaining its traditional charm. In this article, we’ll explore how to make this delicious dish from scratch, complete with tips and tricks to elevate it to the next level. Get ready to impress your guests with the rich history and delightful flavors of this classic dish!
Ingredients
- Base Layers:
- 1 (15 oz) can of refried beans, preferably low-sodium for better flavor control, as traditional recipes emphasize the importance of flavor balance. This also allows the natural flavors of the beans to shine through without overwhelming the other ingredients.
- 1 cup sour cream, full-fat for a richer taste; this adds creaminess and helps to create a luscious texture that contrasts beautifully with the other layers. If you’re looking for a tangier flavor, you might consider using a flavored sour cream variation.
- 1 cup guacamole (homemade or store-bought), aiming for a creamy consistency that complements the other layers well. If making your own, consider adding lime juice and cumin for a flavor boost, which enhances the freshness and adds depth to the overall taste.
- Toppings:
- 1 cup salsa (preferably homemade for the best flavor; use fresh ingredients for maximum impact, including ripe tomatoes and fresh cilantro. Homemade salsa can also be adjusted for spice level, making it perfect for your guests).
- 1 cup shredded cheddar cheese, sharp or mild depending on your preference for stronger flavors versus creamier ones. Mixing different types of cheese can also add an interesting flavor twist.
- 1 cup diced tomatoes, ideally Roma tomatoes for their flavor and minimal seed content, which keeps the dip from getting watery. Make sure to use fully ripe tomatoes for the best taste and color.
- 1 cup sliced black olives, optional but adds a nice salty contrast that balances the richness of the other ingredients, enhancing both flavor and texture.
- 1/2 cup chopped green onions, both the green and white parts for color and flavor depth, bringing a fresh note to the dip that brightens up the other ingredients.
For best results, always use fresh ingredients. If making your own guacamole, ripe avocados will give you the creamiest texture and best flavor, so choose avocados that yield slightly when pressed. When selecting salsa, opt for a brand that uses natural ingredients or, better yet, whip up a quick homemade salsa for dip. This allows you to control the spice level and overall flavor profile to suit your guests’ preferences. Remember, the quality of your ingredients directly affects the final taste of your Old Fashioned 7-Layer Dip Recipe, so invest a little time in sourcing the best! Fresh herbs, ripe vegetables, and high-quality dairy can elevate this dish from good to unforgettable.
Steps / Instructions
- Prepare the Serving Dish: Choose a clear glass dish or a large round plate to showcase the layers beautifully. A 9×13 inch dish works well, providing ample space for each layer while allowing guests to see the colorful presentation. You might also consider using a trifle dish for a stunning look that highlights the layers. Make sure it’s clean and dry before you begin layering to avoid any unwanted moisture.
- First Layer: Spread the refried beans evenly across the bottom of the dish, using a spatula to ensure an even layer. Press down gently to create a smooth, flat surface that will support the layers above. Aim for about a 1/4 inch layer for optimal texture, ensuring it is firmly packed to hold the next layer without mixing.
- Second Layer: Gently spread the sour cream over the beans, ensuring it reaches the edges to create a beautiful contrast. A small offset spatula can help you achieve a clean finish without disturbing the beans underneath. This layer should also be about 1/4 inch thick, maintaining a solid structure for the dip which is essential for visual appeal.
- Third Layer: Add the guacamole on top of the sour cream, smoothing it out carefully to maintain the distinct layers. If you’re using homemade guacamole, remember to sprinkle a little lime juice on top to prevent browning and to enhance the flavor. The guacamole should be spread evenly for a consistent texture throughout, taking care not to mix it with the sour cream below.
- Fourth Layer: Spoon the salsa evenly over the guacamole, allowing some of the juices to seep into the guacamole, which enhances the flavor. Choose a salsa that has a good balance of spice and acidity to complement the creamy layers beneath. This layer can be a bit thicker, about 1/2 inch, to provide a juicy contrast that adds excitement to each bite.
- Fifth Layer: Sprinkle the shredded cheddar cheese across the salsa layer, covering it completely. Consider using a mix of cheddar and Monterey Jack for a more complex flavor profile that also adds visual appeal. Cheese can also be mixed in with some herbs for additional flavor if desired.
- Sixth Layer: Add the diced tomatoes, evenly distributing them to enhance freshness. Be sure to drain excess liquid from the tomatoes to avoid making the dip soggy. A good way to do this is to place the diced tomatoes in a colander for a few minutes before adding them, allowing the extra moisture to escape and maintaining the integrity of the layers.
- Seventh Layer: Top with sliced black olives and chopped green onions to add a burst of color and flavor. The olives provide a salty crunch, while the green onions give a fresh, zesty kick. This final touch is essential for a well-rounded flavor that excites the palate.
- Chill: Cover the dip with plastic wrap and refrigerate for at least 1 hour before serving. This allows the flavors to mesh beautifully, and chilling helps firm up the layers, making it easier to serve. For best results, refrigerate for up to 4 hours, allowing the flavors to develop further. Patience here is key, as the chilling process enhances the overall taste and texture.
Tips & Tricks
To ensure your Old Fashioned 7-Layer Dip Recipe is a hit: Check out our related guide for more tips. These nuggets of wisdom can help elevate your dip, ensuring it’s not only delicious but also visually stunning. Consider additional garnishes like cilantro or diced jalapeños for those who enjoy a bit of heat! A dash of chili powder or paprika can also be sprinkled on top for added flavor and color.
- Make Ahead: You can prepare the layers a day in advance, but avoid adding the tomatoes, olives, and green onions until just before serving to maintain their freshness and crunch. This way, you can focus on enjoying your gathering without stress! This also helps ensure that the dip remains visually appealing, making it a stunning addition to your spread.
- Ingredient Substitutions: If you’re looking for a healthier twist, consider using Greek yogurt instead of sour cream for added protein, or try a dairy-free cheese alternative for a vegan option. You can also experiment with different types of beans, like black beans or pinto beans, for a unique flavor. Each bean variety brings its own character, allowing you to tailor the dip to your liking and dietary needs.
- Avoiding Common Mistakes: To prevent the layers from mixing, be gentle when spreading each layer and be sure to use the right consistency for your ingredients. For example, make sure your guacamole isn’t too runny; a thicker consistency will help maintain the structural integrity of the layers. Always taste as you go to adjust seasoning and flavor balance, ensuring each layer contributes to the overall harmony of tastes.
- Storage: If you have leftovers, store them in an airtight container in the refrigerator for up to 2 days. However, the layers may start to blend together, so it’s best enjoyed fresh. If you want to keep it looking its best, consider separating the layers into individual containers. This allows you to maintain freshness longer and makes for easy serving, ensuring that each layer retains its distinct flavor and texture.
Conclusion
This Old Fashioned 7-Layer Dip Recipe is not just a dip; it’s an experience that brings people together, celebrating the rich and vibrant flavors of Tex-Mex cuisine. Simple to prepare yet impressive in presentation, it’s sure to become a favorite at your next gathering. Gather your ingredients, follow these easy steps, and enjoy the delicious layers of flavor that this classic dip offers. Your friends and family will be asking for seconds and requesting the recipe! Enjoy the process and the smiles of your guests as they savor each delicious layer, creating lasting memories around the table.
Old Fashioned 7-Layer Dip Recipe
A layered marvel, bursting with vibrant colors and flavors, has been a staple at gatherings since the 1970s, making it a true classic in the realm of Tex-Mex appetizers.
Ingredients
- 1 (15 oz) can of refried beans
- 1 cup sour cream
- 1 cup guacamole
- 1 cup salsa
- 1 cup shredded cheddar cheese
- 1 cup diced tomatoes
- 1 cup sliced black olives (optional)
- 1/2 cup chopped green onions
Directions
Prepare the Serving Dish: Choose a clear glass dish or a large round plate to showcase the layers beautifully.
First Layer: Spread the refried beans evenly across the bottom of the dish, using a spatula to ensure an even layer.
Second Layer: Gently spread the sour cream over the beans, ensuring it reaches the edges.
Third Layer: Add the guacamole on top of the sour cream, smoothing it out carefully.
Fourth Layer: Spoon the salsa evenly over the guacamole.
Fifth Layer: Sprinkle the shredded cheddar cheese across the salsa layer.
Sixth Layer: Add the diced tomatoes, evenly distributing them.
Seventh Layer: Top with sliced black olives and chopped green onions.
Chill: Cover the dip with plastic wrap and refrigerate for at least 1 hour before serving.
Nutrition Facts
Recipe Reviews
- ★★★★★
Excellent recipe!
Leave a Reply
Your email address will not be published. Required fields are marked *


Excellent recipe!