
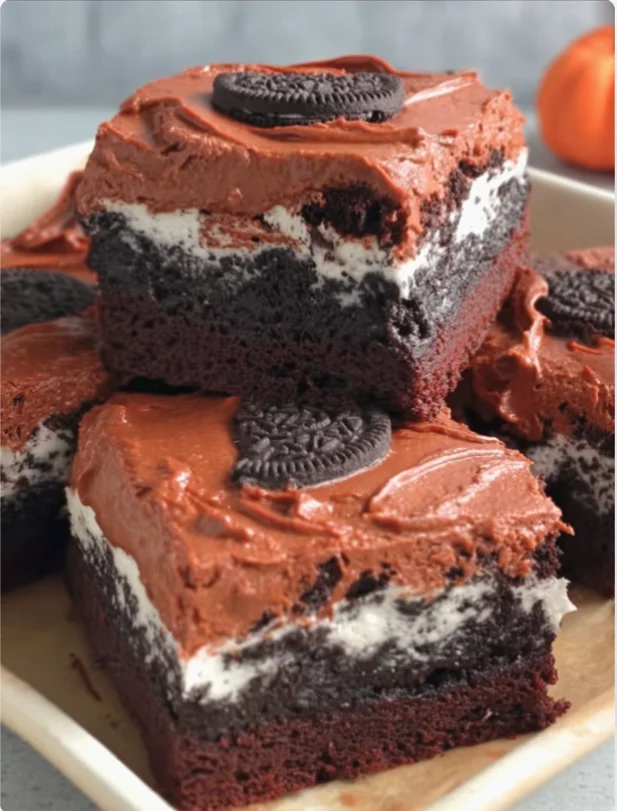
As Halloween approaches, the excitement of preparing festive treats fills the air. One dessert that stands out for its deliciousness and visual appeal is the Oreo Layered Halloween Brownies. These brownies are not only rich and fudgy but also feature layers of creamy goodness and crunchy Oreo cookies, making them an indulgent treat perfect for Halloween parties or family gatherings. The vibrant Halloween colors make them an eye-catching addition to your dessert table, while the combination of flavors and textures provides a delightful experience for both kids and adults. Whether you are hosting a spooky gathering or looking for a fun baking project with your children, these brownies are sure to impress and satisfy sweet cravings. The tradition of creating festive desserts during Halloween dates back for generations, and these brownies are a modern twist that honors that spirit. The unique layering of flavors not only creates an attractive dessert but also introduces an exciting taste experience, as each bite blends the rich chocolate brownie with the smooth cream cheese and crunchy Oreo layers.
Ingredients
To create the Oreo Layered Halloween Brownies, you will need the following ingredients: You can learn more about this topic. Each component plays a crucial role in delivering the delicious layers and textures that make this dessert stand out, contributing both to flavor and overall presentation.
- For the Brownie Layer:
- 1 cup (2 sticks) unsalted butter, softened to room temperature for easier mixing. This ensures the brownies mix uniformly, leading to a smoother texture.
- 2 cups granulated sugar, which adds sweetness and moisture, creating that perfect balance of flavors.
- 4 large eggs, preferably at room temperature to ensure better emulsification, allowing the batter to blend seamlessly.
- 1 teaspoon vanilla extract, to enhance the overall flavor profile, adding a hint of warmth to the chocolate.
- 1 cup all-purpose flour, providing structure to the brownies, ensuring they rise properly while remaining tender.
- 1 cup unsweetened cocoa powder, for that rich chocolate flavor that is essential in brownie recipes and contributes to the darker hue.
- 1/2 teaspoon salt, to balance the sweetness, enhancing the overall taste experience.
- 1/2 teaspoon baking powder, to help achieve the desired rise, ensuring the brownies have a fluffy texture.
- For the Cream Cheese Layer:
- 8 oz cream cheese, softened, for a smooth and creamy layer that contrasts beautifully with the dense brownie base.
- 1/2 cup powdered sugar, which keeps the layer sweet yet light, contributing to its cloud-like texture.
- 1 teaspoon vanilla extract, adding depth to the cream cheese mixture and harmonizing the flavors across the layers.
- 1/2 cup whipped cream or Cool Whip, to lighten the texture of the cream cheese, resulting in an airy layer that balances the density of the brownie.
- For the Oreo Layer:
- 15 Oreo cookies, crushed, adding crunch and iconic flavor to the brownie, ensuring each bite offers that classic Oreo taste.
- 4-5 additional whole Oreo cookies for garnish, creating a beautiful presentation that makes the brownies more appealing.
- For the Topping:
- Chocolate drizzle (store-bought or homemade), which adds a decadent touch and an extra layer of chocolatey goodness.
- Halloween sprinkles (optional), to enhance the festive appearance, giving a fun pop of color and theme.
It’s essential to ensure your ingredients are at room temperature for the best mixing results. Room temperature eggs and cream cheese blend more easily, creating a smoother batter that incorporates air bubbles for leavening. You can substitute gluten-free flour to make this recipe gluten-free, and for a dairy-free version, use a dairy-free cream cheese alternative that mimics the texture well. For optimal flavor, choose high-quality cocoa powder and name-brand Oreos when possible, as the ingredients greatly affect the final outcome. Check out our related guide for more tips on ingredient selection and preparation techniques.
Steps / Instructions
- Preheat the oven: Start by preheating your oven to 350°F (175°C), allowing it to reach the perfect baking temperature. Preparing your pan correctly is crucial; grease it thoroughly with butter or line it with parchment paper for easy removal of the brownies after baking. This step ensures that your brownies do not stick to the pan.
- Make the Brownie Batter: In a medium saucepan, melt the butter over low heat, stirring frequently to prevent browning, which could create an undesirable flavor. Once melted, remove it from the heat and stir in the granulated sugar until well combined, ensuring no lumps remain. Allow it to cool for a few minutes, as adding eggs to a hot mixture can cause them to scramble and affect the texture of the brownies.
- Add Eggs and Vanilla: Whisk in the eggs one at a time, incorporating each egg completely before adding the next to promote proper emulsification. Follow with the vanilla extract, mixing until you achieve a consistent batter that is glossy and slightly thick.
- Combine Dry Ingredients: In a separate bowl, sift together the flour, cocoa powder, salt, and baking powder to remove any lumps and ensure an even distribution of the dry ingredients. This step is vital to avoid clumps of cocoa or flour in your brownie batter, which could ruin the texture.
- Mix Dry into Wet: Gradually fold the dry ingredients into the wet mixture using a spatula, being careful to combine them until just mixed. Avoid overmixing, as this can lead to tough brownies; the batter should be mixed only until the dry ingredients are no longer visible.
- Bake the Brownies: Pour the brownie batter into the prepared baking pan and spread it evenly using a spatula. Bake in the preheated oven for 25-30 minutes, or until a toothpick inserted into the center comes out with a few moist crumbs (not wet batter). Keep an eye on the brownies as they bake to avoid overcooking, which can dry them out.
- Cool the Brownies: Allow the brownies to cool in the pan on a wire rack for at least 30 minutes. This cooling time helps set the structure of the brownies before adding the cream cheese layer, making it easier to spread without tearing.
- Prepare the Cream Cheese Layer: While the brownies are cooling, beat together the softened cream cheese, powdered sugar, and vanilla extract in a mixing bowl until smooth and creamy. Gently fold in the whipped cream until fully incorporated, creating a fluffy texture that will contrast nicely with the brownie layer.
- Add the Oreo Layer: Once the brownies are completely cooled, spread the cream cheese layer evenly over the brownie base using an offset spatula for a smooth finish. Sprinkle the crushed Oreo cookies on top of the cream cheese layer, distributing them evenly for a delightful crunch with every bite.
- Chill the Brownies: Place the brownies in the refrigerator for at least 2 hours to allow the layers to set properly. Chilling ensures that the cream cheese layer firms up, making it easier to cut into squares without disturbing the layers.
- Drizzle and Serve: Before serving, drizzle melted chocolate over the top, creating a pleasing visual effect, and add whole Oreo cookies for garnish. Cut into squares with a sharp knife for clean edges and enjoy your Oreo Layered Halloween Brownies—perfect for sharing!
Tips & Tricks
To achieve the best results with your Oreo Layered Halloween Brownies, consider the following tips:
- Quality Ingredients: Using high-quality cocoa powder and real butter will elevate the flavor of your brownies significantly. Opt for unsweetened cocoa powder for a balanced sweetness that allows the chocolate to shine.
- Chilling Time: Do not rush the chilling process. Allowing the brownies to set in the refrigerator for the recommended time ensures clean cuts and a better texture, making your brownies more appealing when served at your Halloween gatherings.
- Storage: Store any leftovers in an airtight container in the refrigerator for up to 5 days. You can also freeze them for up to 2 months—just make sure to wrap them tightly to avoid freezer burn and preserve their deliciousness.
- Make Ahead: These brownies can be prepared a day in advance, making them a stress-free option for Halloween parties. Just add the toppings right before serving for the freshest flavor, ensuring that they look their best when presented.
- Serving Size: Cut the brownies into small squares to stretch the servings—perfect for sharing at parties! Consider using a pizza cutter for more even cuts, which can also make serving easier.
Oreo Layered Halloween Brownies
These brownies are not only rich and fudgy but also feature layers of creamy goodness and crunchy Oreo cookies, making them an indulgent treat perfect for Halloween parties or family gatherings.
Ingredients
- 1 cup (2 sticks) unsalted butter, softened
- 2 cups granulated sugar
- 4 large eggs
- 1 teaspoon vanilla extract
- 1 cup all-purpose flour
- 1 cup unsweetened cocoa powder
- 1/2 teaspoon salt
- 1/2 teaspoon baking powder
- 8 oz cream cheese, softened
- 1/2 cup powdered sugar
- 1 teaspoon vanilla extract
- 1/2 cup whipped cream or Cool Whip
- 15 Oreo cookies, crushed
- 4-5 whole Oreo cookies for garnish
- Chocolate drizzle
- Halloween sprinkles (optional)
Directions
Preheat the oven to 350°F (175°C). Grease the baking pan or line with parchment paper.
In a medium saucepan, melt the butter over low heat. Stir in granulated sugar until combined and let cool slightly.
Whisk in eggs one at a time, then add vanilla extract until well mixed.
In a separate bowl, sift together flour, cocoa powder, salt, and baking powder.
Gradually fold the dry ingredients into the wet mixture until just combined.
Pour the brownie batter into the prepared pan and spread evenly. Bake for 25-30 minutes.
Allow brownies to cool in the pan for at least 30 minutes.
Beat together cream cheese, powdered sugar, and vanilla until smooth. Fold in whipped cream.
Spread the cream cheese layer over the cooled brownies and sprinkle crushed Oreo cookies on top.
Chill in the refrigerator for at least 2 hours.
Drizzle melted chocolate over the top and garnish with whole Oreo cookies. Cut into squares and serve.
Nutrition Facts
Recipe Reviews
- ★★★★★
Excellent recipe!
Leave a Reply
Your email address will not be published. Required fields are marked *


Excellent recipe!