
When it comes to baking, few things are as satisfying as making your own bread, especially when it’s crusty French bread. This recipe, titled The Easiest French Bread I’ve Ever Made, is a delightful journey into the world of artisan bread baking, perfect for both beginners and seasoned bakers alike. Unlike traditional French bread recipes that often require complicated techniques and hours of kneading, this simple French bread recipe shines for its simplicity and incredible flavor. With minimal effort and no-knead techniques, you’ll find yourself producing a warm, golden loaf that is perfect for sandwiches, serving alongside soups, or simply enjoying with butter. The aroma of freshly baked bread wafting through your kitchen is a sensory experience that brings comfort and satisfaction. The texture and flavor of this bread far surpass anything you can buy at the store, making it an ideal choice for any occasion. Let’s dive into this delicious recipe!
Ingredients
- Dry Ingredients:
- 4 cups all-purpose flour
- 2 teaspoons salt
- 1 packet (2¼ teaspoons) active dry yeast
- 1 teaspoon sugar
- Wet Ingredients:
- 1½ cups warm water (about 110°F or 43°C)
For the best results, use high-quality ingredients, especially the flour, as it greatly affects the texture of the bread. Opt for unbleached flour if available, as it retains more nutrients and provides better flavor. If you’re out of all-purpose flour, bread flour can also be used for a slightly different texture that yields a chewier crust. If you’re looking to experiment, consider using whole wheat flour for a heartier flavor, remembering that it may absorb more water and require slight adjustments in hydration. Additionally, fresh yeast can be used instead of active dry yeast; just adjust the amount according to the specific instructions on the yeast packet. You can learn more about this topic in detail.
Steps / Instructions
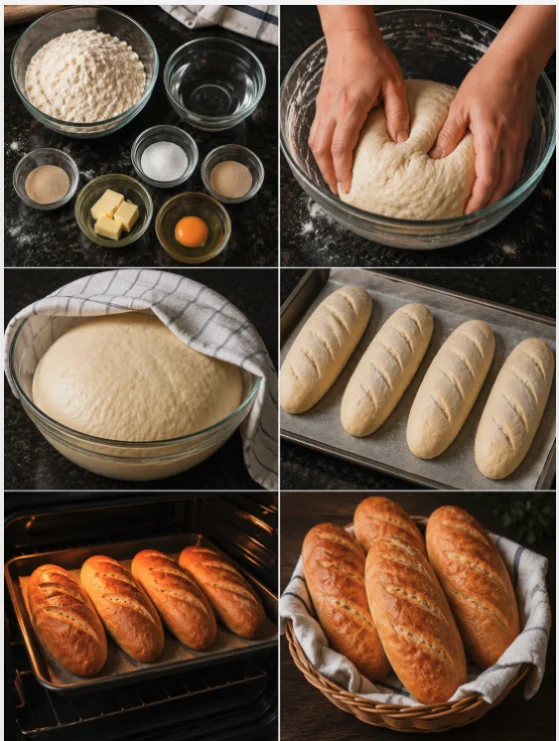
- Prepare the Yeast: In a small bowl, combine the warm water, sugar, and yeast. Allow it to sit for about 5-10 minutes until it becomes frothy. This frothy layer is a sign that the yeast is activated and ready to work its magic in your dough, producing carbon dioxide that makes the bread rise. If the mixture does not foam after 10 minutes, it may indicate that your yeast is inactive, and a new packet should be used.
- Mix Dry Ingredients: In a large mixing bowl, whisk together the flour and salt until well combined. This step ensures that the salt is evenly distributed, preventing any salty pockets in your bread. If you’re using different types of flour, mix them well before adding the wet ingredients to achieve a balanced flavor and texture.
- Combine Ingredients: Once the yeast mixture is frothy, pour it into the flour mixture. Stir with a wooden spoon or spatula until a sticky dough forms. The dough will appear somewhat shaggy and rough, which is perfect. Avoid over-mixing, as you want to maintain some of the dough’s airiness. The stickiness indicates proper hydration, which is key for a good crumb structure.
- First Rise: Cover the bowl with plastic wrap or a clean kitchen towel and let it rise in a warm environment for 1-2 hours, or until it has doubled in size. A sunny spot in your kitchen works well for this. If your kitchen is cool, you can create a mini-proofing environment by placing the bowl in the oven with just the light on to generate warmth. This first rise is essential for developing the dough’s flavor and texture, so be patient and allow it to grow.
- Shape the Dough: After the dough has risen, lightly flour your work surface and turn the dough out onto it. With floured hands, gently shape the dough into a round loaf or an oval shape, using minimal flour to keep it from sticking. This shaping technique helps to create surface tension, which will improve the rise during baking. Be gentle to preserve the air bubbles formed during the first rise, as they contribute to the lightness of the bread.
- Second Rise: Place the shaped dough onto a parchment-lined baking sheet. Cover it loosely with a towel and let it rise for another 30-60 minutes. Preheat your oven to 450°F (232°C) during this time, ensuring that it reaches the correct temperature for a perfect crust. If you have a baking stone, you can place it in the oven to heat up as well for added crustiness. This second rise allows the dough to relax, making it easier to achieve that perfect crust later.
- Prepare for Baking: Just before baking, make several diagonal slashes on the top of the loaf with a sharp knife. This allows the bread to expand while baking and creates an attractive pattern on the crust. The depth of the slashes should be about ¼ inch to ensure optimal expansion without deflating the dough. This step also enhances the visual appeal of your finished loaf.
- Bake: Place the baking sheet in the preheated oven. For extra crustiness, you can add a pan of hot water on the bottom rack of the oven to create steam. Steam helps to develop a beautiful crust while keeping the inside moist. Bake for 25-30 minutes, or until the bread is golden brown and sounds hollow when tapped on the bottom. The internal temperature of the bread should reach around 190°F (88°C) for the best texture. Keep an eye on the bread towards the end of the baking time to prevent over-browning.
- Cool: Once baked, remove the bread from the oven and let it cool on a wire rack for at least 20 minutes before slicing. This allows the interior crumb to set properly, preventing a gummy texture. Slicing too soon can result in a doughy center, so patience is key here. Letting the bread cool also helps to enhance the flavor as the residual heat continues to develop the taste.
Tips & Tricks
Here are some helpful tips to ensure your bread turns out perfect: Check out our related guide for more tips and recipes that complement this delightful bread.
- Storage: Store your bread in a paper bag at room temperature for up to 3 days. For longer storage, wrap it in plastic wrap and freeze it. When ready to eat, thaw and reheat in the oven for a few minutes to regain its crustiness. Avoid storing in plastic as it can make the crust soggy, which detracts from the texture. For the best flavor, consume within the first couple of days.
- Make-Ahead: You can prepare the dough the night before. Let it rise in the refrigerator overnight and then shape and bake it in the morning for fresh bread with minimal effort. This method also enhances the flavor, giving it a more complex taste. Additionally, the cool temperature slows down fermentation, allowing for a better, more developed flavor profile.
- Avoid Common Mistakes: Ensure your yeast is fresh and active. If the dough doesn’t rise, it may be that the water was too hot or too cold, so always check the temperature. Additionally, if your kitchen is too cold or drafty, consider finding a warmer spot or using the oven light trick mentioned earlier. Always remember that variables such as humidity and temperature can affect dough, so adjustments may be necessary based on your environment.
- Tools: A bench scraper can be helpful for handling sticky dough, making it easier to transfer and shape. A kitchen scale ensures accurate measurements for consistent results, which is especially important in baking. Other helpful tools include a sharp bread knife for slicing and a baking stone for an improved crust. Additionally, a digital thermometer can be a handy tool to check the internal temperature of your bread, ensuring perfect doneness each time.
Conclusion
Embrace the joy of baking with The Easiest French Bread I’ve Ever Made. Whether you’re new to bread-making or have been doing it for years, this simple French bread recipe will help you create a crusty loaf that is perfect for any meal. The process is enjoyable, and the end result is a delightful addition to your dining table. Grab your ingredients, and let’s bake some delicious homemade bread! With minimal effort, you can impress your friends and family with a beautiful homemade loaf that tastes simply divine.
The Easiest French Bread I’ve Ever Made
This recipe is a delightful journey into the world of artisan bread baking, perfect for both beginners and seasoned bakers alike. It shines for its simplicity and incredible flavor, allowing you to produce a warm, golden loaf that is perfect for sandwiches, soups, or simply enjoying with butter.
Ingredients
- 4 cups all-purpose flour
- 2 teaspoons salt
- 1 packet (2¼ teaspoons) active dry yeast
- 1 teaspoon sugar
- 1½ cups warm water (about 110°F or 43°C)
Directions
In a small bowl, combine the warm water, sugar, and yeast. Allow it to sit for about 5-10 minutes until it becomes frothy.
In a large mixing bowl, whisk together the flour and salt until well combined.
Once the yeast mixture is frothy, pour it into the flour mixture. Stir with a wooden spoon or spatula until a sticky dough forms.
Cover the bowl with plastic wrap or a clean kitchen towel and let it rise in a warm environment for 1-2 hours, or until it has doubled in size.
Lightly flour your work surface and turn the dough out onto it. Shape the dough into a round loaf or oval shape.
Place the shaped dough onto a parchment-lined baking sheet. Cover it loosely with a towel and let it rise for another 30-60 minutes. Preheat your oven to 450°F (232°C).
Just before baking, make several diagonal slashes on the top of the loaf with a sharp knife.
Place the baking sheet in the preheated oven. Bake for 25-30 minutes, or until the bread is golden brown and sounds hollow when tapped on the bottom.
Once baked, remove the bread from the oven and let it cool on a wire rack for at least 20 minutes before slicing.
Recipe Reviews
- ★★★★★
Excellent recipe!
Leave a Reply
Your email address will not be published. Required fields are marked *


Excellent recipe!