
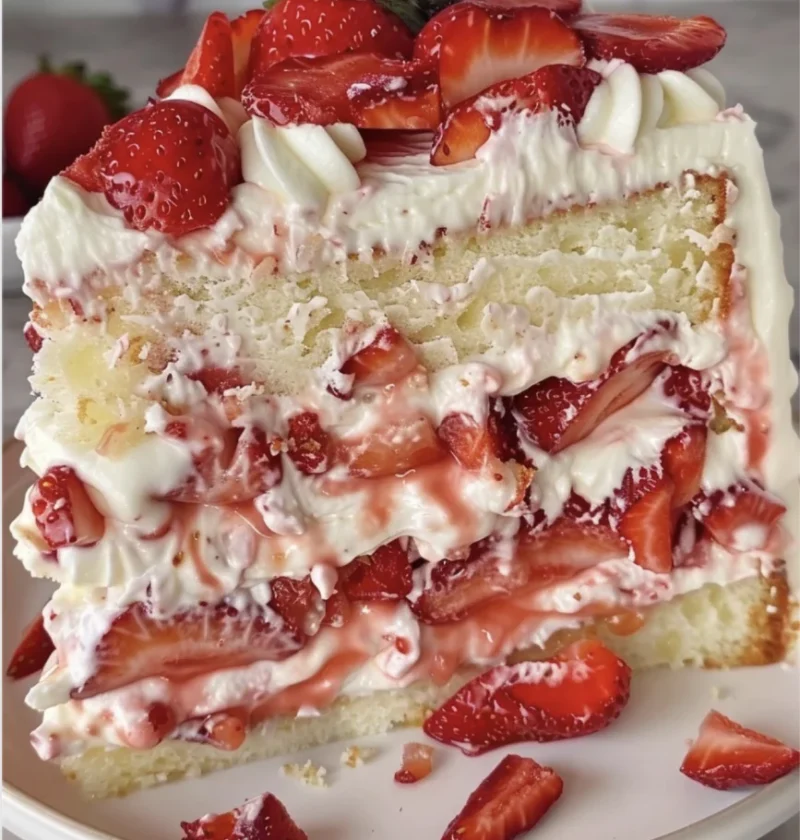
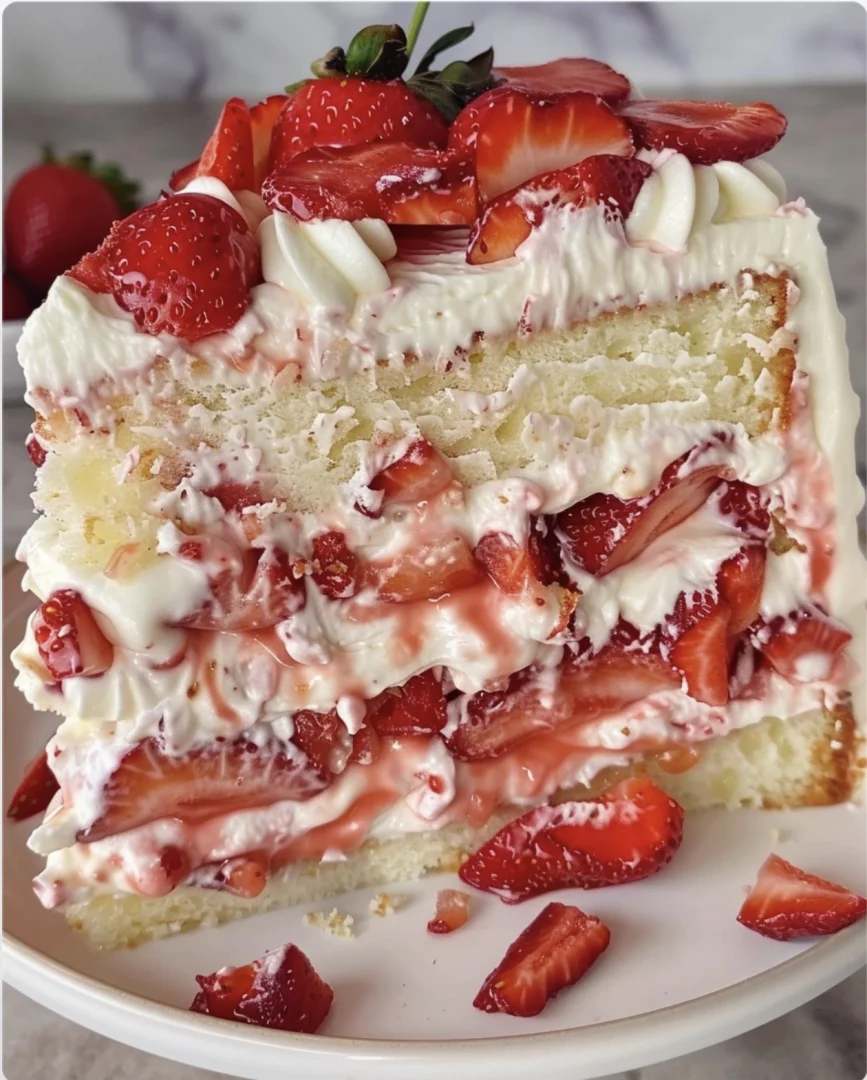
Picture a summer afternoon, the sun casting a warm glow as you slice into a Dreamy Strawberry Cream Layer Cake. This delightful treat combines the lightness of a fluffy sponge with the sweet, tangy essence of fresh strawberries. Ideal for birthdays or any special occasion, this cake captures the essence of summer, promising a burst of flavor with every bite. With roots in classic European patisserie, the strawberry cream cake has evolved over the centuries to become a beloved dessert worldwide. Whether it’s the layered textures or the luxurious whipped cream frosting, there’s something incredibly comforting and indulgent about this cake. Let’s dive into this enchanting recipe and discover how you can create this masterpiece at home. Whether you’re a seasoned baker or a beginner, this recipe will guide you to create a cake that is not only delectable but also visually stunning, making it a centerpiece at any gathering. Additionally, the simple yet elegant presentation of this cake makes it a favorite in household celebrations and professional patisseries alike, showcasing the perfect blend of flavors and aesthetics.
Ingredients
Gathering the right ingredients is the first step to mastering the Dreamy Strawberry Cream Layer Cake. Here’s everything you’ll need:
Dry Ingredients
- 2 1/2 cups all-purpose flour
- 2 teaspoons baking powder
- 1/2 teaspoon baking soda
- 1/4 teaspoon salt
- 1 cup granulated sugar
Ensure your dry ingredients are fresh and accurately measured to guarantee the best results. Sifting the flour beforehand can help achieve a lighter cake texture. Consider using a kitchen scale for precision, especially for the flour, as it can vary based on how it’s packed into the cup. The balance of baking powder and baking soda is critical to ensure the cake rises evenly and achieves the perfect crumb structure.
Wet Ingredients
- 1/2 cup unsalted butter, softened
- 1 cup buttermilk
- 4 large eggs, room temperature
- 2 teaspoons vanilla extract
Using room temperature ingredients is crucial for proper emulsification, which leads to a smoother batter. If you forgot to take the eggs out beforehand, place them in a bowl of warm water for a few minutes. The softened butter should be pliable without being greasy, ensuring it creams properly with the sugar. Buttermilk adds a slight tang and tenderizes the cake, making each bite moist and flavorful.
For the Strawberry Filling
- 2 cups fresh strawberries, hulled and sliced
- 1/4 cup granulated sugar
- 1 tablespoon lemon juice
The lemon juice not only enhances the natural flavor of the strawberries but also helps in preserving their vibrant color. Feel free to adjust the sugar level based on the sweetness of your strawberries. For best results, choose strawberries that are deep red and fragrant, which indicates optimal ripeness. Macerating the berries allows their juices to blend seamlessly with the cake layers, creating a luscious filling.
For the Whipped Cream Frosting
- 2 cups heavy whipping cream
- 1/2 cup powdered sugar
- 1 teaspoon vanilla extract
Chilling the bowl and beaters before whipping the cream can result in a firmer and more stable whipped cream, perfect for frosting. Whip the cream just until it holds peaks; you want a smooth, silky texture that’s ideal for spreading and piping. The combination of vanilla and powdered sugar enhances the cream’s sweetness, complementing the fresh strawberries beautifully.
Note: Choose ripe, red strawberries for the best flavor. If buttermilk is unavailable, substitute with a mixture of 1 cup milk and 1 tablespoon lemon juice, allowing it to sit for 10 minutes. Check out our related guide for more tips.
Steps / Instructions
- Preheat the oven: Set your oven to 350°F (175°C) and grease and flour three 8-inch round cake pans. Properly preparing your pans will ensure the cakes release easily once baked. For a non-stick option, consider lining the bottom of the pans with parchment paper. Check that the oven reaches the full temperature before baking for the best results.
- Mix dry ingredients: In a medium bowl, whisk together flour, baking powder, baking soda, and salt. Set aside. This ensures that the leavening agents are evenly distributed throughout the cake batter. Double-check that no clumps remain in the mixture for a consistent bake. This step is important to prevent any uneven rising or dense spots in the cake.
- Cream butter and sugar: In a large bowl, beat the butter and sugar until light and fluffy using an electric mixer, about 3-5 minutes. This step is crucial for incorporating air into the batter, which contributes to the cake’s airy texture. The mixture should be pale in color and increased in volume. Make sure the sugar is fully dissolved for a smoother cake crumb.
- Combine wet ingredients: Add eggs, one at a time, mixing well after each addition. Stir in vanilla extract. Make sure each egg is fully incorporated before adding the next to maintain a smooth mixture. Scrape down the sides of the bowl as needed to ensure even mixing. This gradual process prevents the batter from curdling, ensuring a uniform texture.
- Incorporate dry ingredients: Alternate adding the dry ingredients and buttermilk to the wet mixture, starting and ending with the dry ingredients. Mix until just combined. Overmixing can lead to a dense cake, so mix until you see no more streaks. The batter should be smooth but not overly worked. The careful folding technique will help retain air in the batter, resulting in a lighter cake.
- Bake the layers: Divide the batter evenly among the prepared pans. Bake for 20-25 minutes or until a toothpick inserted in the center comes out clean. Let the cakes cool in the pans for 10 minutes before transferring to a wire rack to cool completely. Even cooling helps the cake set properly, avoiding any collapse or sinking. Rotate the pans halfway through baking for even cooking. The golden-brown color indicates a well-baked cake layer.
- Prepare the strawberry filling: In a bowl, toss sliced strawberries with sugar and lemon juice. Let sit for about 15 minutes, stirring occasionally, until the strawberries release their juices. This macerating process enhances the flavor and juiciness of the strawberries. If desired, mash a few pieces slightly to create a more sauce-like consistency. This juicy filling will add moisture and a natural sweetness to the cake.
- Whip the frosting: In a chilled bowl, beat the heavy cream, powdered sugar, and vanilla extract until stiff peaks form. Be cautious not to overbeat, as this can turn the cream into butter. The whipped cream should be firm enough to hold its shape yet remain smooth and spreadable. This luxurious frosting will envelop the cake in a creamy, sweet layer.
- Assemble the cake: Place one cake layer on a serving platter. Spread a generous amount of strawberry filling, then a layer of whipped cream. Repeat with the second layer. Top with the final cake layer and cover the whole cake with the remaining whipped cream. Smooth the frosting using a spatula for an even finish; this will make the cake look professional and elegant. For visual appeal, use an offset spatula for neat edges and a polished surface. The final presentation should be clean, highlighting the cake’s delicate layers.
Tips & Tricks
- Storage: Store the finished cake in the refrigerator for up to 3 days. For longer storage, freeze individual slices. Wrap them tightly in plastic wrap and foil to avoid freezer burn. Thaw in the refrigerator overnight before serving to maintain texture and flavor. Always store covered to prevent the cake from absorbing any fridge odors.
- Make-Ahead: Bake the cake layers a day in advance and keep them wrapped in plastic wrap to maintain moisture. This separation of tasks can make the assembly process more manageable on the day of serving. The frosting and filling can also be prepared a few hours ahead and kept chilled. By organizing preparation, you can reduce stress and focus on decoration.
- Pro Tip: Use a serrated knife to level each cake layer for a more stable and visually appealing cake. A cake leveler tool can also be very handy for this step. Leveling ensures even layering and prevents the cake from leaning or toppling. Precise layering gives a professional finish and enhances the cake’s overall aesthetic.
- Avoid Common Mistakes: Ensure all ingredients are at room temperature for a smoother batter and even baking. Also, avoid opening the oven door frequently during baking, as it can cause the cake to sink. Use an oven thermometer to ensure accurate temperature settings. Consistency in technique will lead to a beautifully risen cake.
- Enhance Flavor: For an added flavor boost, consider adding a tablespoon of strawberry jam between the layers along with the fresh strawberry filling. Toasted almonds or coconut flakes can be sprinkled on top for additional texture and flavor contrast. These simple additions can elevate the cake’s complexity and taste.
Serving Suggestions
Pair this Dreamy Strawberry Cream Layer Cake with a refreshing glass of lemonade or a cup of hot tea for a delightful combination. For a more festive touch, garnish with whole strawberries and a sprig of mint. Consider serving alongside other summer dessert recipes like Easy Cherry Cheesecake Brownies for a splendid dessert table. Add a dollop of freshly whipped cream on the side to complement each slice.
Embrace the light and fluffy nature of this cake, savoring each bite of creamy strawberry dessert delight. It’s not just a treat for the taste buds but a feast for the eyes, effortlessly embodying indulgent cake flavors that are perfect for seasonal fruit desserts. Try this strawberry layer cake recipe and bring a touch of summer to your table anytime! Creating a beautiful cake with such vibrant colors and delicious layers is sure to impress your guests and provide a memorable dessert experience. The cake’s striking appearance and delightful taste make it a showstopper at any gathering.
Dreamy Strawberry Cream Layer Cake
A delightful treat combining the lightness of a fluffy sponge with the sweet, tangy essence of fresh strawberries, ideal for birthdays or any special occasion.
Ingredients
- 2 1/2 cups all-purpose flour
- 2 teaspoons baking powder
- 1/2 teaspoon baking soda
- 1/4 teaspoon salt
- 1 cup granulated sugar
- 1/2 cup unsalted butter, softened
- 1 cup buttermilk
- 4 large eggs, room temperature
- 2 teaspoons vanilla extract
- 2 cups fresh strawberries, hulled and sliced
- 1/4 cup granulated sugar
- 1 tablespoon lemon juice
- 2 cups heavy whipping cream
- 1/2 cup powdered sugar
- 1 teaspoon vanilla extract
Directions
Preheat the oven to 350°F (175°C) and grease and flour three 8-inch round cake pans.
In a medium bowl, whisk together flour, baking powder, baking soda, and salt. Set aside.
In a large bowl, beat the butter and sugar until light and fluffy using an electric mixer, about 3-5 minutes.
Add eggs, one at a time, mixing well after each addition. Stir in vanilla extract.
Alternate adding the dry ingredients and buttermilk to the wet mixture, starting and ending with the dry ingredients. Mix until just combined.
Divide the batter evenly among the prepared pans. Bake for 20-25 minutes or until a toothpick inserted in the center comes out clean.
In a bowl, toss sliced strawberries with sugar and lemon juice. Let sit for about 15 minutes, stirring occasionally.
In a chilled bowl, beat the heavy cream, powdered sugar, and vanilla extract until stiff peaks form.
Place one cake layer on a serving platter. Spread a generous amount of strawberry filling, then a layer of whipped cream. Repeat with the second layer. Top with the final cake layer and cover the whole cake with the remaining whipped cream.
Recipe Reviews
- ★★★★★
Excellent recipe!
Leave a Reply
Your email address will not be published. Required fields are marked *


Excellent recipe!