
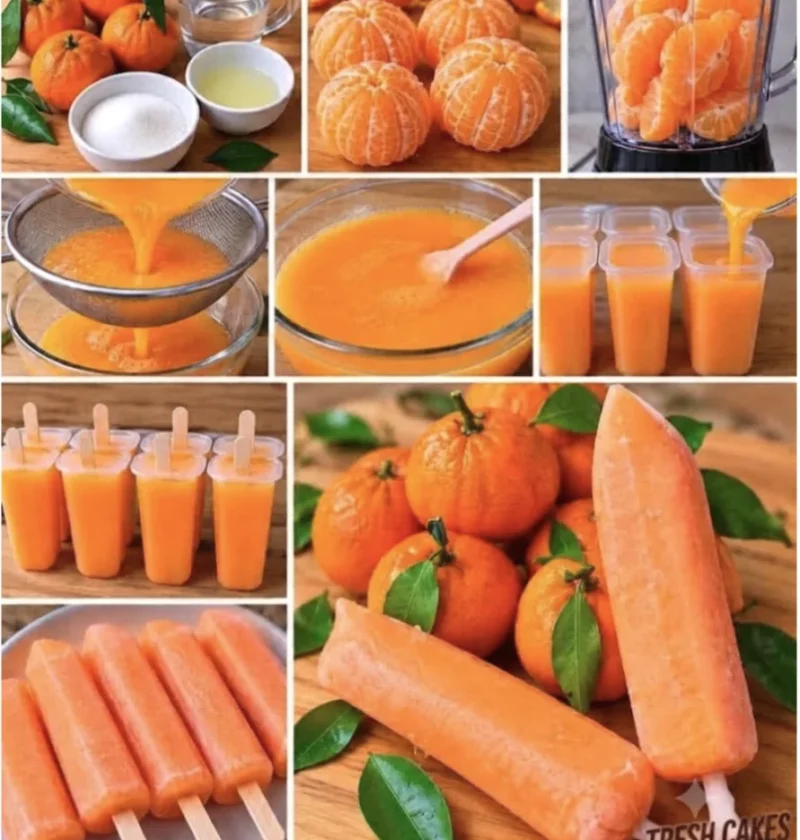
As the sun blazes overhead and summer days stretch long, there’s nothing quite as refreshing as a cool, sweet treat. Enter the world of Homemade Orange Popsicles, a delightful combination of natural ingredients that brings the taste of summer right to your freezer. This recipe not only encapsulates the vibrant flavor of fresh oranges, but it also allows you to control the sugar content, making it a healthier alternative to store-bought frozen treats. With just a few simple ingredients, you can whip up these delicious popsicles that are sure to impress family and friends alike. The joy of making your own popsicles is that you can experiment with flavors and textures, ensuring that each batch is uniquely yours. Furthermore, creating your own healthy frozen snacks can be a fun and educational activity, teaching kids about the benefits of fresh fruit and the joy of DIY treats.
Why You’ll Love This Recipe
Homemade Orange Popsicles are not just delicious; they are also incredibly versatile. You can enjoy them as a quick snack, a refreshing dessert, or a delightful addition to a summer gathering, bringing smiles to faces of all ages. By using fresh orange juice and a touch of honey or natural sweeteners, you can create a frozen dessert that appeals to both kids and adults. Plus, they are an excellent way to sneak in some fruit for the little ones without them even noticing! These popsicles are perfect for hot days, and you can easily customize them to suit your flavor preferences or dietary needs, such as making them dairy-free or adjusting sweetness levels. The simplicity of the ingredients means you can feel good about what you’re serving, and knowing exactly what goes into your treats makes them even more satisfying. You can learn more about this topic and delve deeper into the myriad of flavors you can create.
Ingredients
- Wet Ingredients:
- 2 cups fresh orange juice (about 4-6 oranges, depending on size and juiciness; for the best flavor, choose ripe, organic oranges that yield a vibrant juice; navel oranges are particularly sweet and perfect for juicing)
- 1-2 tablespoons honey or maple syrup (adjust based on sweetness preference; consider starting with one tablespoon and adding more if desired; for those who prefer a sugar-free option, you can use stevia or agave syrup)
- 1 tablespoon lemon juice (to enhance flavor; this will add a subtle tartness that balances the sweetness; using freshly squeezed lemon juice is recommended)
- Optional Add-Ins:
- 1/2 cup coconut milk (for creamy orange popsicles; this not only adds a rich texture but also a hint of tropical flavor that pairs beautifully with the oranges)
- Fresh fruit chunks (like berries or diced peaches) for added texture and visual appeal; this can also introduce exciting flavor contrasts in each bite, making each popsicle a delightful surprise)
For the best flavor, choose ripe, organic oranges and ensure they are firm and heavy for their size, indicating juiciness. If you’re looking for a vegan option, opt for maple syrup and skip the coconut milk for a lighter treat, or include it for a creamy, dessert-like experience. Don’t hesitate to get creative with your ingredient choices—adding a splash of vanilla extract or a pinch of sea salt can elevate the taste profile significantly. Experimentation with herbs like mint might also add an unexpected freshness. Check out our related guide for more tips on popsicle making and flavor experimentation, including unique combinations that can take your popsicle game to the next level.
Steps / Instructions
- Juicing the Oranges: Squeeze the juice from the fresh oranges until you have about 2 cups. A citrus juicer or handheld juicer works best to maximize juice extraction and minimize waste. When juicing, roll the oranges on the counter under your palm before cutting; this helps to release more juice, ensuring you get every last drop for your popsicles.
- Mix the Ingredients: In a mixing bowl, combine the freshly squeezed orange juice, honey or maple syrup, and lemon juice. Stir thoroughly until the sweetener is completely dissolved. This step is crucial, so take your time and ensure there are no granules left in the mixture. Using a whisk can help in achieving a smooth blend.
- Taste and Adjust: Give your mixture a taste. If you prefer it sweeter, feel free to add more honey or syrup gradually, mixing well after each addition. Remember that the sweetness will slightly mellow once frozen, so aim for a flavor you enjoy cold. This is also the time to adjust acidity by adding more lemon juice if desired, balancing the flavors to your liking.
- Add Optional Ingredients: If you want to make creamy orange popsicles, mix in the coconut milk until well combined. This will create a lovely smooth consistency that is irresistible. You could also stir in fresh fruit chunks at this stage if desired; just ensure they are cut small enough to fit in the mold openings, allowing for an even distribution without clogging the popsicle sticks.
- Pour into Molds: Carefully pour the mixture into your popsicle molds, leaving a little space at the top for expansion as they freeze. It’s recommended to use silicone molds for easy release, but any type will work. If using plastic molds, be cautious as they may require a bit more effort to remove the popsicles later.
- Insert Sticks: If your molds don’t come with lids, insert popsicle sticks into the mixture. Make sure they are centered; a good trick is to freeze the popsicles for about 30 minutes first, then insert sticks so they stand upright. This prevents the sticks from sinking to the bottom.
- Freeze: Place the molds in the freezer for at least 4-6 hours, or until solid. For best results, leave them overnight to ensure they are fully frozen and ready to enjoy. Make sure to keep the freezer temperature at 0°F (-18°C) to maintain proper consistency.
- Remove from Molds: To remove the popsicles, run the molds under warm water for a few seconds, then gently pull the popsicles out. If they stick, give them a minute to soften slightly at room temperature. Be gentle to avoid breaking the popsicles during removal.
- Enjoy: Serve immediately and enjoy your refreshing Homemade Orange Popsicles! These are perfect for a hot day, a fun party treat, or simply whenever you need a burst of summer flavor. You can also serve them in a fun way by adding a splash of sparkling water for a fizzy delight.
Tips & Tricks
- Storage: Store any leftover popsicles in an airtight container in the freezer for up to a month. This way, you can have a refreshing snack at your fingertips all summer long! For added freshness, wrap each popsicle in plastic wrap before placing them in a container to prevent freezer burn.
- Make Ahead: These popsicles can be made well in advance. For gatherings, prepare them days ahead to ease your hosting duties. Just be sure to label the container if you make different flavors! This helps in keeping track of what’s inside, especially if you create a variety of popsicles.
- Avoid Common Mistakes: Ensure that the juice is well-mixed before pouring into molds; uneven sweetness can happen if it’s not mixed well. Also, be careful not to overfill the molds, which can lead to messy spills when they expand during freezing. A good rule of thumb is to fill them about 3/4 full to allow room for expansion.
- Pro Technique: For a beautiful presentation, consider layering orange juice with a creamy coconut layer to create a striped effect. Just freeze one layer before adding the next! Alternatively, using a swirl technique with a fork can create a marbled effect that looks stunning and adds a fun touch to your popsicles.
Conclusion
With just a handful of fresh ingredients, you can create a delightful treat that captures the essence of summer. Homemade Orange Popsicles are easy to make, delicious, and a healthier option than many commercial frozen desserts. Share these treats with friends and family, or keep them all to yourself! Enjoy them during hot afternoons, or serve them as a vibrant dessert at your next barbeque. So, get your popsicle molds ready and make summer even sweeter with this simple and satisfying recipe! We can’t wait to hear how your popsicles turn out!
Homemade Orange Popsicles
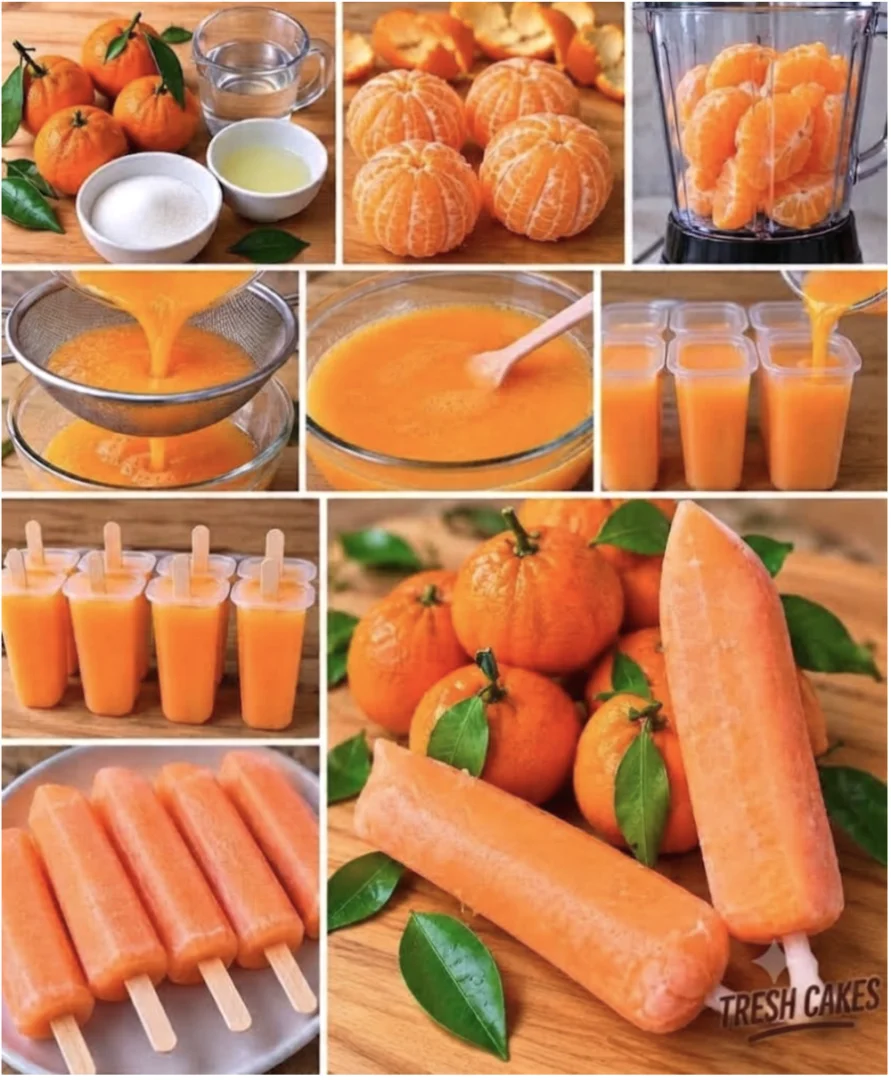
A delightful combination of natural ingredients that brings the taste of summer right to your freezer. This recipe encapsulates the vibrant flavor of fresh oranges, allowing you to control the sugar content for a healthier alternative to store-bought frozen treats.
Ingredients
- 2 cups fresh orange juice (about 4-6 oranges)
- 1-2 tablespoons honey or maple syrup
- 1 tablespoon lemon juice
- 1/2 cup coconut milk (optional)
- Fresh fruit chunks (optional)
Directions
Juicing the Oranges: Squeeze the juice from the fresh oranges until you have about 2 cups.
Mix the Ingredients: In a mixing bowl, combine the freshly squeezed orange juice, honey or maple syrup, and lemon juice. Stir thoroughly until the sweetener is completely dissolved.
Taste and Adjust: Give your mixture a taste. If you prefer it sweeter, add more honey or syrup gradually, mixing after each addition.
Add Optional Ingredients: If you want creamy orange popsicles, mix in the coconut milk until well combined. You can also stir in fresh fruit chunks at this stage.
Pour into Molds: Carefully pour the mixture into your popsicle molds, leaving a little space at the top for expansion.
Insert Sticks: If your molds don’t come with lids, insert popsicle sticks into the mixture, ensuring they are centered.
Freeze: Place the molds in the freezer for at least 4-6 hours, or until solid.
Remove from Molds: To remove the popsicles, run the molds under warm water for a few seconds, then gently pull the popsicles out.
Enjoy: Serve immediately and enjoy your refreshing Homemade Orange Popsicles!
Recipe Reviews
- ★★★★★
Excellent recipe!
Leave a Reply
Your email address will not be published. Required fields are marked *

Excellent recipe!