
Introduction
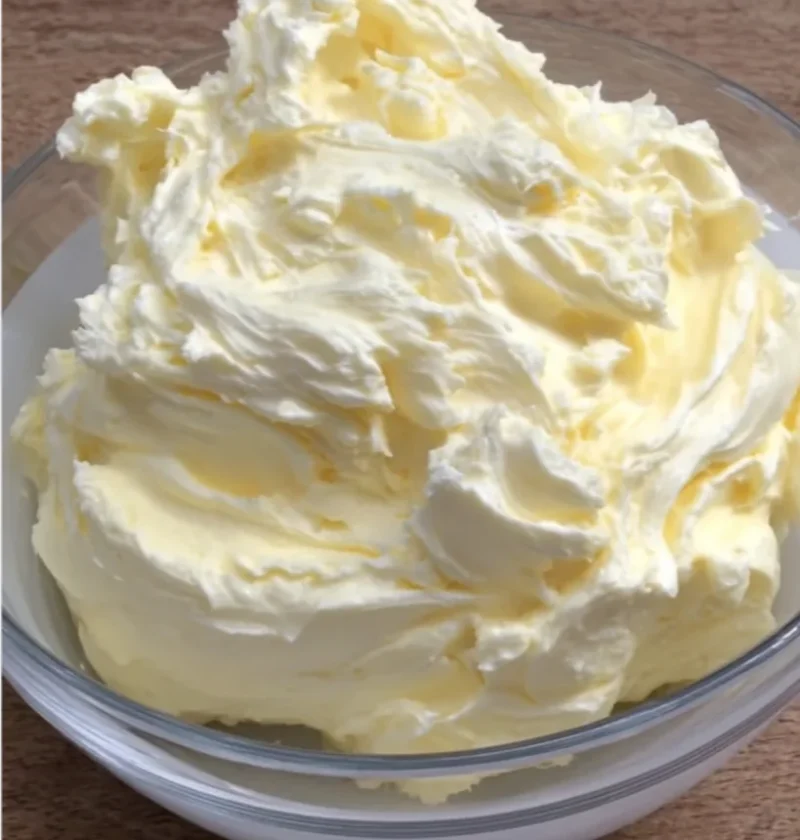
Welcome to the world of luxurious spreads with our Silky Whipped Creamy Butter Spread recipe. Perfect for elevating your breakfast toast or adding a gourmet touch to baked goods, this spread is a delightful blend of creaminess and versatility. The art of making homemade butter spread is an age-old tradition that transforms simple ingredients into a rich, flavorful delight. Imagine the satisfaction of savoring a whipped butter recipe that not only promises a creamy butter alternative but also brings a touch of elegance to your culinary creations. Whether you’re a seasoned chef or a home cook, this butter spread for toast is a must-try. Its silky texture and rich flavor will undoubtedly make it a staple in your kitchen. The luxurious combination of fresh ingredients and simple technique makes this recipe special, while its customizable nature allows for personal and unique flavor explorations. Additionally, crafting your own butter spread can be a therapeutic process, connecting you with the roots of traditional cooking methods. The experience of watching cream transform into this luscious spread can be incredibly rewarding, providing a deeper appreciation for the culinary arts and the simple joys of homemade creations.
Ingredients
- Base Ingredients:
- 1 cup of heavy cream, chilled
- 1/2 teaspoon of salt
- Flavor Enhancers:
- 1 tablespoon honey (optional, for a sweet spread)
- 1 teaspoon fresh herbs like chives or dill (optional, for a savory twist)
- Tools Needed:
- Electric mixer or food processor
- Mixing bowl
Choosing the right ingredients is crucial. For best results, ensure that the heavy cream is fresh and of high quality, ideally from grass-fed cows, which tends to have a richer flavor and higher butterfat content, enhancing the silkiness of your spread. If you prefer a sweeter touch, opt for natural, raw honey to complement the creamy base. Fresh herbs should be finely chopped to distribute flavor evenly throughout the butter. If you decide to experiment with other flavor enhancers, consider a pinch of cinnamon for a sweet option or a splash of lemon juice for a zesty kick. Experimenting with high-quality specialty salts such as Himalayan pink salt or sea salt can also add an extra dimension of flavor, turning your butter spread into a gourmet delight. The quality and freshness of each ingredient can profoundly influence the final taste and texture, making this spread a true testament to the saying “less is more” when it comes to ingredient selection.
Steps / Instructions
- Prepare the Cream: Pour the chilled heavy cream into a mixing bowl. If using a stand mixer, attach the whisk attachment. For a food processor, ensure blades are secure. Begin whipping on a medium-high speed. The key here is to maintain a consistent speed to ensure even aeration. Make sure the bowl and utensils are pre-chilled to help the cream whip more effectively and quickly.
- Watch for Peaks: Continue to whip the cream until you notice soft peaks forming. This typically takes about 3-5 minutes. You should see the cream starting to hold its shape but still having a soft texture. Be attentive, as over-whipping at this stage can lead to the cream quickly turning into butter.
- Reach the Butter Stage: Keep mixing until the cream separates into solid butter and liquid buttermilk. You’ll know it’s ready when the mixture appears grainy and the buttermilk is fully extracted. This process might take an additional 5-7 minutes. It’s a fascinating transformation, where the cream shifts from a smooth, thick consistency to a grainy, butter-filled mass. The sound of the mixer may change at this point, indicating that the butter is forming.
- Strain and Rinse: Pour the mixture into a fine mesh strainer to separate the buttermilk. Rinse the butter under cold running water until the water runs clear, ensuring all buttermilk residues are removed. This step is crucial for a longer shelf life. Proper rinsing prevents souring, keeping your butter fresh and flavorful. You may need to knead the butter slightly under water to ensure thorough rinsing.
- Add Flavor: Transfer the butter to a bowl and mix in salt. For flavored butter spreads, add honey or herbs at this stage and mix well until combined. This step allows the flavors to integrate fully, giving every bite a uniform taste. Taste the butter and adjust the seasoning or flavorings as desired for a perfectly tailored spread.
- Store: Shape the butter into a log or pack it in an airtight container. Refrigerate for at least 1 hour to let the flavors meld together. The cooling period is essential as it allows the spread to firm up and enhances the overall texture. Consider using parchment paper to shape the butter into a neat roll before refrigeration.
Approach each step with patience and precision, as these influence the final quality of your Silky Whipped Creamy Butter Spread. Pay close attention to the texture and consistency throughout the process, adjusting whipping times as necessary for your desired result. Experimenting with the addition of different herbs or spices can lead to exciting new flavors, making each batch a unique creation. You can even involve family members or friends in the process, making it a fun and educational activity that turns into a delicious reward at the end. Check out our related guide for more tips.
Tips & Tricks
- Quality Matters: Opt for high-quality cream as it greatly influences the taste and texture of your spread. Consider organic options or local dairies for fresher taste. The fat content in the cream is crucial, so aim for a higher butterfat percentage for a creamier result.
- Storage: Keep your Silky Whipped Creamy Butter Spread refrigerated in an airtight container. It can last up to 2 weeks. Ensure the lid is on tightly to prevent any fridge odors from affecting the spread. For extended freshness, consider wrapping the butter in parchment paper before placing it in the container.
- Common Mistakes: Over-whipping can make the butter too dense. Stop mixing as soon as the butter separates from buttermilk. Always monitor the process closely to avoid over-processing. If the butter becomes overly hard, consider adding a little cream back to soften it.
- Make-Ahead: Prepare the butter spread in batches and freeze for up to 2 months. Thaw overnight in the fridge before use. This way, you’ll always have a ready supply for impromptu gatherings or everyday use. Label the containers with the date and flavor for easy identification.
- Customize the Texture: For a fluffier texture, add a tablespoon of milk or cream back into the butter during the mixing stage. This can make the spread more pliable and easier to apply to breads or crackers.
These tips will not only help you make the best Silky Whipped Creamy Butter Spread but also ensure a smooth, hassle-free experience. Adjusting small details can make big differences in the final outcome. Don’t hesitate to record your adjustments and results for future reference, creating a personalized recipe that suits your tastes perfectly. Additionally, sharing your unique variations can inspire others to embark on their own butter-making journey, promoting a communal spirit of culinary creativity.
Conclusion
Creating your own Silky Whipped Creamy Butter Spread is not only a rewarding culinary experience but also a delightful addition to your dining table. With its rich texture and customizable flavors, this butter spread will undoubtedly enhance your meals. Whether you’re spreading it over a slice of Cozy Apple Cinnamon Swirl Loaf or pairing it with Buttery Crab Stuffed Cheddar Bay Biscuits, the possibilities are endless. We hope this recipe inspires you to explore more homemade butter spread creations. Feel free to share your experience and flavors with us. Happy spreading! Whether it’s a family breakfast or a festive banquet, this spread is sure to please. The process of making this spread allows for a moment of creativity and experimentation, offering a personal touch to your culinary adventures. As you experiment with different flavors and presentations, you’ll find that this butter spread not only nourishes the body but also fuels the soul with every creamy, silky bite.

Silky Whipped Creamy Butter Spread
A luxurious spread perfect for elevating breakfast toast or adding a gourmet touch to baked goods, made with a blend of fresh cream and optional flavor enhancers.
Ingredients
- 1 cup of heavy cream, chilled
- 1/2 teaspoon of salt
- 1 tablespoon honey (optional, for a sweet spread)
- 1 teaspoon fresh herbs like chives or dill (optional, for a savory twist)
- Electric mixer or food processor
- Mixing bowl
Directions
Prepare the Cream: Pour the chilled heavy cream into a mixing bowl. If using a stand mixer, attach the whisk attachment. For a food processor, ensure blades are secure. Begin whipping on a medium-high speed.
Watch for Peaks: Continue to whip the cream until you notice soft peaks forming, typically taking about 3-5 minutes.
Reach the Butter Stage: Keep mixing until the cream separates into solid butter and liquid buttermilk, taking an additional 5-7 minutes.
Strain and Rinse: Pour the mixture into a fine mesh strainer to separate the buttermilk and rinse the butter under cold running water until the water runs clear.
Add Flavor: Transfer the butter to a bowl and mix in salt. For flavored butter spreads, add honey or herbs and mix well until combined.
Store: Shape the butter into a log or pack it in an airtight container. Refrigerate for at least 1 hour to let the flavors meld together.
Recipe Reviews
- ★★★★★
Excellent recipe!
Leave a Reply
Your email address will not be published. Required fields are marked *


Excellent recipe!